Dual Robot Control Using Web Development + the Cloud
By Edgardo Peregrino View In Digital Edition
In my first article, I had talked about how to control two robots using guizero, gpiozero, and pigpio. This time, I decided to take another route and use web development to create an app to control two robots and also deploy that app to the cloud. I was inspired by a tutorial on the Raspberry Pi official website on how to use Flask to build a web app. Here, I’ll explain the process as to how I developed this app and how I deployed it using Docker and Kubernetes, and then integrated it with GitHub Actions and ArgoCD.
Getting Started
Just like before, I’ll list the hardware and software I used to get started. Of course, you can use alternative materials to create your robots. Here’s the repeated list of items I used to build my robots Linus and Torvalds:
Linus
- Generic robot car chassis.
- CamJam Edukit 3, motors, and wheels.
- Jumper wires.
- L298N motor controller.
- CamJam Edukit 3 6V battery pack.
- Cardboard (for the face and servo arm).
- Gray and green paint (for the face and the servo arm).
- Two PC style power LED connector cables (for the eyes).
- Raspberry Pi Zero W.
- Raspberry Pi Zero W case.
- Plasticard (to mount the Pi and L298N).
- Two 9g servos.
- CamJam Edukit 3 breadboard (for the servos to avoid using both 5V rails).
- Standoffs for the L298N.
- 32 GB micro SD card.
- 5V 2.1A USB power bank.
- Micro USB cable with power switch.
Torvalds
- DF Robot Devastator Tank Mobile Platform.
- Two PC style HDD LED cables (for the eyes).
- LED bezels.
- Raspberry Pi 3B+.
- 32 GB micro SD card.
- Cam Jam Edukit 3 motor hat.
- Plasticard and standoffs for the Pi 3B+ and the base of the robot.
- Six AA batteries (for the motor).
- Raspberry Pi camera.
- 3D printed camera mount.
- 5V 3A USB power bank (to power the Pi).
- Jumper wires for the LED eyes.
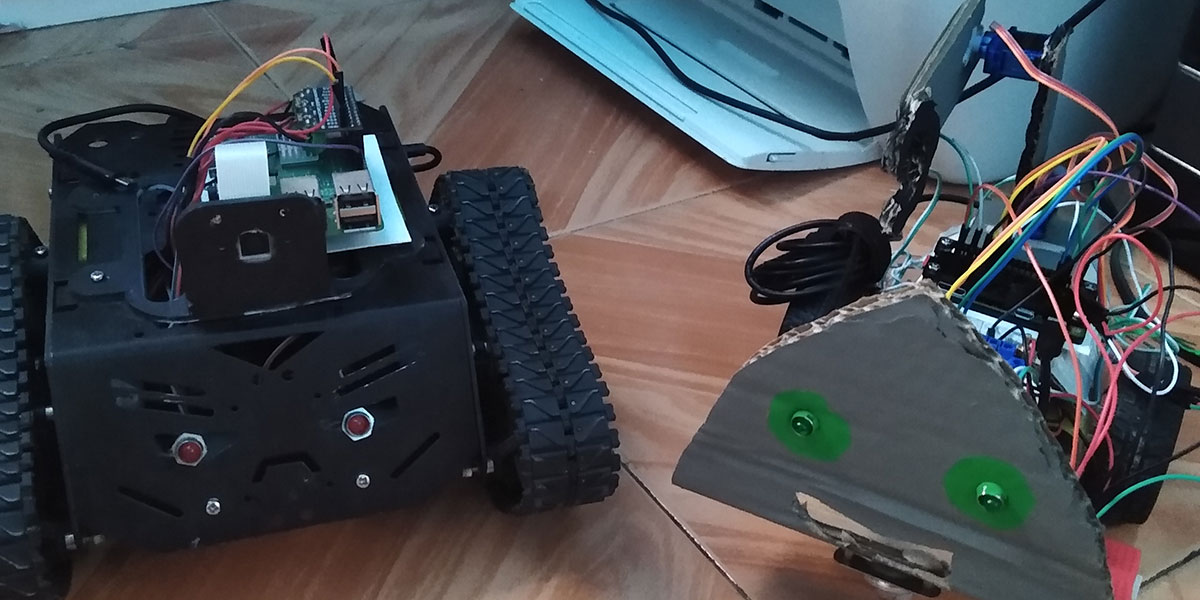
Figure 1 shows the final product (these are the exact same robots I’ve been using).
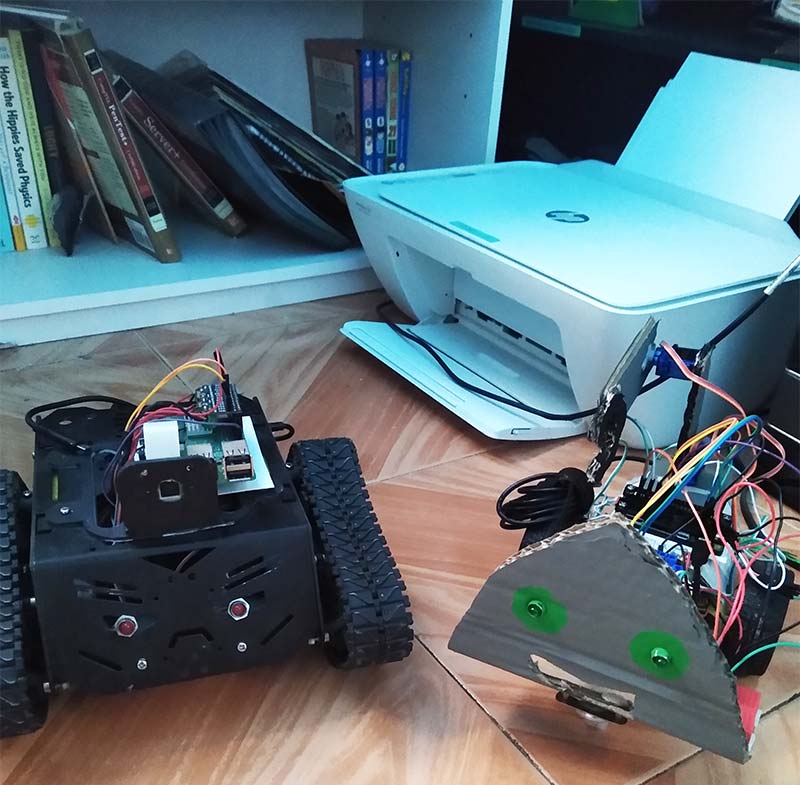
Figure 1: My robots, Torvalds (left) and Linus (right).
I did make a few changes this time, however. I kept the jumper wires connected to the enable lines of the L298N because this is necessary to enable PWM. As I explained in my second article, the two enable lines on the L298N are used for PWM control. However, unlike last time (Issue-5 2020), I also used my programming PC to test the app and also to deploy the app using Docker, Kubernetes, and ArgoCD. So, while I initially used the Raspberry Pi 4 for my first initial tests, I decided to use my programming PC running Ubuntu 20.04 for the remainder of my tests.
Just like before, I used Raspberry Pi OS on my Raspberry Pi 4 for the initial tests but this time I made sure I had Flask installed. Flask is a Python web framework that’s used to build websites and is used with HTML, CSS, and JavaScript. Luckily, Flask was already installed by default as was gpiozero and pigpio. Also (just like in my first article), I used Raspberry Pi OS on Torvalds and Raspberry Pi OS Lite on Linus. For Raspberry Pi OS Lite, it’s necessary to enable SSH and Wi-Fi. If you want to know how I did that, please reference my first article in Issue-4 2020 for more information.
To make sure that the Pi Zero W is able to use Wi-Fi, first add the wpa_supplicant.conf file to the boot directory of the Pi as well as an empty file called SSH. Eject the card, then when you turn it on, it should automatically connect to your Wi-Fi. To find the IP address, you can use your router or something like Angry IP Scanner. Or, if you’re more comfortable with the terminal, you can use nmap as well.
Code Explanation
In the article downloads, I’ve provided three folders named dualpwmtouch, dualpwmtouch_debug, and dualpwmtouch_docker. While they have similar code, the dualpwmtouch folder is better suited for mobile platforms like Android and iOS. I’ll explain the code for the dualpwmtouch_debug folder while making brief comments about the dualpwmtouch folder code.
In the dual_pwm_robot.py code, first we import our libraries. From Flask, we import Flask, render_template, request, and json. Then, from gpiozero, we import OutputDevice, AngularServo, LED, and PWMOutputDevice. After that, we import PiGPIOFactory from gpiozero.pins.pigpio, and finally we import logging to create a log file.
To elaborate, under Flask, we import render_template because we want the dual_robot_pwm.html template to display. In order to get requests, we need to import request; json is for our healthcheck and metrics functions which I’ll explain later on.
The first thing is we define an app called app which is equal to Flask(__name__). We then define the two pin factories for each robot. Next, we define the motor and PWM pins for both robots. For example, the en_1 and en_2 pins are the PWM output pins for Linus.
We define Linus’ eye and then finally the two angular servos which are part of Linus’ arm. Each function will have the @app.route header because each function will reference a route. For example @app.route(‘/’’) is the main route of the web app. The healthcheck function checks if the request was made successfully. Going back to the json module, we create a response, which is equal to the app.response_class. Inside, you see json.dumps. Now what happens is that it relays the message that the app result is “OK-healthy.” After that, it will log that the request was successful.
The metrics function gives you the user count and status. You can alter this part depending on how many users will visit the web page. Next, we have our index function which returns the HTML file I had referenced. Again, make sure to include return render_template because if you don’t, you’ll get a 404 error.
Next, we define the directions for both robots with functions like direction_one, direction_two, north, and south for example. Then, finally, we have two functions: test and test2. Test controls the angle of each servo and test2 controls the speed of the motors.
If you notice, I added methods=[‘POST’] because we are posting rather than getting. For slider1 and slider2, we have request.form that will reference the form from the HTML (which I’ll explain later).
I then set the angle of each servo equal to the integer of slider1 and slider2 which are between -90 and 90 degrees. I do the same for test2, but I must divide by 10 since the speed of the motor is between 0 and 1 and the ranger of slider3 and slider4 are from 0 to 10. In the final three lines, we run the app with host IP 0.0.0.0 and log everything using a log file named app.log. You can omit this and enable debugging with debug=True inside app.run.
Now let’s look at the dual_robot_pwm.html file. Here, we have the main design of the app. This is placed inside of the templates folder because that’s how a typical Flask app is structured. We have several headlines and buttons as well as four sliders. The buttons each have a class which is used for the stylesheet and an ID which is used for the JavaScript file. The four sliders are placed in two forms which each reference an action and a method. The action is the function referenced from the Python code and the method in both forms is post because we are posting the values of the servo angle and the values of the PWM. If we look at the static folder, we have a CSS and JavaScript file.
The dual_robot.css file lays out the design of the buttons as well as the background. For example, the btn-group buttons are given a background color of gray, a display of inline-block, a padding of 15px and 32px, and a font-size of 16px. In dual_robot_pwm.js, we can see several references to the IDs like up, down, left, and right. Each ID is connected to a function which either is mouseup or mousedown. If using the touchscreen, it would be touchstart and touchend.
This means that if the mouse button is pressed or if you press the touch screen, the function indicated will be called. For example, if I press the button that has the ID of up, the robot will go forward. If I let go, the robot will stop. There are slider variables and output variables at the very end where it references spans in the HTML file. Whenever the slider is moved, you can see the numbers change. This is helpful so you can decide what speed you want to give the motors and what angle you want the servos to be at.
To run the code, simply run the command python3 dual_pwm_robot.py or python dual_pwm_robot.py if you’re using a virtual environment. This code can be run on any platform. To access it on your local machine, just go to localhost:5000 since Flask uses port 5000. On Windows, make sure to install Python from the official Python website. This time, I’ve provided a requirements.txt file which should make it easier to install the needed libraries. Just run pip install -r requirements.txt or pip3 install -r requirements.txt. The app should look similar to Figure 2.
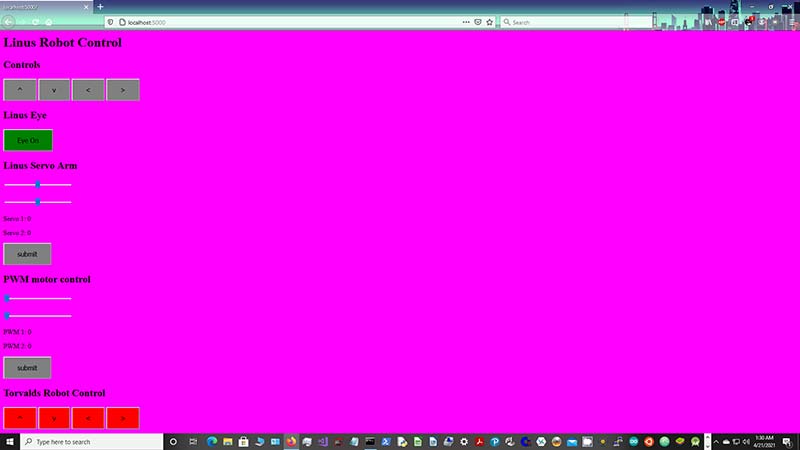
Figure 2: App running on Windows 10.
On MacOS, install Python using brew install python and then you can use the same commands to install the needed packages using the provided requirements.txt file.
On Android, you can either access the app from Chrome by going to http://<ip-address>:5000 or by using Pydroid3, installing the needed libraries, and then running from the terminal provided in the app; it should run the same way.
Figure 3 shows the app running on an Android device.
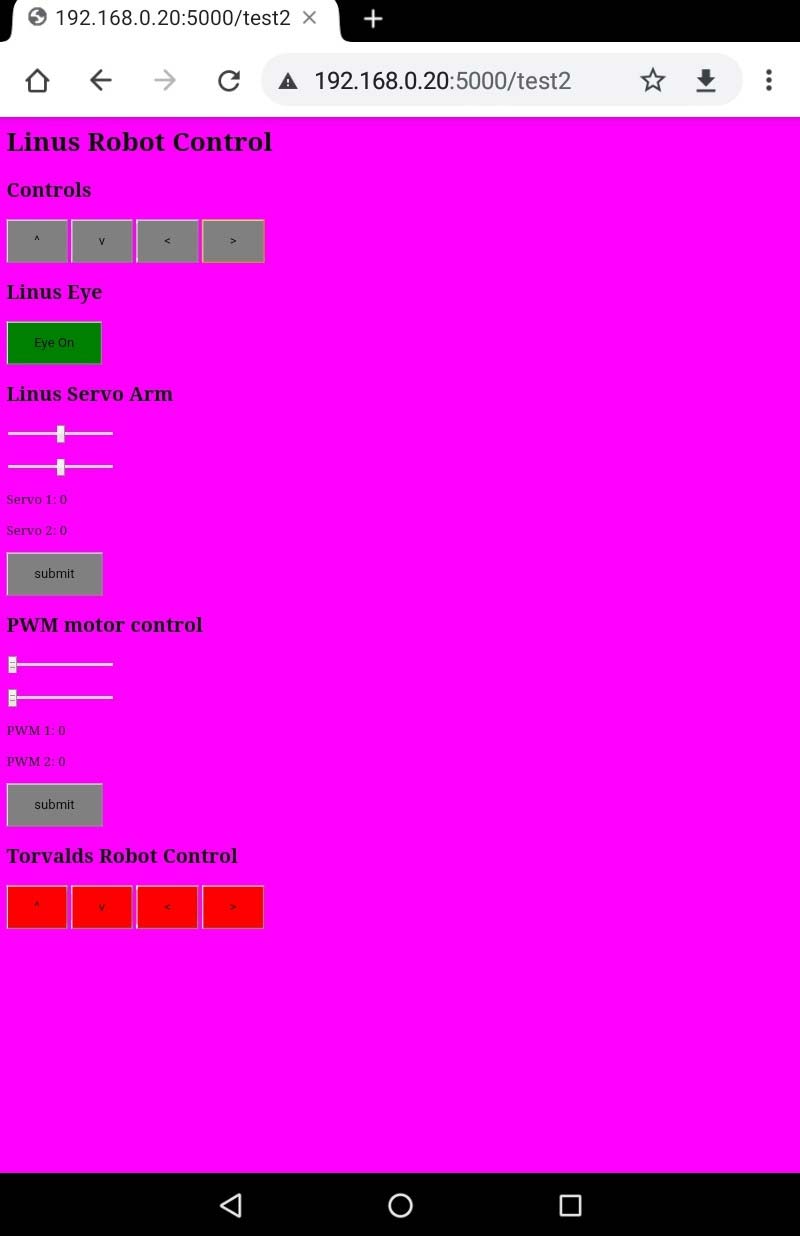
Figure 3: App running on Android.
On Linux, use the provided requirements.txt file to install the needed libraries. Since Python is already installed, just run the app as I showed earlier. The app should then look similar to Figure 4.
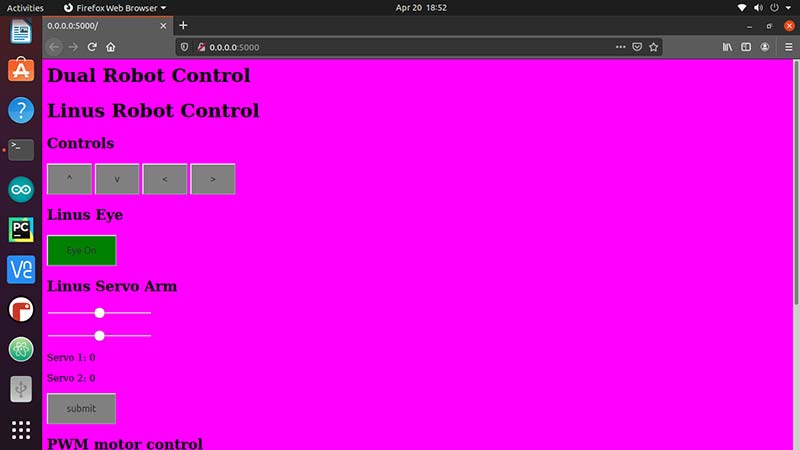
Figure 4: App running on Ubuntu 20.04.
Once you have the app running, try moving the robots around, set the speed of the motors, and finally move the arm around. Create an obstacle course and use a tablet or phone to control the robots as if you were using a remote control. In my case, I drove them around in my front and back yards and had them evade obstacles. While the code is very important, just being able to see it run successfully is the best part.
Optional Camera Recording
This section is completely optional. If you’re willing to try recording video using Flask, then this section is for you. If you go to the cameraapp folder from my GitHub repository (see Resources), you can see the camera_app.py, templates, and static files and directories. In the camera_app.py file, we import PiCamera from picamera. We then import LED from gpiozero, and also import Flask, render_template, and request from Flask. Finally, we import datetime.
We set up the camera with the name camera with a resolution of 640x480 which is the VGA resolution, a framerate of 25 fps, and the LED to 25 which is Torvald’s eye. We have the main index function which returns the camera.html file. We then have the record and stop functions. So, when the record button is pressed, the LED turns on and the camera starts recording. When the stop button is pressed, the LED turns off and the camera stops recording. You’ll see a video file with the date/time stamp. This is important so that we don’t overwrite previous video files. To run this app, this must be run from the Pi itself because the camera has to be present. Debug mode must be disabled for the camera to work. Once the app runs, then you can access the camera using the link ip-address-of-pi:5001 since the first app already runs on port 5000.
I used this app to record video while both robots were moving. To view this, you can use omxplayer on the Pi. Or, if you wish, you can use software to covert the mjpg file to an mp4 so you can view it on another device. Figure 5 shows the app running alongside the app that controls both robots.
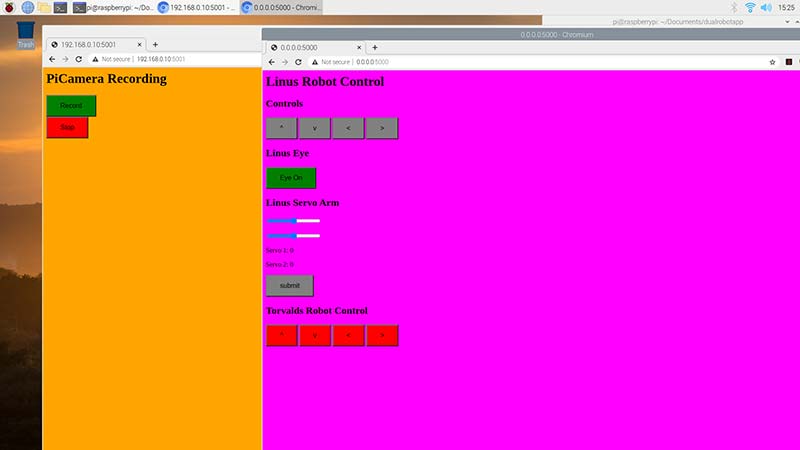
Figure 5: camera_app.py running on Raspberry Pi OS alongside dual_robot_pwm.py.
Docker
Before I show how to run this app using Docker, let’s talk about what Docker actually is. Docker is open source software used to create, deploy, and manage application containers on MacOS, Windows, and Linux. Docker is preferable to using virtual machines because with Docker containers you can have multiple containers run on one PC. These containers can be ported to any other machine using Docker Hub. To run this app, you’ll need a Dockerfile which is used to build the Docker image. I have provided a Dockerfile in the repository. I’ll give a rundown of each line to explain the Dockerfile and how you can make your own.
The first line sets the base image; in this case, we’re using a Python image. Then, there’s the label which (in this case) indicates the maintainer. Then, the next line will copy files from the host machine to the container file system. In the file, we’re copying to the /app directory.
Next, we define the working directory which is also /app. We have it run the pip install -r requirements.txt command to install the needed dependencies. Finally, we provide a command so that the app can start.
To use Docker, make sure to follow the instructions for MacOS, Windows, or Linux. I used Ubuntu 20.04 to install Docker and to run the various Docker containers. To build the docker image, run the command docker build -t python-dualrobot. This builds a docker image named python-dualrobot in the current directory which is indicated by the dot. Once the image is built, you can check if it was created with docker images and then run the image to test it with docker run -d -p 5000:5000 python-dualrobot.
Here, the image is run detached in the background at port 5000. Go to any browser and go to localhost:5000 and the app should run. You can confirm this with docker ps hich checks the docker images that are running. You can stop the container with docker stop containerID.
Make sure to get the ID of your container which is obtained by running docker ps. For the next steps, obtain a Docker Hub account so you can push the image to your own repository. Once you do that, run the docker login command and provide your username and password. Then, run docker tag python-dualrobot yourdockerhubusername/python-dualrobot:tag-version. You can push the image with docker push yourdockerhubusername/python-dualrobot:tag-version.
You’ve now successfully pushed your very first Docker repository. Now, if you want to run this container in another machine, make sure to install Docker on that machine and then run docker pull yourdockerhubusername/python-dualrobot:tag-version. Follow the same instructions to run the container. You can run this app from any computer without even having to use a virtual machine.
RESOURCES
Getting Started with ArgoCD
https://argoproj.github.io/argo-cd/getting_started/
My Dual Robot Flask GitHub Repo
https://github.com/sentairanger/Flask-Dual-Robot
Docker Hub Main Page
https://hub.docker.com/
k3s Lightweight Kubernetes Main Page
https://k3s.io/
Devastator Tank Mobile Platform that I Used for Torvalds
https://www.dfrobot.com/product-1219.html
Cam Jam EduKit 3
https://camjam.me/?page_id=1035
Raspberry Pi Camera Mount
https://www.thingiverse.com/thing:3155461
gpiozero
https://gpiozero.readthedocs.io/en/stable/
Installing Python on MacOSX
https://docs.python-guide.org/starting/install3/osx/
Installing Python on Windows
https://www.howtogeek.com/197947/how-to-install-python-on-windows/
Flask Tutorial from Raspberry Pi Website
https://projects.raspberrypi.org/en/projects/python-web-server-with-flask
Kubernetes
Kubernetes is a container orchestrator framework that can run containerized workloads in multiple machines. Kubernetes is portable because it’s open source, it can be scaled up, it’s resilient since it uses functionalities such as ReplicaSet, and because of its readiness. A typical Kubernetes architecture has a control plane with multiple master nodes (physical or virtual servers) and a data plane which has several worker nodes. To deploy this app with Kubernetes, there are many options to choose from. In this case, we’ll use kind and k3s; k3s is a production grade cluster while kind is a development grade cluster. In this case, I used k3s on a virtual machine called Vagrant. I have provided a Vagrantfile which you can use on your own. However, you must first install Vagrant on your machine and also Virtual Box.
To access your VM, run vagrant up and then run vagrant SSH. The default password is vagrant, but you should change that for security reasons. Next, go to the k3s website and install k3s by using the command provided in the front page. However, you can’t run kubectl as a regular user, so it’s best to run sudo su to run kubectl. If you plan to run this on your own machine, use kind and then install kubectl which will be used to manage this cluster.
To create a deployment, first run kubectl create deploy python-dualrobot –image=yourdockerhubusername/python-dualrobot:tag-version and then it will create that deployment. To check that the deployment was successfully created, you can run kubectl get deploy python-dualrobot and it should appear. It will take time for the deployment to be created. If you want to check the individual pod, run kubectl get po and there you should get the list of pod(s) as well as an ID. To run the service, run the command kubectl port-forward svc/python-dualrobot 5000:5000. The app should now run and you can go to your browser. If you’re using the Vagrantfile, make sure that you use the IP address of the VM instead of the local host. In this case, the IP address is 192.168.50.4.
If you’re running it locally, then it would simply be localhost. Make sure to append 5000 to the end; in this case, it would either be 192.168.50.4:5000 or localhost:5000 and then the app should run. You’ve now successfully created and run your own cluster.
Deploying with ArgoCD
According to the ArgoCD website, ArgoCD “is a declarative, GitOps continuous delivery tool for Kubernetes.” I used this software so I could deploy the app to the cloud. However, to get things started, I had to use my VM which has openSUSE installed to run ArgoCD. First, I installed ArgoCD using the official instructions. Then, after several minutes, I was able to get all the services running.
In my repository, I have several yaml files that I’ll explain, so that you can try something similar on your own.
With ArgoCD installed, I wrote several yaml files that I would be using to deploy my app. These yaml files are declarative files that are necessary to deploy the application.
Here are the following files and what each does:
- argocd-server-nodeport.yaml. This sets up the argo-cd server at port 30007 for HTTP and port 30008 for HTTPS. This is the main file I used to enable the service. To run this, I ran kubectl apply f argocd-server-nodeport.yaml. I then went to my browser and headed to 192.168.50.4:30007. I got a warning which I ignored and then logged in with credentials I obtained from the getting started guide. I was able to log in and I was shown a GUI where I can add applications.
- Argocd-python-robot.yaml. This file is used to build and deploy the application to ArgoCD. To deploy it, I ran kubectl apply -f argocd-python-robot.yaml and the application appeared in the GUI. However, it was not synced so I had to sync the application. Figure 6 shows the final deployment.
- argocd/manifests/deployment.yaml. This is necessary for the argocd-python-robot.yaml file to deploy correctly. Here, it creates one replica using the linuxrobotgeek/python-dualrobot:v1.0.2 image and uses 256 MB of RAM and 50M of CPU.
- Argocd-helm-robot.yaml and argocd-helm-robot-prod.yaml. These files are used with Helm to deploy the application. They use the demo and production namespaces and are useful when deploying the final product.
- Chart.yaml describes the deployment, image, and version being used. Values.yaml and values-prod.yaml create the demo and production namespaces. Deployment.yaml references the values from the values.yaml and values-prod.yaml files, and the namespace.yaml file creates the namespaces.
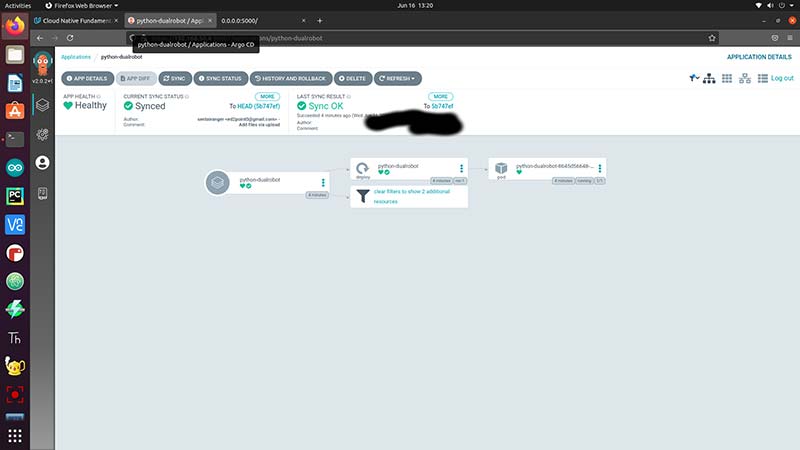
Figure 6: App being deployed on ArgoCD.
After deploying the app to ArgoCD, I was able to successfully test the app. This can be altered to create multiple replicas if I wanted to run the app somewhere else. For example, if I was in a facility and I had several robots I needed to run using this software, I would deploy it and I would create several replicas so I could access the app from anywhere in the facility.
Conclusion and Dedication
I’ve now shown how I used web development, Docker, Kubernetes, and ArgoCD to control my robots. I have to thank the SUSE Cloud Challenge Scholarship for making this possible. I want to thank Isabella and Palak for making all this possible, including the community who have been very supportive.
I dedicate this to them and to my dad who sadly passed away. I hope he is proud. SV
Article Comments