Robotics: How to Get Started — Part 8: Using Behaviors to Build Applications
By John Blankenship View In Digital Edition
In the previous article of this series, we discussed how to build simple reusable behaviors. This time, we’ll explore how such modules can be used to build exciting applications.
Last time, it was asserted that reusable behaviors make it possible to build new applications much faster and easier. Now it’s time to demonstrate just how true that is.
There are many possible applications we could use, but let’s look at one in detail to demonstrate some of the pertinent points of this type of project. Imagine that you own a restaurant, and you’d like to build a robot that can deliver food from the kitchen to the dining room. A robot could be made that would take the food directly to the proper table, but let’s simplify our approach for this article.
To that end, our robot will deliver the food to a central location in the dining area where the wait-staff can easily transfer it to the table.
With this simplified task, someone new to robotics might assume that programming such a robot should be very easy. Just make the robot move between two specific locations: one in the kitchen that is convenient for cooks to load food onto the robot’s tray; and one in the dining area that is reasonably close to all the tables.
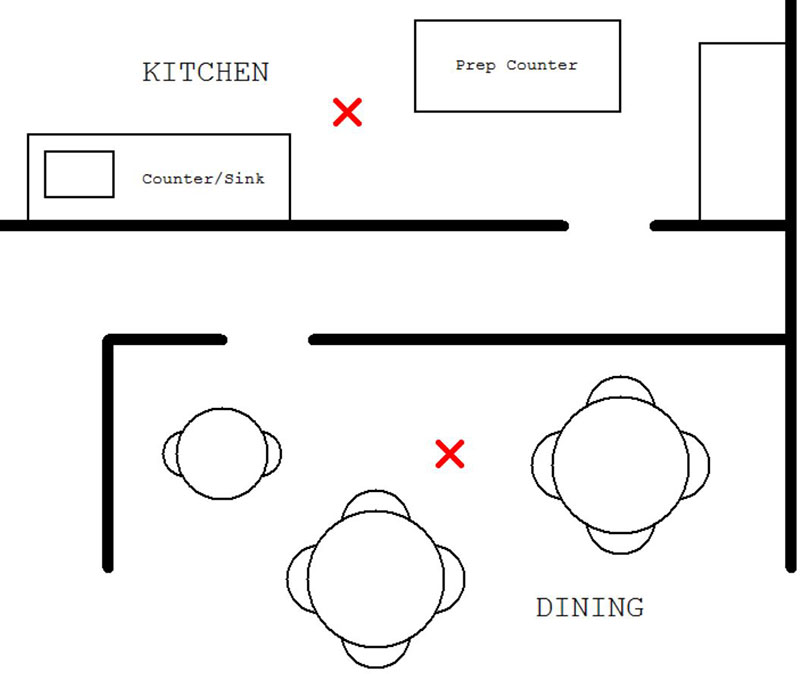
Unfortunately, making a robot move between two designated places can’t be handled without some form of sensory data to influence the movements. Imagine a robot moving back and forth between the two locations (marked with Xs) in Figure 1.

Figure 1.
A Simple Solution
If the robot is initially at the X on the left and heading directly toward the destination X, then it should be able to move between the two positions with the code fragment in Figure 2.
// assume the two positions are 400 units apart
while true // repeat the movements
rForward 400
rTurn 180
rForward 400
rTurn 180
wend
Figure 2.
Unfortunately, this code will only work if the robot has perfect movements and that is impossible. If the robot moves slightly further than 400 units, or slightly less than 180°, or if it drifts slightly left or right because one wheel is slightly faster or slightly larger than the other, then the tiny errors of movement will sum over time as shown in the movements of Figure 3.

Figure 3.
Figure 3 shows only 10 round trips between the two Xs and it only has a random error of 2%. If the robot can get so far off course in this example, imagine what kind of problems you would have if the robot was traveling through a series of movements encompassing a relatively large area. This may seem like a huge problem, but a solution is actually easy to achieve.
Understanding the Error
Imagine you were blindfolded and placed in a large open room and told to move forward five steps, turn around, and move back five steps. If you did this once, you might actually end up very close to your starting position.
However, if you had to repeat these actions even a few times, your movements would end up looking like Figure 3.
Possible Solutions
Imagine how you could solve this problem if you were the blindfolded person. There are many possibilities. Perhaps you could have a person at each end of your travel that could adjust your heading to make sure you’re pointed directly at your destination.
Maybe you could have Xs on the floor that are made of wood so that you can feel them with your feet to ensure that you have found the correct spot before continuing.
An ideal solution might be to have one handrail that runs between the two destinations, so that you could hold onto the rail and use it to guide you directly to the desired position. If you’re pretty good with your walking skills, you might not even have to have a rail that extends the total distance between the two destinations.
Imagine having a four foot rail at each destination, with the rails extending directly toward the other position. When you start to move forward, you can use the rail to ensure you’re moving in the right direction. Remember, the two destinations are five steps apart, so about 12 or 13 feet.
When you get to the end of your four foot rail, there should only be about four feet of empty space before you encounter the next rail. Before leaving the first rail, you can use it to make sure you’re traveling toward the second rail. After you move four or five steps, you can feel around for the second rail before following it to the destination.
Sensory Feedback
Having the rails — even only at the end points — lets you get back on track, even if you’ve deviated from the perfect path. The rail lets you use your sense of touch to correct your movements.
If you have reasonable senses, you don’t need a rail extending all the way from one destination to the next. As long as your unguided movements are relatively short, you can find the next rail and use that feedback to get back on track.
Robots Need Sensors
If we want a robot to make extended movements between two destinations, it will need ways of periodically correcting its movements using appropriate sensors. Examples of such sensors might be an electronic compass that could provide an accurate heading. Maybe the robot could have a camera so that it could see destination markings on the floor or maybe the camera could just detect colors and you could have a few circles painted on the walls of the environment.
If each circle was a unique color, perhaps the robot could face each of the circles and using the compass heading associated with each to mathematically determine where it was in the room.
The point is that there are many ways to solve problems. If you’re building a robot to handle a particular problem, don’t just assume it can be best accomplished using sensors that you have seen on other robots. Spending some time exploring your options can help you determine what sensors can make it easier to program your robot to achieve the desired goal.
A Practical Example
Remember the problem mentioned earlier: a restaurant robot that can deliver food from the kitchen to the dining area.
Look at the simplified restaurant floor plan in Figure 4.

Figure 4.
There’s a kitchen (with various counters) at the top of the diagram and a dining area at the bottom (with three tables).
Imagine that the robot starts in the kitchen at the red X. Obviously, it needs to be equipped with some sort of tray that food can be placed on by the kitchen staff. There should also be a way of telling the robot to go to the dining room. Perhaps the robot could handle voice commands, but you could use a simple button (connected to an I/O port) or even a mouse click to initiate the action.
When the robot reaches the designated spot in the dining room, the wait-staff should move the food to the appropriate table and then send the robot back to the kitchen. While this is not a sophisticated application, it could make it easier for the wait-staff to attend to customers and it might increase sales because people might bring their friends to the restaurant just to see the robot in action.
Sensory Feedback
Based on the earlier discussion, we obviously need ways to allow the robot to periodically correct its movements so that it can make the round trip over and over without the small errors that will occur, summing over time and causing problems.
In the previous article of this series, we developed a reusable behavior that allowed our robot to follow a wall for a specific distance or until it encountered a doorway. We also had a behavior that could move the robot through the doorway. Since there’s a hallway connecting the kitchen and dining room in this example, we can use the previously developed behaviors to assist the movement of the robot between its two destinations.
Moving to the Dining Area
The routine in Figure 5 moves the robot from the kitchen to the destination in the dining area.
GoToDining:
rPen DOWN, RED
rTurn 180
while rRange()>10
rforward 1
wend
rTurn -90
call FollowWall(WallOnRight,500,30,DoorFound)
call GoThroughDoor(WallOnRight)
while rRange()>10
rforward 1
wend
rTurn 90
call FollowWall(WallOnLeft,500,30,DoorFound)
call GoThroughDoor(WallOnLeft)
rTurn -90
rForward 50
call FollowWall(WallOnLeft,110,30,DoorFound)
rTurn 90
while rRange()<50
// beep or something appropriate
wend
rForward 50
return
Figure 5.
Let’s see how it works. The routine starts by dropping a pen so that a red line traces the robot’s path. Since it’s assumed that the robot is facing upward in Figure 4 (to make it easy for staff to load food onto its tray), the robot must turn 180° so that it faces downward.
A while loop moves the robot forward until it’s 10 units from the wall. Notice that this is also a sensor-controlled movement ensuring that the robot will end up the correct distance from the wall even if its starting position has deviated.
The robot then turns left and follows the wall to the doorway (as discussed in the previous article). The variable DoorFound could be checked and if FALSE, an error routine could be called to handle the situation. To keep things simple, extra checks like this one will not be addressed.
The robot then goes through the door and then moves to the opposite wall where it makes a right turn and follows that wall to the next doorway. After passing through the doorway, the robot turns left. Since the robot is still within the doorway opening, it moves forward a small amount to put it beside the dining room wall. It then follows that wall for a short distance (only 100 units) and turns right, making it ready to move to the dining room destination.
Even though this program is not trying to address all the possible error conditions, it’s worthwhile to show how some of these can be handled. This is one of those times. At this point in the program, the robot is preparing to move into a relatively open space — and it’s certainly possible that someone in the dining area could be in its way.
The robot wants to move 50 units, so it starts by checking to see if there is anything within that range that would block its travel. If a blockage is detected (perhaps a person or even a chair that has been moved), it waits and emits beeps until the blockage is removed before moving forward to the terminal location.
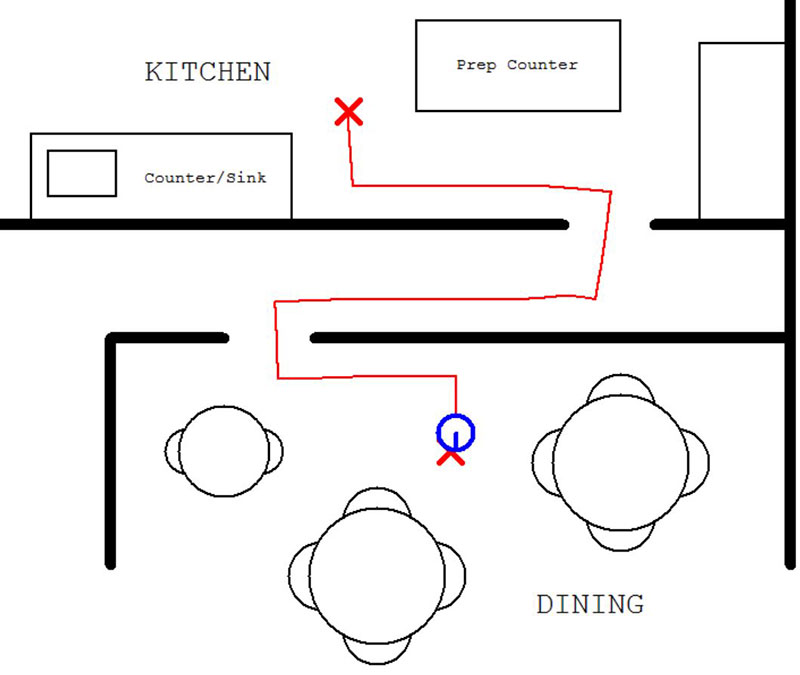
Figure 6 shows the robot’s path as it executes the code in Figure 5.

Figure 6.
The robot’s movements have been set to have a random error rate of 5% to show that a less-than-perfect machine can successfully complete the travel. This error is easily seen as the robot passes through the kitchen doorway. The robot easily recovers though, as it uses its sensors to move to and along the wall.
Returning to the Kitchen
Figure 7 shows the routine that moves the robot back to the kitchen.
GoToKitchen:
rPen DOWN, GREEN
rTurn 180
while rRange()>10
rforward 1
wend
rTurn -90
call FollowWall(WallOnRight,150,30,DoorFound)
call GoThroughDoor(WallOnRight)
while rRange()>10
rforward 1
wend
rTurn 90
call FollowWall(WallOnLeft,250,30,DoorFound)
call GoThroughDoor(WallOnLeft)
rTurn -90
rForward 50
call FollowWall(WallOnLeft,180,30,DoorFound)
rTurn 90
rForward 65
return
Figure 7.
Its operation is similar to that of Figure 5, so study it on your own to see how it works.
Testing the Routines
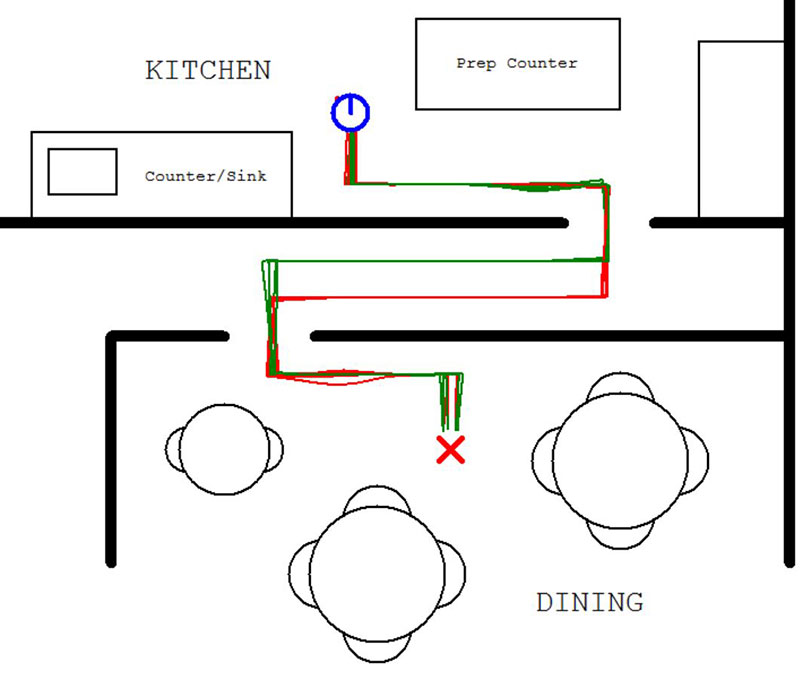
We can test to see that our routines are effective by having them make the round trip over and over to see if an error ever occurs. Figure 8 shows the paths left after 10 trips.

Figure 8.
Notice that the movements without sensor control are slightly off, but the robot gets back on track with the next sensor-controlled movement. Notice also that the actual destination positions are never exact, but they are always close enough for the intended purposes.
Conclusion
The example in this article shows how easy it is to build applications when prebuilt behaviors are available. This should encourage you to create reusable modules whenever you work on new projects. As your library of routines gets large, building future projects should be both faster and easier.
It’s suggested that you start by modifying the program used for this article. You can download the full source code for the program from the article downloads. To run the code, you’ll need a copy of RobotBASIC, so visit RobotBASIC.org and download your free copy along with many example programs and the interactive help file.
Using the RobotBASIC simulation is an easy way to experiment with a wide range of ideas that might be time-consuming or expensive if you used a real robot. For example, you could easily build a system where the simulated robot has to find a charging station when its power is low. A more complex idea might be to create a soccer-playing robot that can recognize the ball (perhaps by its color) and determine the angle needed to bump into the ball and move it toward the goal.
These are just suggestions of course, so come up with projects you find both challenging and exciting. At the very least, experimenting with simulation-based exercises like these can enhance your robot programming skills.
The articles in this series have provided overviews of many aspects of hobby robotics. Hopefully, the chosen topics have made it easier for readers that are just getting started. If there are any topics that that you would find helpful or interesting, you can email me at RobotBASIC@yahoo.com. SV
If you have ideas for additional topics in the How to Get Started Series, please send them my way at RobotBASIC@yahoo.com.
Article Comments