Servo Magazine ( August 2015 )
Beer2D2 — A Robot in a Can
By Steven Nelson View In Digital Edition
There are many ways to begin a new robotic project. You can start with one of the many robotic kits that are available from venders such as Parallax, SparkFun, Adafruit, etc. You can do a lot of searching for raw materials, electronics, motors, controllers, and wheels, and then ponder what to do with them. A more modern approach may involve finding the parts you wish to use and then beginning your design by laying everything out using a CAD program, then eventually a milling machine, lathe, or even a 3D printer. Then, of course, there is the old school classic design method that involves collecting the various parts and sketching out your rough ideas with a pencil and a piece of paper. Personally, I usually start with that. In talking to my friend, Camp Peavy (Neato Robotics), he told me, "You can build a robot out of anything and do it very quickly if you use a lot of that magical material called Obtainium." (Obtainium being any parts or materials you can “obtain” and re-purpose.) Of course, this may turn you into a bit of a pack rat since almost everything becomes re-usable again ...
I had an Itch to Scratch. I Needed to Build Something.
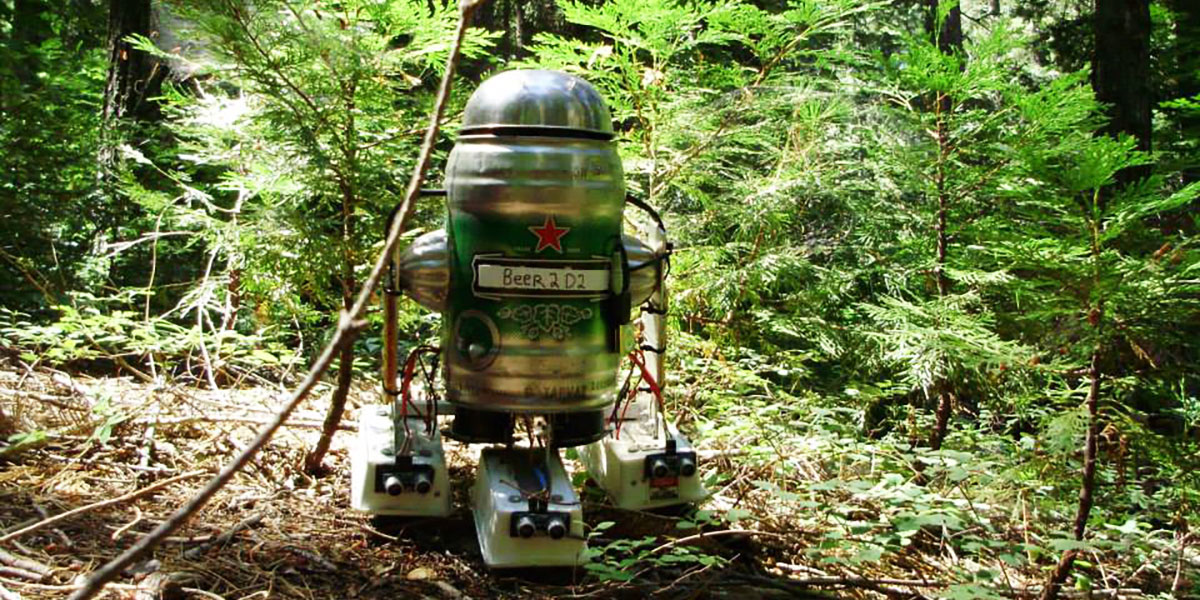
About five years ago, I was working at two different jobs in two different cities and had very little free time for my projects. Having a job and working is great, but for me I never stop thinking about making some new robot or toy to play with. In about mid February of 2010, I was aware of the upcoming RoboGames event that would be held in April. I got to looking at my “Obtainium” pile and noticed an empty 1.5 liter Heineken keg that I hadn't thrown out yet. Boy, I thought, that shape sure reminds me of a world famous astro-droid from another galaxy.
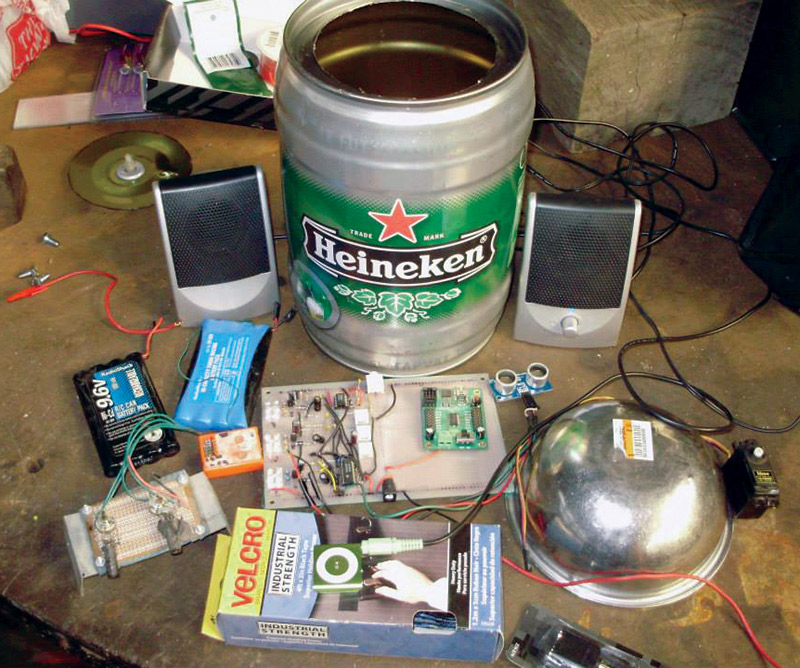
I grabbed that can, an old set of amplified computer speakers, and a 75 MHz Novak radio receiver. I then started looking for some tires and drive motors. I didn't have any that weren’t already in use. I looked up on a shelf and saw my little 4WD robot called EVA. For a moment, I thought, NO! You can't strip EVA for parts! EVA was actually a training aid I made so I could learn how to build and program autonomous robots using the Parallax BASIC Stamp 2 and various sensors. Plus, she had a pan and tilt wireless camera, a tele-operated mode, and a gripping arm that could retrieve 12 ounce drinks/cans from the refrigerator. It was a really hard decision to borrow her electronics and motors, so with a sightly heavy heart I decided to go for it.
Beer2D2 parts.
Building Beer2D2 from Random Bits of Stuff
Once I knew I had some of the major components for the robot’s drivetrain, I had to come up with a basic design for the rest of the body. Out came the tape measure plus the paper and pencil. I measured the Heineken keg’s length and width, and guesstimated its inner volume. I measured EVA’s tread width and wheelbase includung the tire diameters, plus I weighed her. She weighed six lbs. Since I knew EVA would run for over an hour with a 2,000 mAh 9.6 VDC NiCad battery pack, I figured the new robot should do so as well. At this point, I needed to actually buy/find some new parts.
My first stop was the Budget Robot Builder’s Emporium (Goodwill store). The first things I found in the used kitchenware section were some tin cupcake molds. I thought, "Ah, these will make excellent shoulders." Then, I had a problem. I needed a domed head for the robot. Since I had measured the top of the Heineken can and knew it was 5-1/2” in diameter, I began digging through dishes, glassware, cups, saucers, plastic kid’s toys, and nothing fit! I was almost ready to give up when I saw a stack of stainless steel mixing bowls on the bottom shelf.
I got down on my hands and knees, pulled the stack of bowls out, and right there two bowls down from the top was a stainless steel bowl that was the perfect size. I quite loudly exclaimed "YES!" Several of the women that were also shopping looked at me like I was crazy. (Little did they know, they were probably right.)

Beer2D2’s dome motivator.
I meekly apologized for my sudden outburst and greedily grabbed my rare treasure. I grabbed a few other bowls but I didn't end up using them since none fit as well. The next thing I needed was something to mount the drivetrain into.
Astro-droids have these rectangular wheel parts and I needed three of them. Again, I searched through lots of cake pans and metal dishes by placing the servomotors and 3” tires in them, and found nothing. So, I took the treasures I had already found, payed $4 for them, and went to Walmart to search for more ... and found nothing.
At this point, I headed toward Home Depot to get some sheet metal to make my own drivetrain enclosures. Then, I saw a K-Mart store and whipped into the parking lot. I showed the cashier my motors and wheels, and asked where their kitchen appliance section was — triggering yet another strange look.
In the kitchen section, I was very lucky to find the only three plastic butter dishes that my motors and wheels would fit in. I believe they were from the Martha Stewart collection, and cost me about $11. Finally, after that purchase, I went to Home Depot and bought three feet of 3” x 1/8” aluminum flat bar, and three feet of 1-1/4” angle aluminum stock — plus a bunch of 1” long number six and number four bolts and nuts, and a roll of self adhesive Velcro™. These parts cost around $45. (I bought extra.)
A Box of Happiness
I put all of the parts into a box and hauled them to my second job. I began the project in their shop late at night after work. I needed to cut open the top of the Heineken can, and knew that the can had been pressurized. So, I took a hammer and center-punched a small hole in the top. I was gifted with a whoosh of gas and the unpleasant smell of very old beer residue (eew).
I wanted to leave about 3/4” in the top of the can’s metal, so I could mount the domed head. I used a piece of stiff solid core wire, a sheet rock screw, and a Sharpie™ pen. I put the sheet rock screw in the center hole where the can’s dispenser valve used to be, and made a loop in the wire to hold the Sharpie. I then used the wire/guide (pulled tight) to trace out a circle on the top of the can. Using a Dremel rotary tool and a cut-off wheel, I cut out the circle, removed it, and the exhausted internal gas cartridge.

Beer2D2 and my handy Dremel.
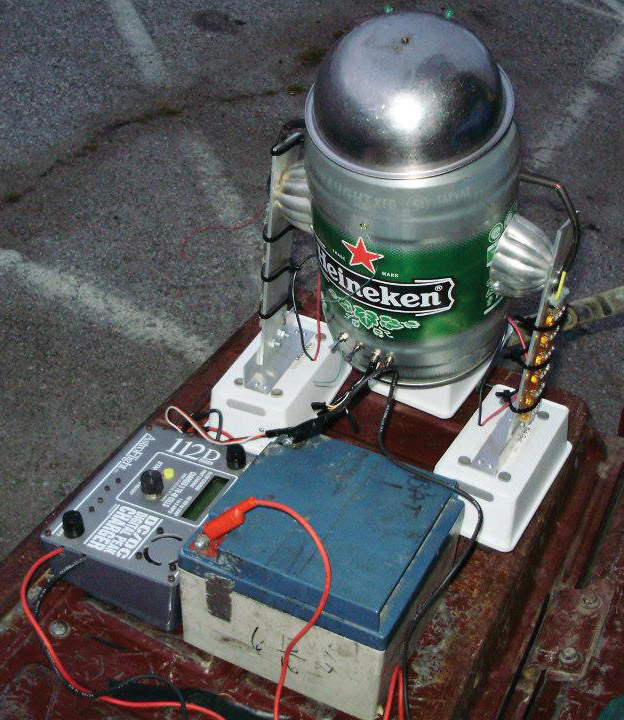
I gave the can a thorough bath inside and out in hot soapy water to remove the smelly old beer residue. I then proceeded to totally disassemble EVA, so I could get her two Vantec RET 411 motor speed controllers, battery packs, and power switches, and lay them out on the table.
There were several test fittings done to see how to get all of the parts inside of the can, while pondering how to wire Beer2D2 and make it easy to do maintenance and battery charging. In the initial design, I placed the speed controllers and the battery packs in the very bottom of the can to keep the robot’s center of gravity low so it would be semi stable. I placed the entire speaker system on top, and it all fit. Time being a factor, I figured that was good enough for now. I had to build the drivetrain/chassis. This part of the build I actually did over a couple of nights.
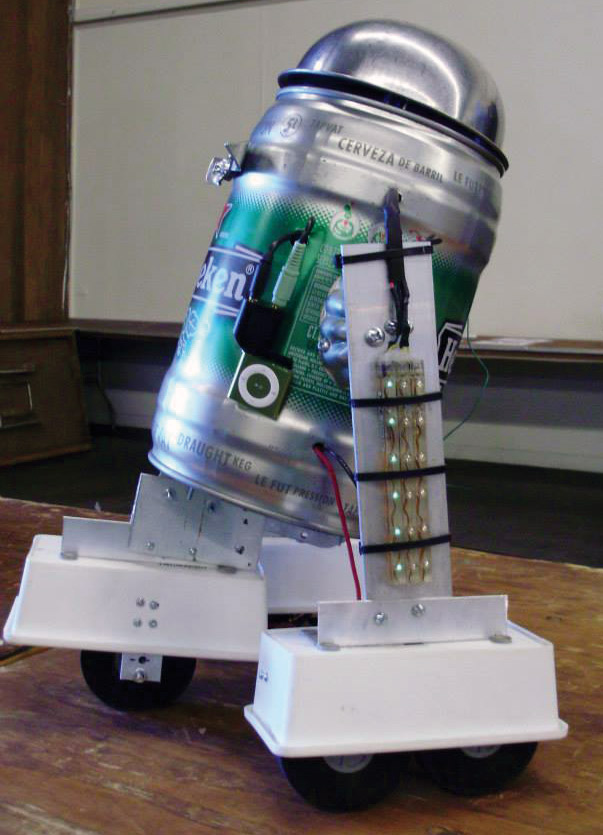
Beer2D2's drivetrain uses four Futaba S3004 servos hacked for full rotation, with all of the original electronics removed. They are mounted with 4-40 machine screws to a piece of angled aluminum that was notched using a Dremel to fit the motor’s case.
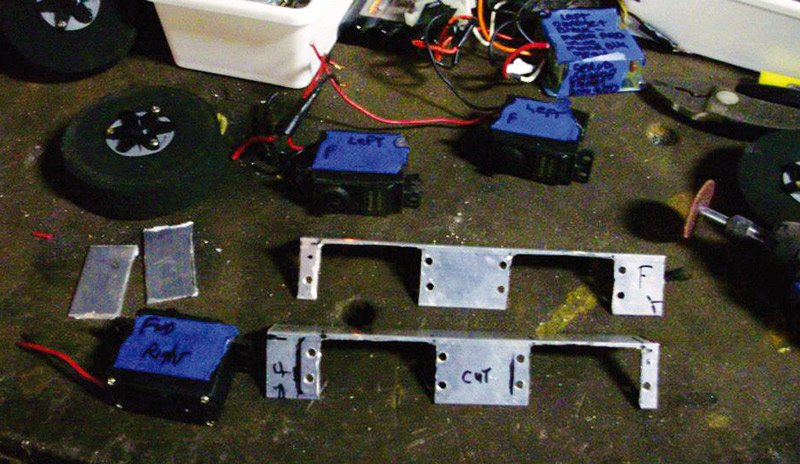
Beer2D2’s motor frame.
Each set of motors is wired in parallel and connects to one of the Vantec RET 411 speed controllers. The motors are fed 9.6 VDC from a 2,000 mAh NiCad battery pack. Actually, 9.6 VDC is a good over-voltage level for stock hobby servos with nylon gears. If you use a higher voltage, you should use servos with metal gears.
It was a bit tricky fitting the motors and 3” Dave Brown Lite Flite wheels inside of the butter dishes/motor housings. All of the holes I drilled were 1/8” and the drill bit liked to grab the plastic as it went through. As usual, I ended up bleeding a bit from the cuts acquired from reaching into a metal can.
For the front wheel housing, I made a bracket with some 1-1/4” angle aluminum and a long through to act as the axle, to support another non-driven 3” Lite Flite wheel. Eventually, I would regret this.
After I had assembled the housings and tested the drive motors with a battery, it was time to figure out how to attach them to the Heineken can.
Trying to mount things evenly on a round can gave me a few things to think about. How was I going to measure all of the places I needed to drill the holes? After some pondering, I used a pocket tape measure that was very flexible. I could wrap it around the can to take measurements and mark the places for the holes. I also wrapped some blue painter’s tape around the can to give me some straight edges to work from. The printed decal on the Heineken can has a star in the center of it, so I used its center line to work from, as well.
Once I found the positions for the shoulders, I attached them with a couple of number 8 sheet metal screws. One thing I learned about Heineken cans is they are incredibly thin walled and not easy to drill through without tearing. The drive housings are attached to 1-1/4” angle aluminum that bolts to the 3” aluminum flat bar that acts as Beer2’s legs. They attached to the shoulders using several number 8 sheet metal screws. The front wheel housing is attached using 1-1/4” angle aluminum connected to another piece of 3” flat bar, connected to yet another piece of 1-1/4” angle aluminum.
Beer2D2’s feeding time.
Test Run and the Typical Disaster
Once I had it all bolted together, I put the batteries, speakers, and electronics in and set it on the floor. It fell over. Ah dang, I had a center of gravity problem. I went back and watched the real R2D2 in the movies, and noticed that he actually leans back a bit when he is rolling around. Ah ha! Better building through watching sci-fi movies! I had to reposition/tilt Beer2D2’s main body back until he became stable.
After all of that, I finished the four battery power switches, motor, speed controllers, radio receiver wiring, and took him for an R/C test drive. Yay, he works! It was now time to give Beer2D2 a little personality, so I connected his 12 VDC 2,000 mAh battery pack to a switch mounted in the can, connected the amplified speakers, and added an Apple iPod Shuffle for an audio source.
Beer2D2 iPod.
I also mounted a stock servo to another piece of 1” angled aluminum and found the inside center of the stainless steel mixing bowl by carefully balancing it on a Sharpie pen to mark the spot where I drilled the 1/8” hole for the servo motor’s center shaft screw.
I also drilled a couple of holes and mounted a couple of green LEDs in the bowl to act as his eyes. Once the head was mounted and rotating about 90 degrees under radio control, he was pretty much done.
The First Adventure at RoboGames
Beer2D2 and I went to RoboGames for the first time in 2010. We actually had a lot of fun hanging out with the ArtBots and the folks from the Homebrew Robotics Club. To my surprise, the kids really loved the little guy.
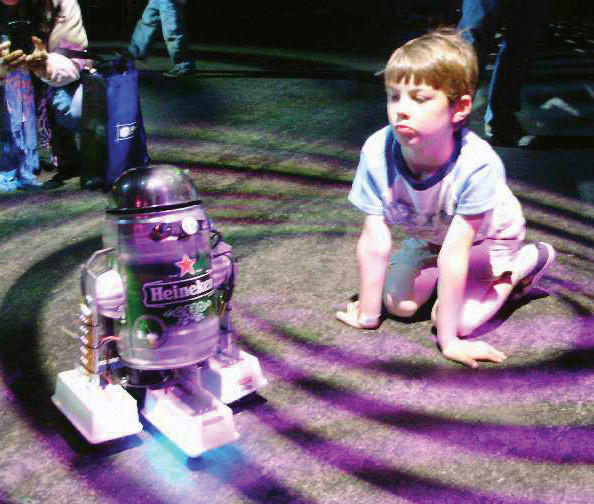
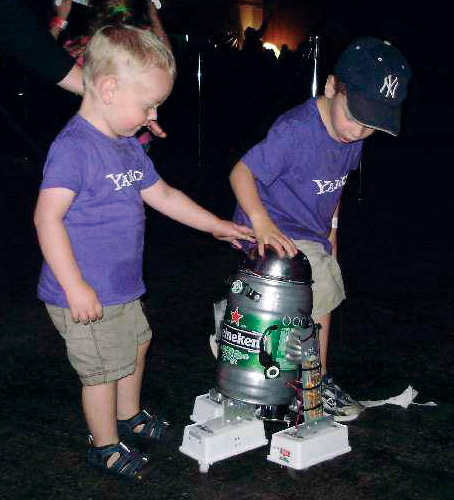
A Beer2D2 fan.
We drove all over that event. He even got to meet the full-sized R2D2 projects from several talented builders.
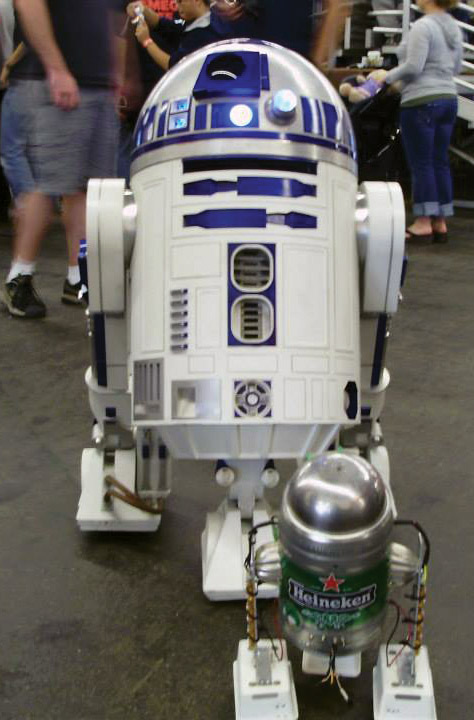
Beer2D2 and R2.
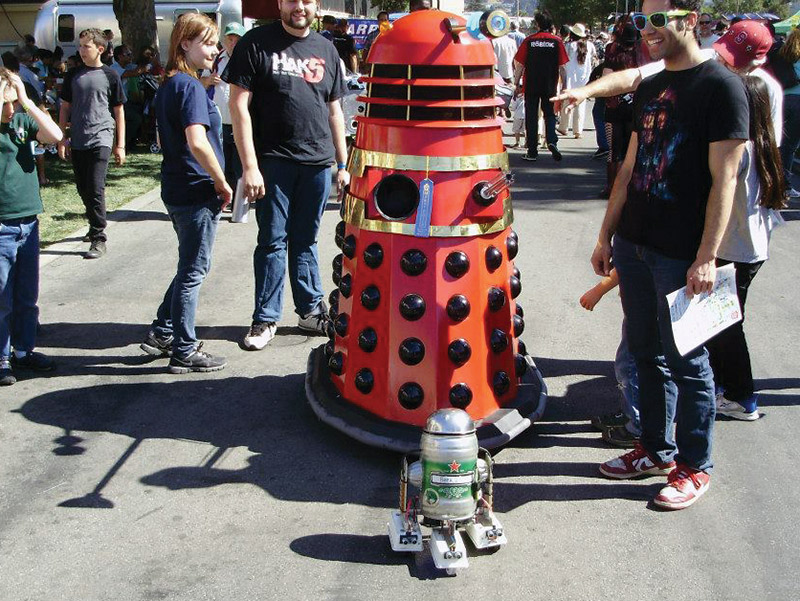
Beer2D2 meets Dalek.
Then, I started noticing several problems. The fixed front wheel was causing a lot of drag during turns and was also trying to tear itself off of its rim sideways. Another major problem was happening with the drivetrain legs and their attachment to the tin cupcake holders/shoulders. The legs began shifting and flexing, and starting to tear the mounting screws out of the cupcake molds and the main Heineken can. Not good! I stopped driving him on the second day of that event and just put him on display.
Time for Some Upgrades, then Off to the Bay Area Maker Faire
When we got home from that event, I accessed the damage. I strengthened the shoulder mount, added a piece of aluminum channel between the drivetrain housings, and bolted that channel to the can with some more 1” angled aluminum. That made the drivetrain much stronger, and there was no more flexing.
I removed the fixed front wheel and replaced it with a 1” self-aligning caster wheel. That took care of the tire drag and helped him turn easier. Now, for a serious road test!
In May 2010, I took him to the Maker Faire, along with several other projects. He was working a lot better.
Even More Upgrades
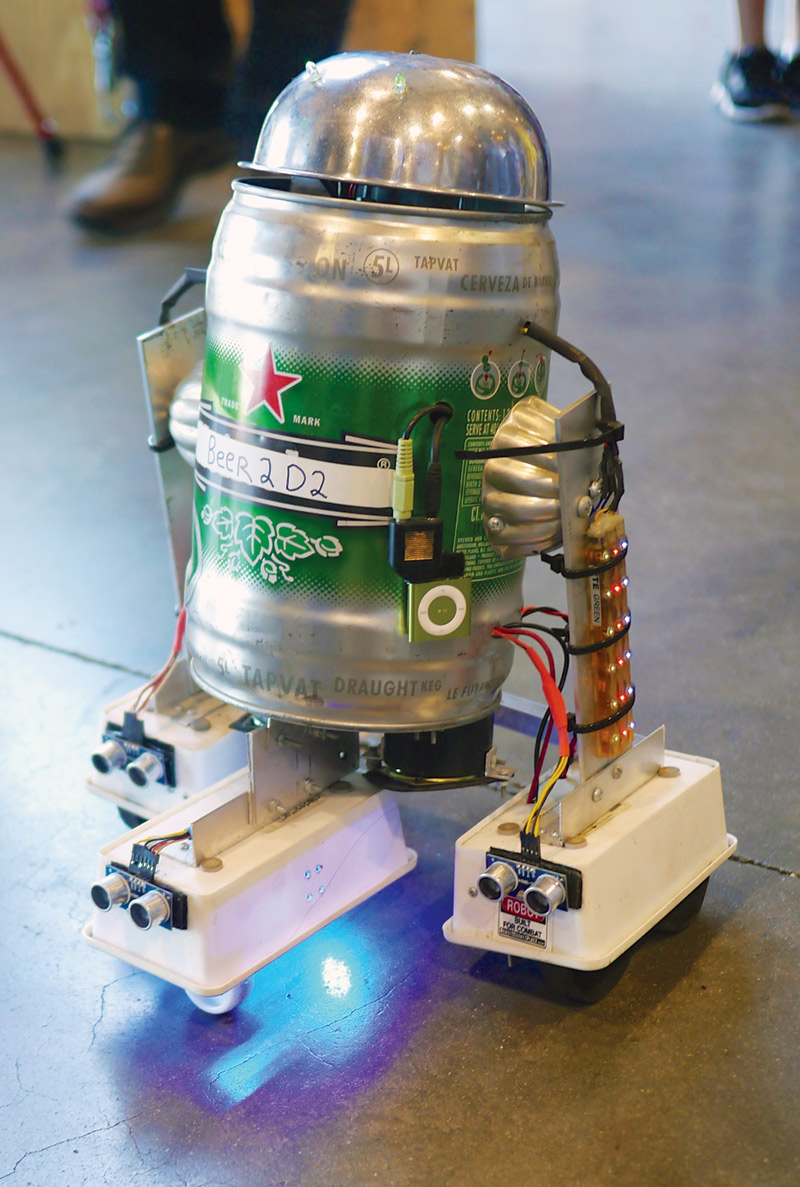
After that Maker Faire, I wanted his sound system to work better. The speakers were really muffled from being inside of the tin can. So, I took him apart and disassembled the amplified computer speakers.
Once the speakers were free from their housing, I found that they were about 1-1/2” in diameter. I took one to Home Depot and found a PVC pipe coupling that they would fit in, so I bought two. I mounted them to the bottom of Beer2's can, along with some of their original speaker grill. I put the amplifier inside of a small Rubbermaid™ container that I found at Walmart and put it all back in the can. That really improved his sound.
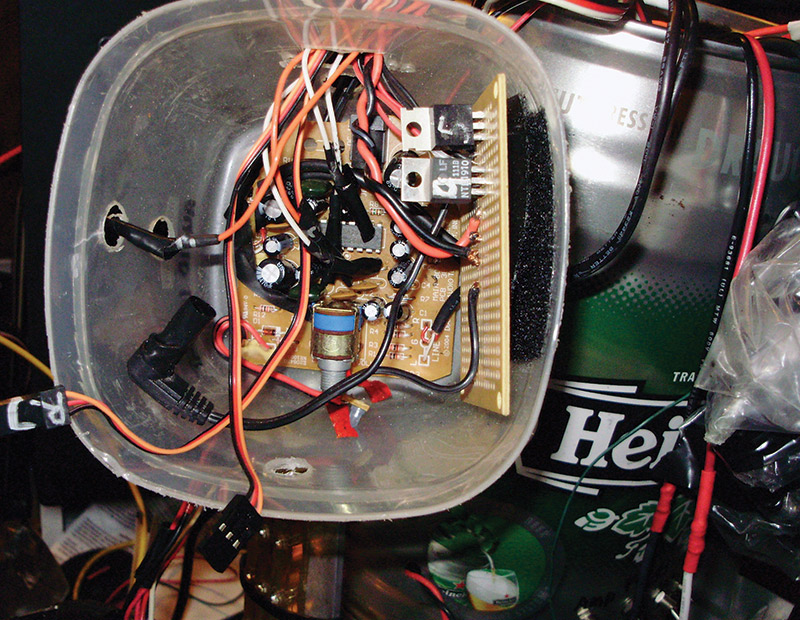
Amplifier and power supply.
One of the other projects I had demoed at that particular Faire was an audio controlled LED color organ circuit that I had built using a schematic from Make Magazine and a lot of discrete components from Jameco Electronics. I decided one day to see If I could fit/cram that board into the new found space inside of Beer2's can. Well, it wasn't easy to cut the board down to size, but with some Dremel work on the circuit board, rewiring of the circuits, and some new cuts on my hands, I got it in there. Plus, a Y connector was also added so the audio signals would go to both the audio amplifier and the LED color organ circuit.
I wrapped the whole board in a plastic sandwich bag and some electrical tape, so it wouldn't short out inside of the metal can. I also modified the original circuit by adding an output driver stage using TIP 42 PNP transistors. This way, I could drive a lot more LEDs. Beer2D2 got a bit more expensive at this point.
I bought some NTE Electronics’ red, green, and blue waterproof self-adhesive LED strips. At the time, they were $17 each. Plus, I bought some super bright LED modules at Fry’s Electronics for another $50, and yet more NiMh batteries to make another 12 VDC pack to power them.
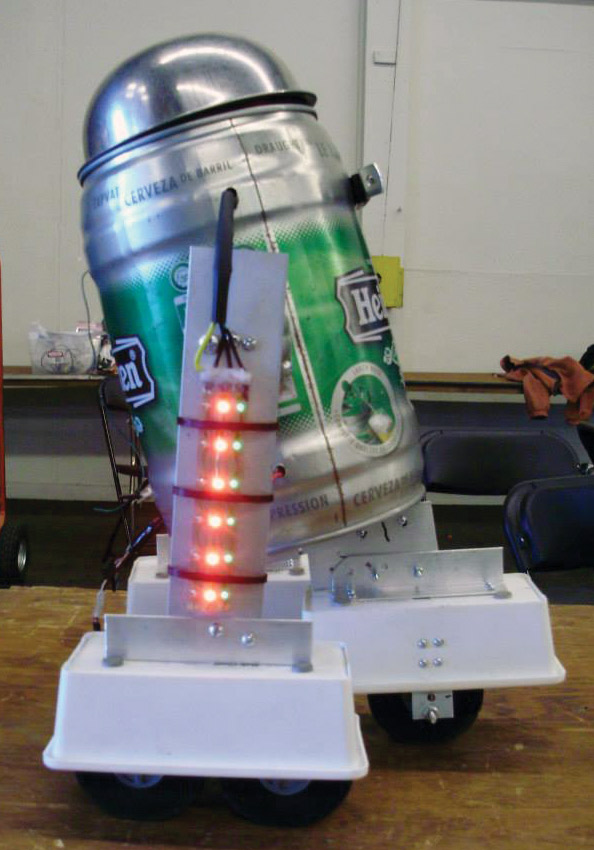
Beer2D2 with his blinky lights.
But wait! That's not all! After the audio controlled blinky light upgrade, I decided to make him selectively autonomous. So, I also added a 7805 5 VDC voltage regulator for sensor power; a 7809 9 VDC voltage regulator for Arduino power; three HC-SR04 ultrasonic PING))) distance sensors — one for each drivetrain housing; and an Arduino microcontroller to read the PING))) sensors and send the PWM control signals to the speed controllers. I actually wrote the Arduino code while his batteries were charging at RoboGames 2013.
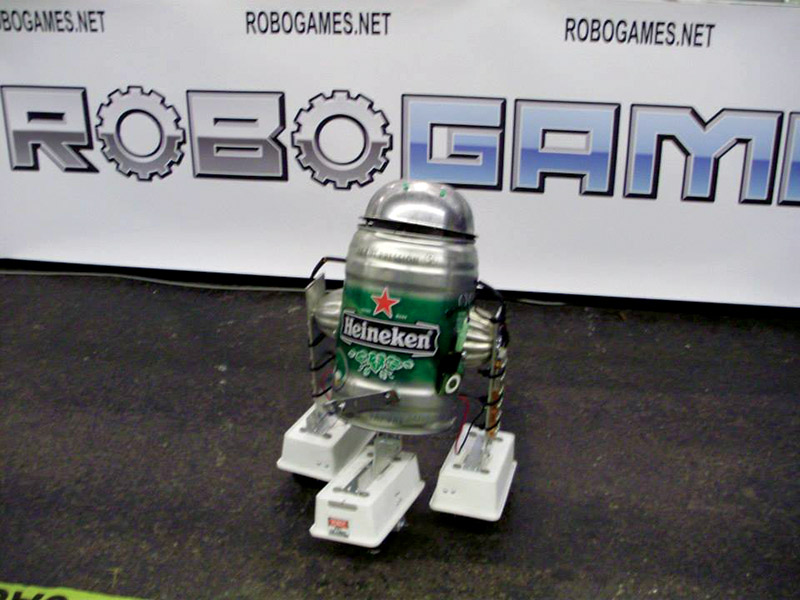
Beer2D2 at RoboGames 2013.
A Very Simple Program
Basically, his simple program is always motivated to move him forward. However, if he gets within three inches of anything that the HC-SR04 PING))) sensors can detect, he will turn right if the left sensor is triggered, or he’ll turn left if the right sensor is triggered. Beer2 will back up if the center PING))) sensor is triggered — all for one second in the desired direction to correct or clear his path.
I also added a 4PDT relay that is controlled with a toggle switch to manually select either the radio or microcontroller. To switch which signal is used, the radio PWM signals are connected to the normally closed side of the relay, and the Arduino PWM signals are connected to the normally open side of the relay. The common pins connect to the speed controller’s PWM input pins.
If the relay is off, the robot is in R/C mode; if the relay is turned on, the robot is in Arduino/PING))) sensor controlled autonomous mode. This is and has been Beer2D2's configuration since 2013. I'm sure he would appreciate it if I upgraded his software one of these days.
Our Many Wonderful Adventures Together on the Planet Earth
Beer2D2 and I have been to all of the Bay Area Maker Faires and RoboGames events since 2010. We have also been to countless art, science, robot clubs, maker spaces, and frequent camping and road trips together. This little guy and I have personally met and entertained literally thousands of folks. I've seen him make a lot of people smile. Watching the looks on little kid’s faces and having Beer2D2 sing and dance with them has been beyond heartwarming for me.
At one of the trips to RoboGames, Beer2D2 and several of the robots from the Home Brewed Robotics Club did a parade. There must have been 20 children marching along with the various robots. That was a magical impromptu moment for all of us.
More Beer2D2 fans.
Another one of my other favorite things to do is have Beer2D2 drive around the booths at Maker Faires on Sunday night and see if we can get the incredibly tired folks that have manned those booths to smile after their epic ordeal of talking and demoing their own passions to thousands of humans. Beer2D2 almost always has.
One should always give back to the makers, is Beer2D2’s way of thinking since they often inspire and teach us so much. When in doubt, always thank the makers!
To our surprise, Beer2D2 was actually awarded the Editor’s Choice award at the 2013 Faire. He got a blue ribbon. That's not bad for a previous random pile of Obtainium and a bit of science, robotics, new/used electronics, and stuff.
The Poor Little Guy Eventually Died. But He was Fixable.
In 2014, Beer2D2 really died and was completely unusable. After a bit of difficult surgery, wire cutting, soldering, and adding wire extensions, I was able to rebuild, buy new parts, and replace/build his current six failing battery packs that would no longer take a charge.

Beer2D2 surgery.
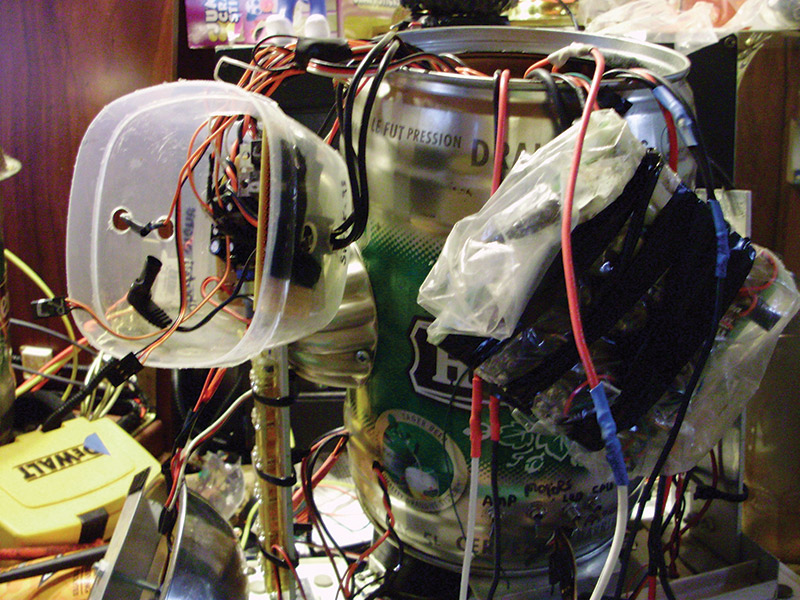
More Beer2D2 surgery.
Beer2D2 performed well again at RoboGames 2015. With a bit of maintenance, he should be ready for his fifth trip to Maker Faire 2015. Of course, I still cut my hands reaching into his tin can when fixing him ...
My human friend, Camp Peavy is right. You can make a robotic friend out of anything.
Invent, Re-purpose, Recycle. It's good for you and it's good for the kids, too. SV
Web Links for Beer2D2
Jameco LED color organ — now in kit form!
www.jameco.com/Jameco/workshop/diy/ledcolororgan.html?CID=organ
A much simpler and smaller LED color organ from Make Magazine
The Easy LED Color Organ
http://makezine.com/projects/easy-led-color-organ
Vantec speed controllers
www.vantec.com/acatalog/spdcat.html
Article Comments