Servo Magazine ( March 2015 )
Actobotics’ Nomad
By Jeff Cicolani View In Digital Edition
A Capable Chassis for Your Next Project
I have been looking at off-road robot chassis for a while. So, when the opportunity to try out the new Nomad chassis from Servo City was presented to me, I jumped on it. Nomad is a four-wheeled frame built for rugged outdoor use, constructed with parts from Servo City’s Actobotics line of channel and hardware. Actobotics parts are something else I've been wanting to try.
Building the Nomad
The package containing the Nomad arrived shortly after Thanksgiving, along with a number of Black Friday purchases from some of my favorite robotics suppliers. This was going to be a fun robot-filled holiday!
Going through the parts, one thing that was missing was any form of printed instructions. As a robotics hobbyist, you get used to the fact that most of the items you order will not come with instructions. If you’re lucky, you may get a pin diagram with your microcontroller, but even that is less and less common. Most companies are using the Internet to provide their documentation. So, naturally, I turned to the Servo City website (www.ServoCity.com).
I did not find the Adobe PDF with the instructions as I was expecting. Rather, all that was available was an assembly video. This is not my preferred format for assembly instructions, but it would do. I proceeded to clear my work surface so I could spread out the parts and make room for my tablet that would be used for viewing the assembly video.
As I began building, the first thing that really struck me was the quality of the parts. The channel had very precise holes in a pattern that allows for a lot of options. The mounting hardware and brackets were exquisitely milled from aluminum. All in all, the precision, strength, and quality of the Actobotics system is impressive.
The second thing that struck me was the pile of plastic bags that were now covering my bench (Figure 1).
FIGURE 1. The Nomad kit is packaged in many bags.
They were everywhere. It took me a while to remove the parts from all of the bags. There were a lot of bags. Many of them were far too large for the parts inside.
With all of the parts removed, it was time to get down to the fun part: building this beast. I busted out the hex keys and started to get to work. It was at this point I discovered I did not have the correct key. The 6-32 hex head screws require a 7/64 hex key which is not one of the sizes in any of my sets.
Fortunately, I discovered one of my torx head bits worked nicely. Undaunted, I forged ahead with the build.
Assembly was straightforward. The ABS plastic box which makes up the body went together easily. The brackets aligned nicely with the holes in the channel. The provided bearings snapped easily into place. All in all, the precision with which everything went together was brilliant.
However, shortly before assembly was completed, I ran out of screws. At first, I thought I must have tossed out a bag of screws with the other bags (there were a lot of bags remember). Checking the packing slip in the box, I discovered they sent three bags of 25 screws; a total of 75. To put the kit together as demonstrated in the video requires 88 screws. I was 13 short. A quick call to Servo City straightened the whole thing out. They sent me another package of screws and updated the kit to make sure all future shipments contain the right number.
Screws in hand, I was back to work. When I was finished, the assembled kit was larger than I was expecting. Putting it together you are aware of the size, but when you get the large knobby wheels onto the four 12 volt geared motors, somehow it feels bigger.
At this point, I had a very impressive chassis (Figure 2).
FIGURE 2. The completed Nomad chassis.
The kit is just that: a chassis. It comes with the frame, box, four wheels, and four motors. Any electronics needed to get it moving are entirely up to you to provide. For this review, I wanted to keep it simple since the idea was to test the Nomad chassis as it comes in the kit.
To get it going, I simply dropped in a 12V sealed lead acid (SLA) battery, an R/C remote receiver, and a dual channel motor controller. For safety and convenience, I threw in a toggle switch, as well.
In addition to the Nomad kit, Servo City also provided me with a RoboClaw dual channel 15 amp motor controller by Ion Motion Control. This, too, is a new addition to their extensive product line. I have to say I was as excited about the RoboClaw as I was about the Nomad.
This was an impressive controller with a number of modes including R/C, direct, and serial. The controller was well documented on their website (www.ionmc.com), so getting it connected and configured was very easy. Once the RoboClaw was set up, it was time to take the Nomad out for a test spin.
Putting the Nomad Through Its Paces
I cannot express enough how much fun the Nomad is. The four motors are powerful and — for lack of a better term — downright zippy. The knobby off-road tires want to grip to everything, likely due to the soft rubber as well as the tread pattern. On more than one occasion,the Nomad tried to climb up my leg, a wall, or my neighbor’s fence.
Due to my experience with other platforms that use a wheeled configuration with a tank drive format, I was expecting to have troubles turning. I could not have been more wrong. It was very responsive and had no problems making sharp turns spinning in place or on carpet or grass.
I took it out to an empty lot near my home to run it through more paces. The Nomad seemed unstoppable. This thing was so much fun — right up until the point where one of the wheels fell off. Fortunately, this happened on the street and not in the field so I was able to find the screw that fell out. The screw that holds the wheel to the hub loosened and worked its way out. This was simply fixed by applying a little Loctite Blue to the screws. I noticed several of the other screws holding the motor mounts and a few other places were coming loose, so I put some Loctite on them as well.
Once everything was back together, I had to take it outside and run it around some more. I took it down to another lot where construction was about to begin so I could test it on more challenging terrain: dirt mounds, construction debris, and other obstacles (and because it was so much fun). Again, the Nomad was unstoppable. Until a wheel fell off, again.
A couple of the set screws that hold the wheel hub to the motor shaft fell out. This time, however, it was in a mix of gravel and mud, so they were lost forever. Fortunately, Home Depot carries the 10-32 set screws, so I picked some up and got Nomad back on the road. I ran it all around the neighborhood and finally down to a boat dock. Overall, it went nearly a mile before the charge on the battery dropped low enough to cause it to struggle with hills.
Next-Level Nomad
With all the initial fun out of the way, it was time to start examining the Nomad for a practical application. First, I wanted to tackle one of the things that I did not like about this particular design. The way the Nomad’s suspension works is quite simple. The box that serves as the body is mounted to a piece of channel that then attaches to two more aluminum channels that run perpendicular. The motors are mounted at the ends of these channels and the wheels mount directly to the output shaft of the gearing.
One of these channels is mounted on a pillow block with a pair of bearings, providing smooth pivoting. This allows that side of the Nomad to adjust to its environment and provide excellent traction. However, the other channel is rigid to the frame. This means the body is always pitched to align with that side of the chassis. The design is effective, but I wanted more.
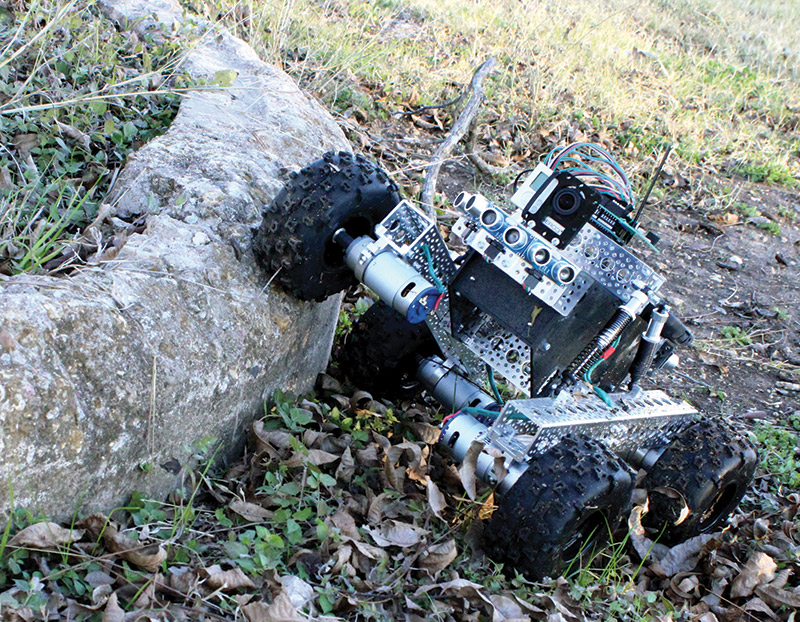
To add a little more flexibility to the platform, I ordered a few more brackets, two pairs of small shock absorbers, and the hardware necessary to make both channels pivot and a few other parts for mounting the sensors (see the sidebar).
The shock absorbers are another new addition to the Actobotics line. The shocks limit the movement of either channel, but the sum of the angles with these in place exceeds that of the single pivoting design. Plus, it looks cooler (Figure 3). With the suspension modified to my liking, the next step was to make the robot conversion.
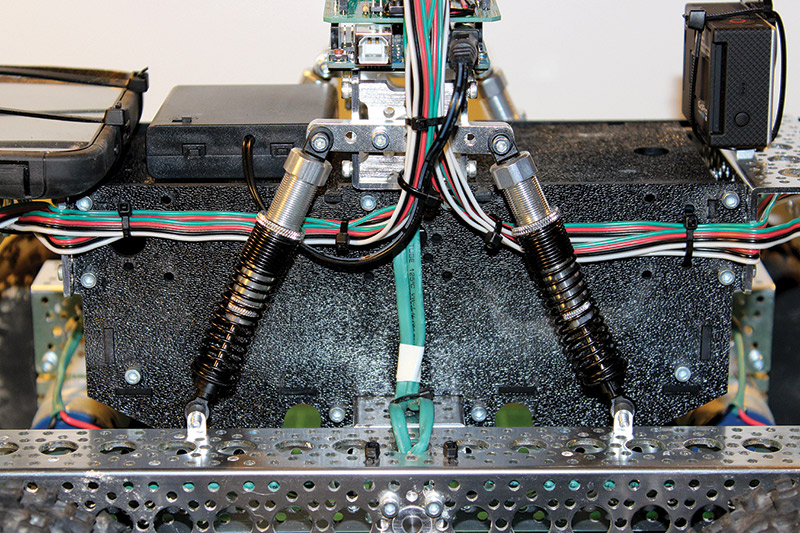
FIGURE 3. Modified suspension to add a little flare.
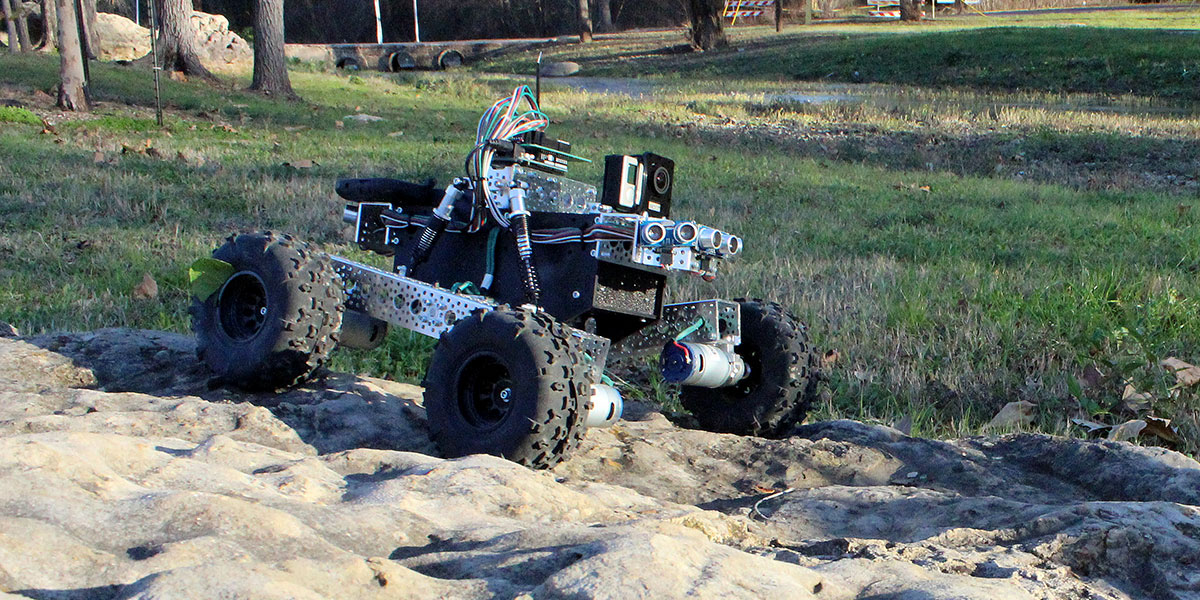
My next goal is to build an autonomous robot that will live up to the Nomad name. This final project will consist of a microprocessor with a selection of sensors to allow Nomad to traverse various types of terrain. It will be able to navigate autonomously in one of two modes: Magellan and Roam.
In Magellan mode, Nomad will navigate from one point to another via GPS, with the ability to stop at waypoints along the path. In Roaming mode, it will explore its surroundings, mapping obstacles and terrain. In addition, it will be equipped with a grasper to allow it to interact with the environment. These are some challenging goals to be sure, but Nomad has the flexibility to handle this and more.
When I upgraded my mobile phone, I kept the old one. This will become the primary processor on the robot. With GPS, accelerometers, gyroscopes, and other sensors built in, it will make the perfect platform on which to build a robot. I mounted an Arduino and add a Seeed Studio proto shield. The proto shield is configured with the connections needed for the six sonic range finders — three in front and three in back — as well as the Bluetooth transceiver used to communicate with the phone.
With the large SLA battery, motor controller, 15A toggle switch, and R/C receiver in the body, there was no room for more electronics. The Arduino and shield were attached to the channel mounted on top of the box. The phone was zip tied to the back of the box. Just for fun, I also mounted a GoPro camera to the front. The completed robot is shown in Figure 4.
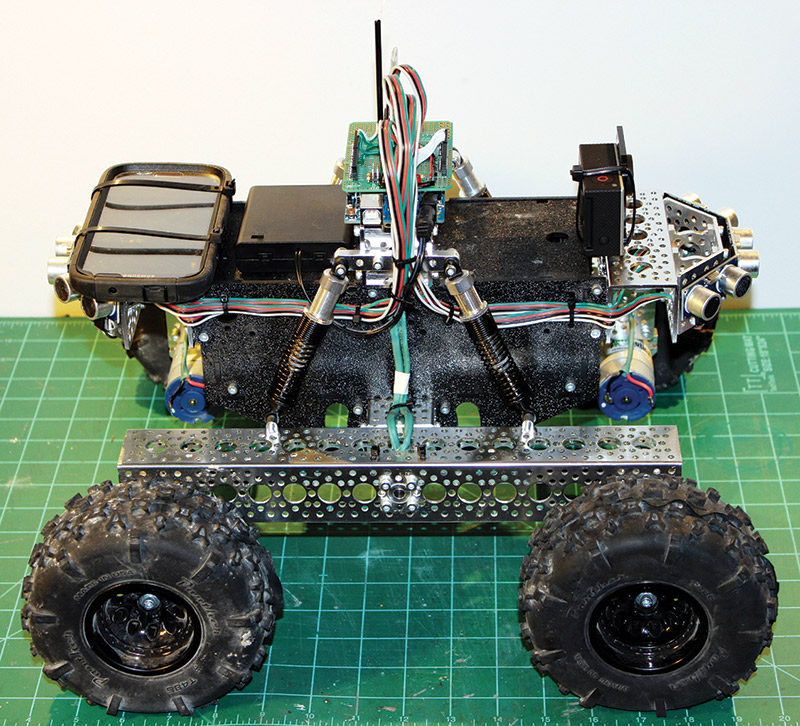
FIGURE 4. The completed Nomad robot conversion.
With everything mounted, I took it down to the park to test the new configuration. It worked beautifully and was able to conquer any terrain I put it up against. I will need to make a cover for the electronics and a better mount for the phone, however.
I did have an issue with the rubber of the tire wanting to separate from the wheel (Figure 5).
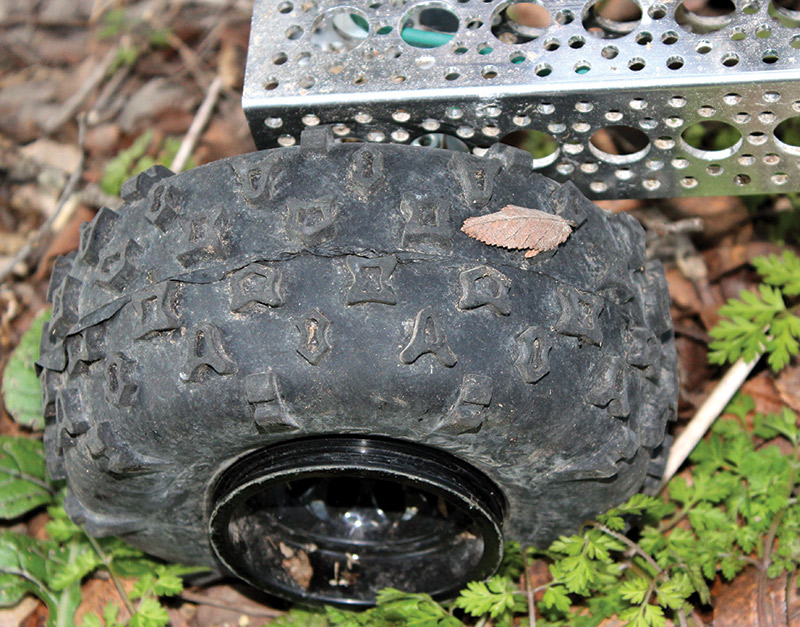
FIGURE 5. This tire kept separating from the wheel.
The lip on the wheel is not quite deep enough to prevent the tire from breaking bead and popping off. This generally only happened when I made sharp turns or spun in place. The tires can be super-glued to the rims, which is a simple fix to this separation issue.
My “final” remedy for this will actually be to add a couple of plates on either side of the tire, attached by screws that pass through holes in the wheel. This will, in essence, create a bead lock which should prevent the tire from popping off of the wheel. That being said, all in all I am very happy with the end result.
Summary
The new Nomad kit from ServoCity is a very capable platform for use in most any wheeled robot application. If you are going to build one, be sure to invest in a tube of Loctite Blue. You will also need to provide a solution for the tire separating from the wheel. These are minor issues, however.
The Actobotics line of parts from which Nomad is built allows for limitless modifications to the kit. If you’re not looking to build a Magellan bot as I now am, the kit can be customized to virtually any application. As mentioned, you do have to provide your own electronics and power source, but that is common for most chassis in this class.
I am impressed with the quality of the Actobotics parts I used from the kit and the added ones used to customize it. I will definitely be looking to ServoCity and Actobotics for parts for future projects. SV
Stay tuned for more on the Nomad Autonomous Vehicle Project.
These are the additional parts I ordered for the suspension modification:
- 2 x 1/4 inch Bore Set Screw Hub (0.770 inch): Part # 545548
- 2 x 1/4 inch x 4 inch D-Shaft: Part # 634080
- 1 x .250 inch ID x .500 inch OD Flanged Ball Bearing (2 pack): Part # 535198
- 1 x 1/4 inch Ball Bearing Quad Pillow Block: Part # 535130
- 4 x 90 Degree Quad Hub Mount D: Part # 545324
- 2 x 130 mm Aluminum Robot Shocks (pair): Part # 585032
- 1 x Beam Attachment Block B (4 pack): Part # 585600
- 1 x 2.31 inch Aluminum Beam (2 pack): Part # 585406
- 2 x 45 Degree Dual Angle Channel Bracket: Part # 585426
- 4 x 90 Degree Quad Hub Mount A: Part # 545420
- 1 x .750 in L x 6-32 Zinc-Plated Alloy Steel Socket Head Cap Screw (25 pk): Part # 632120
- 8 x 6-32 Machine Screw Nylock Nuts: Part # 90631A007
You may also want to invest in a 7/64 hex key, part # 57185A44.
ServoCity
www.servocity.com/index.html
Nomad Assembly Video
www.youtube.com/watch?v=FAPDkyeAek8
Nomad Product Page
www.servocity.com/html/nomad_4wd_off-road_chassis.html#.VK4mTCvF-FM
Article Comments