Totem Robotics Kit – A Review
By Jim Arlow View In Digital Edition
I’ve been doing electronics as a hobby since the 1970s and have long wanted to get into robotics. However, the cost of entry always seemed just a bit too high both in terms of the necessary skills and the cost of parts and tools. Being more of a “tabletop tinkerer” than a “workshop warrior,” I’ve always been looking for a simple, effective robot building system that has all the necessary tools and other bits and pieces, that doesn’t require extensive mechanical engineering skills, and that is reasonably priced. When I was offered the chance to review the Totem Robotics Kit, I wondered, “Is this it?” Well, let’s find out.
The Totem Robotics Kit
First impressions of the Totem Robotics Kit are very positive. It comes well presented in an attractive box inside of which there’s everything you need to construct one of an impressive range of seven robots, as well as your own designs (see Figure 1).
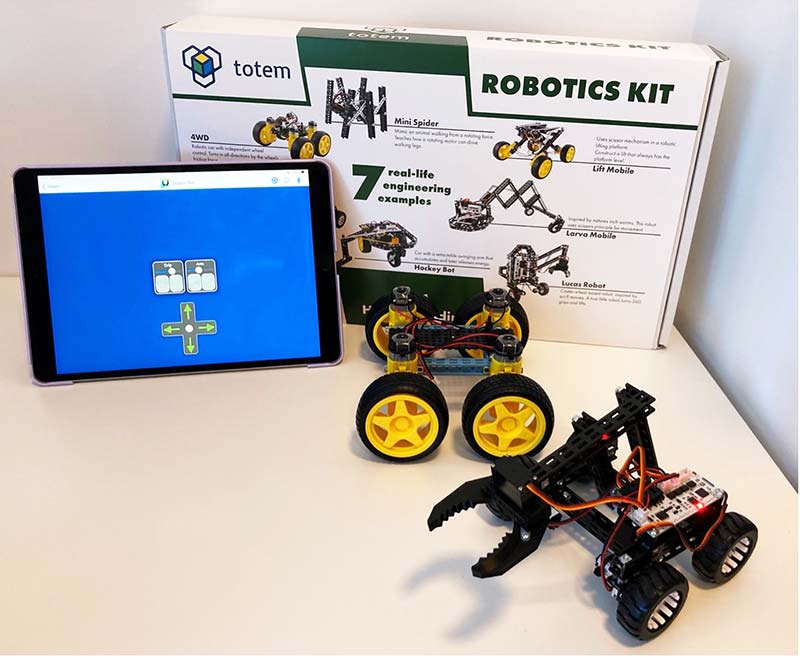
Figure 1: The Totem Robotics Kit showing the box and two constructed robots (4WD and Gripper Bot). The control program for Gripper Bot is shown running on the author‘s iPad (not included!). Note that all the beams in the Robotics Kit are black. However, you can buy blue and copper colored beams. To illustrate this, I constructed 4WD using some blue beams I had from another project.
Once you’ve built a bot, it’s easy to take it apart and reuse the components to build the next one.
A Kit of Many Parts
As you can see in Figure 2, there are a lot of different parts.
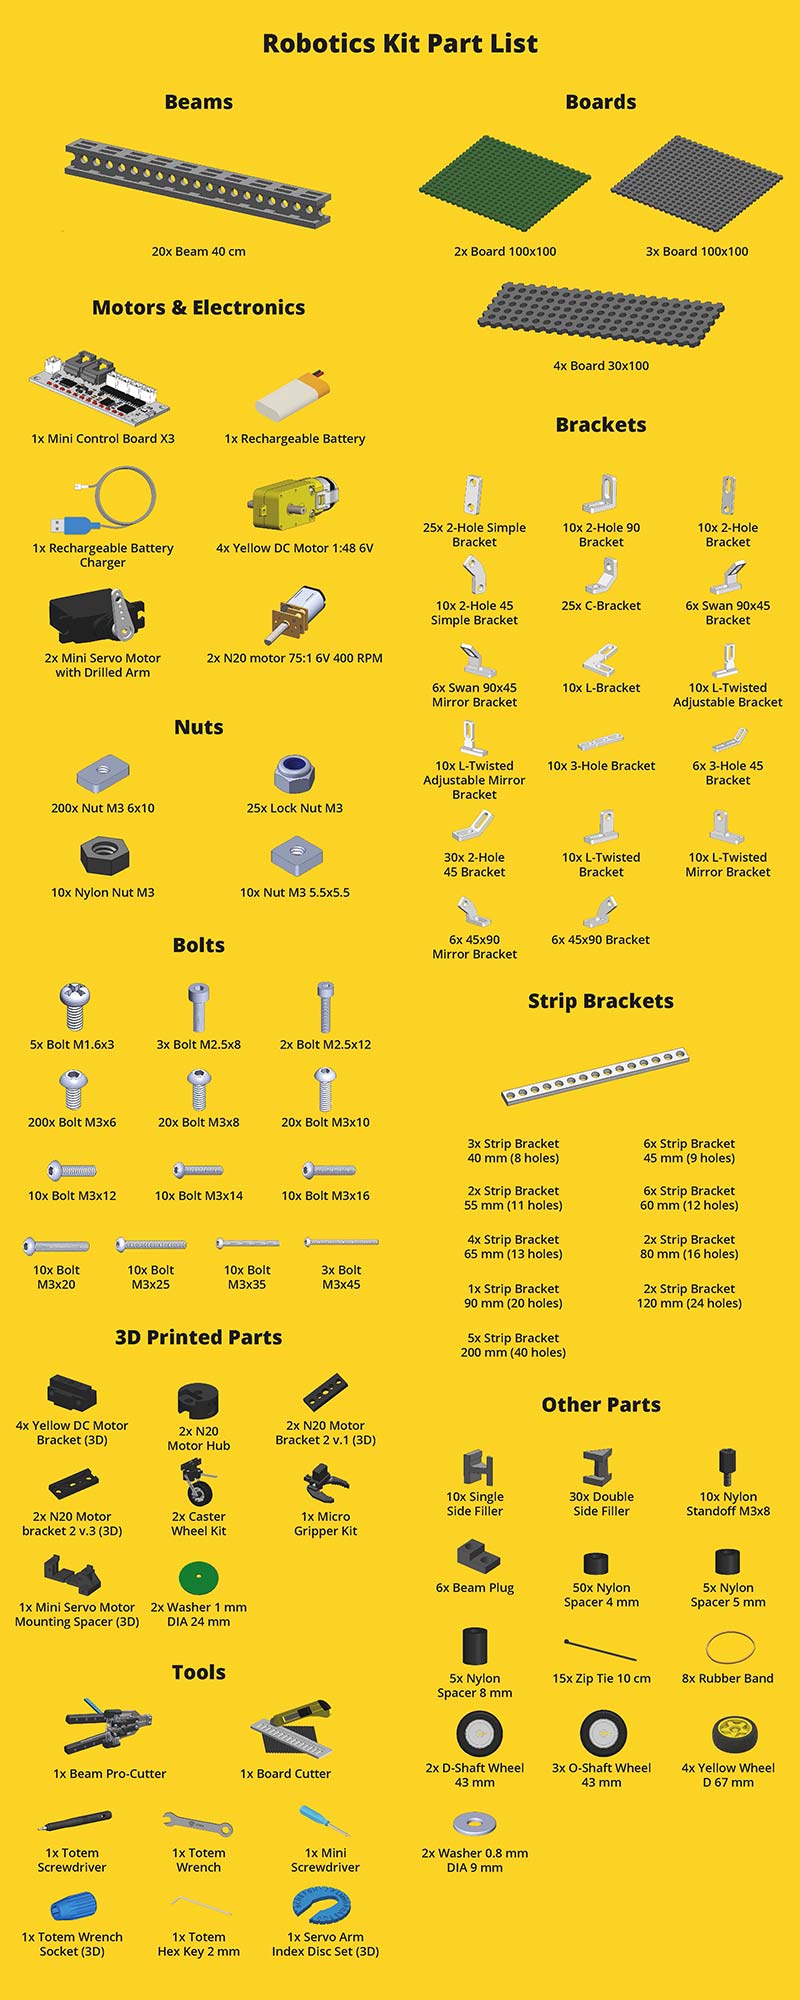
Figure 2: Totem Robotics Kit inventory.
Don’t panic! There’s a good reason for this as we’ll see shortly. The first thing I did was to remove the parts from their plastic bags and store the nuts, bolts, brackets, and other small parts in neatly labelled flip-top bead storage boxes I bought in packs of 24 from Amazon.
When there are so many parts, being able to find the part you want quickly is crucial for an enjoyable build. Although it took me some time to box up and label all the parts, every time I build a Totem bot, I thank myself for taking the time. Over the days I spent constructing the robots, I was inspired to design some 3D printed small parts storage (and other tools) specifically for the Totem system. I’ve put links to the 3D printer files in the Resources section.
The Seven Remote Controlled Robots
Along with all the parts is a short manual (The Robotics Kit Handbook) that describes the Totem system and the robots. At the start of the handbook, there’s a brief introduction and then a list of seven robots that you can build. These are:
- 4WD – A four-wheel drive chassis with a motor on each wheel. It can move in any direction by controlling the motors individually.
- Gripper Bot – A vehicle with a gripper arm controlled by servo motors.
- Mini Spider – A walking bot driven by a rotary motion.
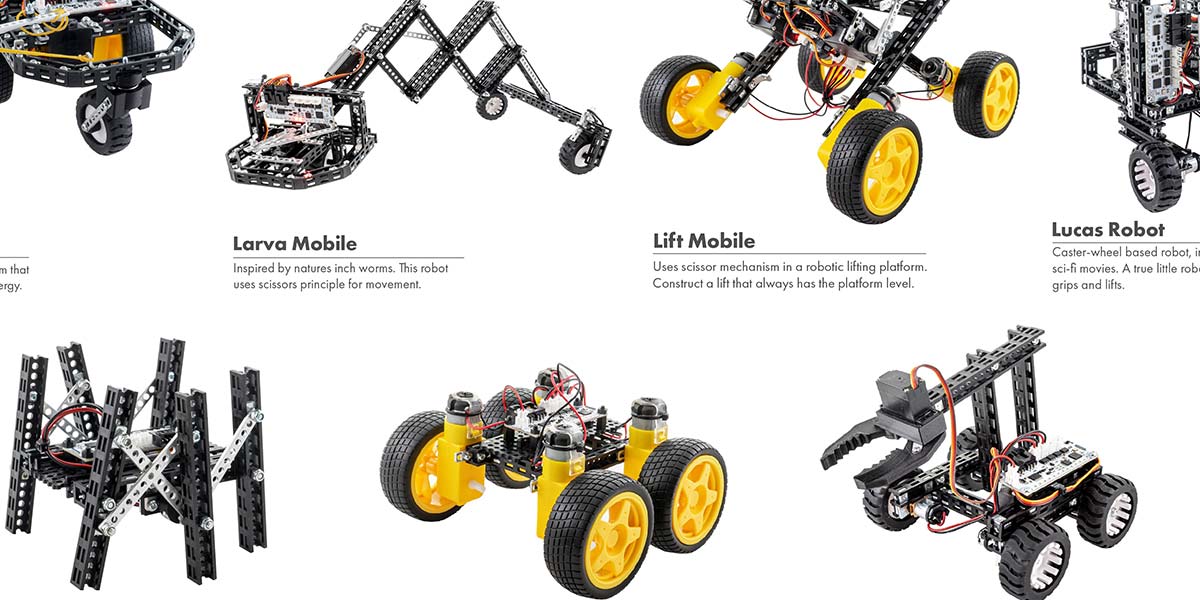
- Lucas Robot – A two-wheel plus caster robot chassis with a gripping and lifting arm. This is inspired by a famous series of science fiction films.
- Hockey Bot – A three-wheel robot with a rubber band powered arm for hitting pucks, balls, etc.
- Larva Mobile – An unusual bot that uses shape shifting to move about like a caterpillar.
- Lift Mobile – A bot with a lifting platform that always stays level.
A photo of the seven bots is shown in Figure 3, and as you can see, there is excellent variety.

Figure 3: Totem bots from the totemmaker.net website. From top-left clockwise: Lucas Robot, 4WD Car, Larva Mobile, Gripper Bot, Lift Mobile, Mini Spider, and Hockey Bot.
This system is very much more than a simple chassis, some sensors, and some programming. The emphasis is on mechanical construction (not programming), using the immensely flexible Totem system that allows you to build almost anything you can imagine.
Totem describes the example bots as, “seven real life engineering examples,” and I completely agree. These are mechanically interesting bots, and each one is unique and has several learning points that deepen your robotics knowledge. I believe that this makes the kit ideal both for the hobbyist and for use in education. The robots are all controlled by the Mini Control Board X3 (Figure 4).
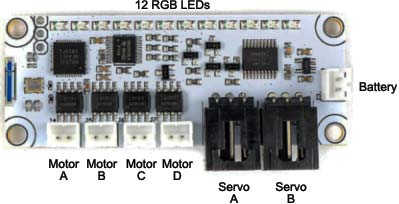
Figure 4: Mini control board X3. This has four motor ports and two servo ports. There are also 12 RGB LEDs and a battery connector.
This is a motor controller that is remote controlled over Bluetooth by the Totem iPhone/Android app. I should point out that because the board is not programmable and doesn’t support sensors, the Robotics Kit is limited to the construction of remote-controlled robots only.
At first, I thought this might be too limiting. However, I soon came to appreciate this simplification because it allowed me to focus on the mechanics of the robots rather than programming. It’s easy to add more sophisticated boards and sensors should you wish to do so.
The Robotics Kit Handbook
This slim manual contains details of the Totem system and each of the seven robots. The handbook page for each robot has a QR code you can scan that takes you to detailed online build instructions for that robot. You can save these instructions as PDFs; that’s what I chose to do so I could read them using the Apple Books app on my iPad. You can also access them directly from the Totem app, which is the simplest way to do it. All the instructions are very clear and take you through the build process step by step. Figure 5 shows a typical page.
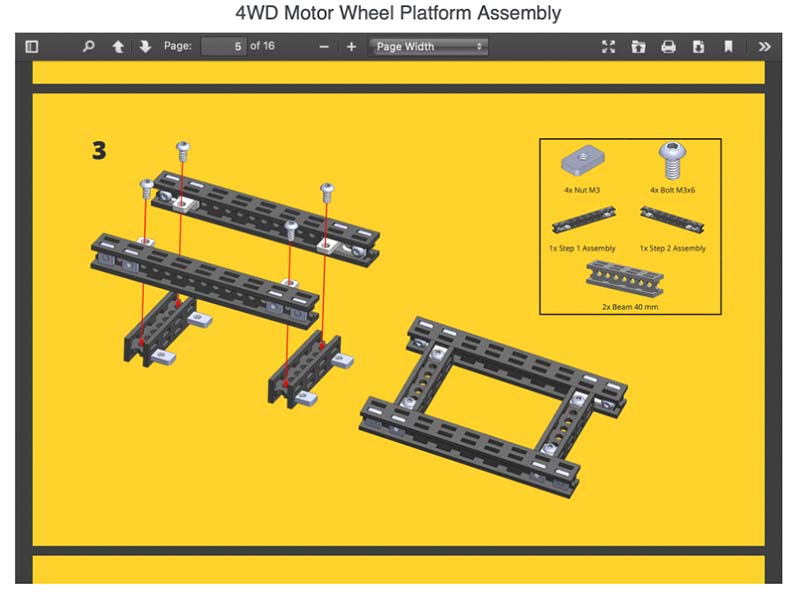
Figure 5: Typical page from the online build instructions. Note that all the parts and previous assemblies that you need are listed at the top right so you can get these ready before you start.
Each step is beautifully illustrated, and this makes the whole build process very enjoyable.
Although the instructions can look a bit daunting, when you have the components in your hands, assembling them according to the instructions turns out to be very easy because you can see and feel how the pieces fit together.
The remainder of the handbook takes you through Totem building techniques, of which there are many. I suggest you take a quick look through this without trying to memorize the techniques. For me, the best way to learn Totem is by building things, so I use this part of the handbook as a reference when I want to create a particular kind of joint or geometry in one of my own projects. However, you can often work things out for yourself once you understand the logic of how the various parts fit together.
Detailed Review of the Robotics Kit
In order to do a detailed review of the Robotics Kit, I’m going to break it into several subsystems:
- Totem Maker – These are the Totem construction components: the beams, boards, and connectors form the skeleton of the bots.
- Tools -- The special Totem tool set.
- Wheels, etc.
- Motors – A selection of motors and servo motors.
- The Mini Control Board X3 – This is the brains of the system that drives the muscles that move the skeleton.
After taking a quick look at these components individually, I’ll describe building all the bots.
Totem Maker
The Robotics Kit is based around the elegant Totem Maker system. This is a set of components that you can use for making just about anything really. Provided you can express your idea as joined beams and flat boards, then you can make it using Totem. The system doesn’t do curves, but anything angular is quite feasible. If you look online on the Totem site (see Resources), you’ll see that people are making some amazing things with it. It’s not just for robotics. The whole system is based on a 5 mm x 5 mm hole/slot matrix, M3 threads, and a preference for 90° and 45° angles. The Totem Robotics Kit includes the following Totem Maker components (refer back to Figure 2 and Figure 5):
- I Beams – 10 mm x 10 mm x 400 mm ABS with slots through the flanges (the top and bottom of the I) at 5 mm pitch and holes through the web (the downstroke of the I) also at 5 mm pitch.
- Slot Nuts - M3 6x10 nuts that fit in the I beam slots. These push into the slots so that their central threaded hole lines up with the hole in the beam.
- Bolts - M1.6, M2.5, and M3 bolts (various lengths).
- Seventeen types of brackets.
- Aluminium strip brackets in various lengths for reinfo rcing.
- Perforated ABS boards (100 mm x 100 mm) with 5 mm hole pitch.
- A special set of tools for cutting beams and boards.
- Documentation – Very clear user manual, online assembly instructions, and videos available on the website.
- Misc. – Various 3D printed plastic components for mounting motors, etc.
The beams and boards are made of ABS which is the same plastic that LEGOs are made of. Rather than coming with a range of different beam sizes as you might expect, the Totem system comes with 400 mm beams that you cut to size as needed. You do this using the Totem Beam Pro Cutter that makes the process both accurate and easy.
This is a very flexible approach because (provided you have a stock of 400 mm beams) you’ll always be able to cut whatever size you need. I think that for the amateur, this is quite a big deal because it means that you don’t have to keep a large stock of different beam lengths, many of which you may never use.
In fact, when I look at my stock of Maker Beam aluminium extrusion, I find that I invariably have a surplus of those lengths that I don’t use much and a lack of lengths that I use a lot. This can never happen with Totem.
The same cut-to-size principle applies to boards. However, for convenience, there are some pre-cut boards in the Robotics Kit. This is a good job because board cutting in the Robotics Kit isn’t nearly as refined as beam cutting, but I will defer this discussion until the section on the special Totem tools.
I think a lot of people worry unnecessarily about using plastic for robots. You’ll find that ABS beams and boards are strong and rigid enough for most hobby robotics applications, and even some professional ones. Okay, you aren’t going to win the next Robot Wars with a plastic robot, but for small robots, plastic is much easier to work with than aluminium or steel and it generally works just fine.
Should you need extra strength and rigidity, the Robotics Kit provides aluminium strip brackets that you can add to the plastic beams to strengthen and stiffen them. This is a clever combination that gives you the best of both worlds. ABS parts are simple and pleasant to work with, while aluminium parts provide strength where needed.
Because strength usually equates to weight, good robot design only applies strength where it’s needed. Using this principle will keep your robots light, strong, and efficient, and the Totem system encourages this.
Totem construction involves three activities:
- Cutting beams and boards to size or finding appropriately sized beams and boards that you have already cut.
- Inserting M3 6x10 nuts into the appropriate beam slots.
- Fastening it all together with brackets and M3 series nuts and bolts.
The basic premise of Totem Maker is that you create the geometry you need by cutting beams and boards to size and joining them using M3 6x10 nuts inserted in beam slots, M3 nuts and bolts, and a whole array of different types of brackets. The genius of the system is that the 17 different types of brackets allow for an incredibly wide range of different connection geometries.
These brackets can also make hinges, so you aren’t constrained to specific angles. I think it’s highly likely that Totem is the most flexible build system out there, but I can’t say for sure because I haven’t tried them all.
Totem structures are inherently easy to modify because you can push a nut into a slot anywhere along a beam to create a new connection point. This allows you to easily build up your construction as you go along.
If you’ve used a system such as Maker Beam, you’ll be quite familiar with having to partially disassemble structures to make modifications because bolts only slide in from the end of the beam (yes, I know about Maker Beam T bolts, but I don’t use them because they don’t grip very well).
Disassembly is hardly ever necessary with Totem because you can just pu sh a nut into a slot to make a new connection point. One of the tests I did for this review was to see how easy it was to replace a beam in an existing structure. Obviously, there are geometries that completely lock beams in, but provided you can access all the bolts, I found I could take a beam out and replace it with a new one with ease. This is very impressive.
Slotted brackets allow you to deviate from the natural Totem 5 mm pitch. This flexibility is very welcome and completely solves the common problem of mismatch of hole spacings when trying to line up a metric build system with Imperial components. There’s enough play in the slots so that you can adjust for anything. This is very handy when mounting servo motors. The whole system is elegant and ingenious, and I can see why Totem has patented it worldwide. It seems to me quite revolutionary in the unprecedented flexibility it gives the maker. The system can appear complex at first because of the wide range of brackets, but once you start building, you get the hang of it very quickly and it becomes quite natural and even addictive.
I like the Totem Maker system immensely. So much so that I have just used it in a Nuts & Volts article to make the chassis for my SoftPot Ribbon Controller for voltage controlled analog synthesizers (see Resources). I wish I had come across this system sooner because some of my earlier Nuts & Volts electronic music projects would have benefitted from it. I shall certainly use it extensively in the future.
Tools
An important point about the Robotics Kit (and Totem in general) is that it’s a complete system. Not only are there all the mechanical components, but there are special tools that enable you to measure and cut beams and boards with great accuracy. In fact, success with Totem Maker is predicated on the use of these special tools, and you are unlikely to get satisfactory results should you decide not to use them. Fortunately, they work so well that you really won’t want to use anything else. Figure 6 shows the four main tools included in the Kit.
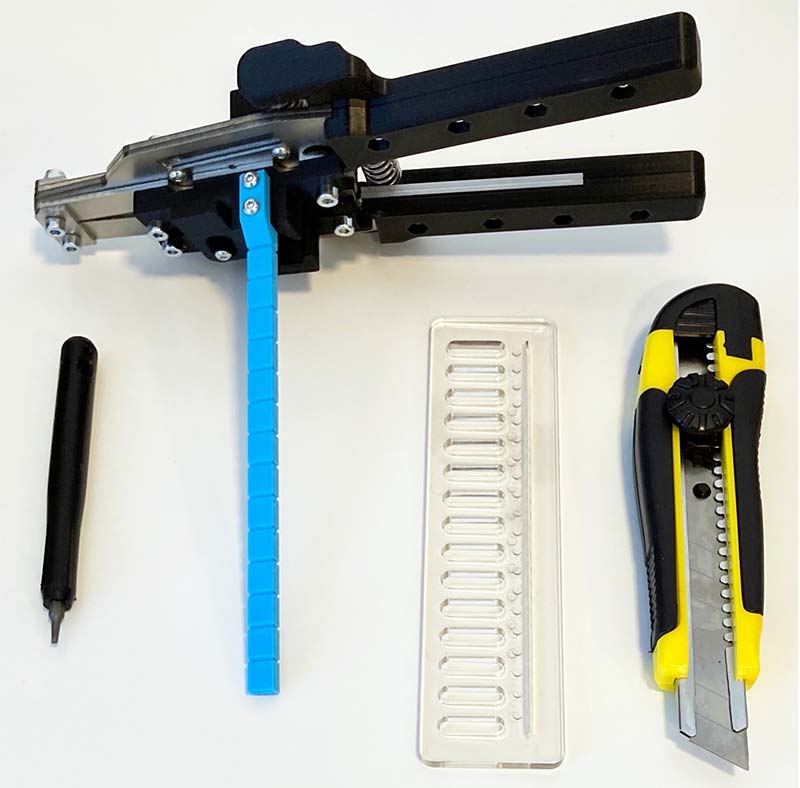
Figure 6: From left to right: Totem magnetic screwdriver, beam Pro-Cutter, board cutter, and knife.
Starting from the top of Figure 6, we have the Beam Pro-Cutter for cutting beams. This curiously satisfying tool is like a big pair of scissors that allows you to cut beams quickly with perfectly square ends to exact 10 mm increments ranging from 10 mm up to the length of the beam. It works beautifully and is fun to use.
The only issue I had with it was that very occasionally you can get a bad cut if you don’t align the beam correctly. If you try to clean this up with another shallow cut, it can leave slivers of plastic inside the tool. These can obstruct the opening and cause the beams to crack when they’re being cut. It’s a puzzling problem when you first encounter it, but it’s very easily fixed just by blowing through the cutting channel to remove any waste plastic.
I should mention that aside from the Beam Pro-Cutter, there are cheaper hacksaw-based jigs available on the Totem site. However, once you’ve used the Beam Pro-Cutter, I think there is no going back.
For cutting boards, the Robotics Kit comes with a large knife and a special acrylic ruler/template called the Totem Board Cutter (see Figure 6, right hand side). As I mentioned earlier, there are pre-cut boards for the seven robots in the Kit, so board cutting is only necessary for your own designs. You need to supply your own cutting mat, which is essential for safe cutting.
One side of the template has pins that fit into the 5 mm pitch holes in the boards for horizontal and vertical cuts, and the other side has pins at a slightly different pitch so you can cut boards at 45 degree angles. The pins secure the Totem Board Cutter to the board so that it can’t slip.
You then cut the board though a slot that guides the knife blade. Normally, I would never use a plastic ruler/template with a craft knife but because the Totem Board Cutter is 4 mm acrylic, it’s robust enough to give me confidence that it’s safe.
The Totem Board Cutter is clever and it works, but for me it’s the weakest part of the Robotics Kit. I found it difficult to cut the boards using the knife because it required a lot of pressure and several passes, and the knife tended to bind in the ABS. The good news is that the holes in the boards seem to keep the knife pretty much on track, so the blade doesn’t wander much.
This seems to be because you cut from the center of one hole to the next, so the point of the knife continually falls into a hole which tends to re-center it. After a few trial cuts, I got the hang of it somewhat, but it’s the one part of the system that I didn’t enjoy using.
Although the template is okay, as a luthier of 30 or so years of experience, using a plastic template with a sharp knife goes against most of my better instincts. Totem has a rather whimsical guillotine-type device called the Totem Board Pro-Cutter (Figure 7) that’s available for a few tens of dollars.
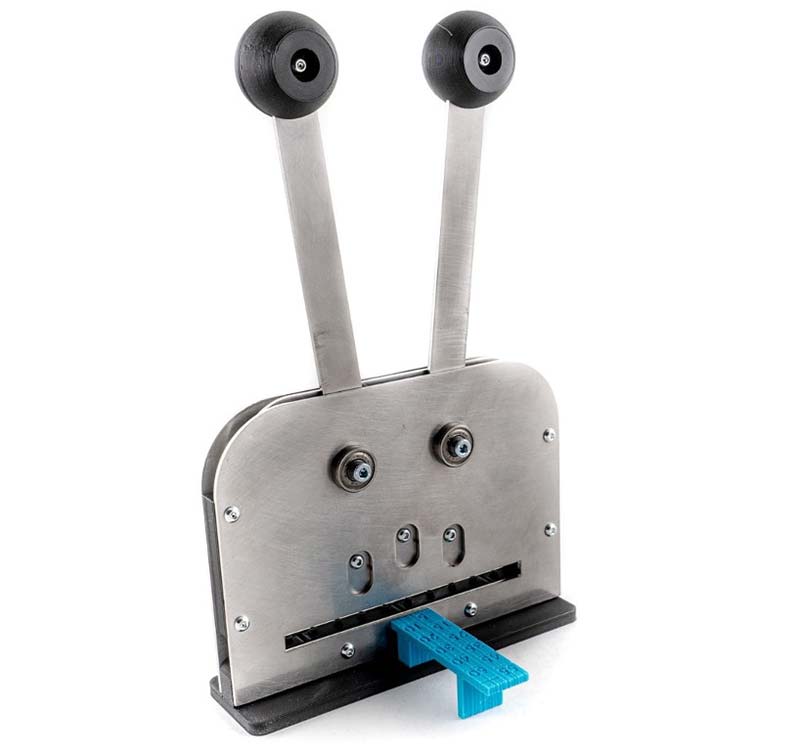
Figure 7: Totem board Pro-Cutter. This is not included in the Robotics Kit but is an essential add-on if you’re going to cut a lot of boards.
It cuts boards easily, accurately, and safely, although not at 45 degrees. I would strongly recommend buying one if you have a lot of boards to cut, or if you’re giving the system as a present to a child.
The only other standout tool is the screwdriver (Figure 6, left-hand side). This has a very high power magnet so you can use it for picking up parts and offering bolts up to the brackets and nuts. It might sound like a small thing, but it makes the whole build process much easier and more enjoyable. It’s thoughtful touches like this that make the system such a pleasure to use.
Note that the bit is held in the plastic screwdriver by a super strong magnet, so if you use the screwdriver to help to push nuts out of beam slots, the bit can jam in the slot and come out of the screwdriver body without you noticing. I thought I had lost the bit at one point, but it was just stuck in a slot!
There are a few other tools included: a tiny screwdriver; a couple different types of spanner; a hex wrench; and a very useful 3D printed jig for aligning servo motors. All these work as they should, and the servo jig is particularly useful. The included tools are really all you need. As I was building the robots, I kept track of any of my own tools that I used.
The only tools I included were a pair of side clippers that I used to snip off part of a cable tie, a pair of snipe nose pliers to remove a recalcitrant M3 6x10 nut from a slot, and a cutting mat. Nothing else! It really is ready to go out of the box.
Wheels, Etc.
The Robotics Kit includes:
- Four large wheels with tires.
- Four small wheels with tires.
- Two bearings used in 3D printed castors.
- 3D printed gripper with dedicated micro servo motor.
- 3D printed parts for castors, servo mounts, etc.
- Some elastic bands (used in the Hockey Bot).
There’s not much to say about the wheels. They are the usual suspects that you can find in any number of robotics kits. They are readily available online if you want spares.
The gripper is a nice touch because you often pay extra for this sort of thing. The 3D printed parts are printed in PLA on Prusa I3 MK3S+ printers. They are of very high quality, and I had no problems with fit and finish, hole clearances, etc. The holes are never tapped, and in some cases, you cut a thread by screwing in an M3 bolt. This is no problem, but younger users may need help. As well as simplifying some of the builds, these 3D printed parts illustrate the great results you can get with a decent 3D printer.
Totem provides a library of 3D printable parts that you can download and print yourself (see Resources). This includes a useful selection of motor brackets. There is also a Sketchup library of Totem parts, allowing you to construct 3D models of your robots if you have access to the Sketchup 3D CAD package.
Motors
The Robotics Kit comes with:
- Four large yellow DC geared motors 1:48 6V with JST PH 2.0 female connectors.
- Two high torque N20 DC geared motors 75:1 6V 400 RPM with JST PH 2.0 female connectors.
- Two mini servo motors with DuPont female connectors.
- A micro servo motor that is part of the gripper with a DuPont female connector.
The motors are all commonly available models and are exactly what you would expect for a kit such as this. They are more than adequate to drive the various robots.
It’s good to have a couple of high torque motors, as well as the four DC motors, and it’s nice that the gripper has its own dedicated micro servo because this leaves the other two mini servos free. The motors all plug into ports on the control board and there are four ports for DC motors and two ports for servo motors.
Mini Control Board X3
The Mini Control Board X3 (Figure 4) is a motor controller that connects via Bluetooth to the TotemMaker app for Apple/Android phones/tablets that lets you control the motors remotely. The board has six motor ports:
- Four DC motor ports.
- Two servo ports.
As I mentioned earlier, this board is for remote control of motors only, and there are no other input or output ports, or ports for sensors. Should you need a programmable board that can handle sensors, Totem sells the RoboBoard X4, which is compatible with the Totem app.
The Mini Control Board X3 has 12 onboard RGB LEDs, but these are not accessible from the app and are only used by the board itself to indicate its state. I think this is a bit of a missed opportunity as it would be fun to control them remotely.
The board comes with a small LiPo 3.7V 250 mA battery and USB charger, so once you provide an Apple or Android device you have everything you need to get started.
The Totem App
I used the iPhone/iPad version of the app and didn’t get the chance to test the Android version. The app is very straightforward, and the main screen is shown in Figure 8. This is divided into two panes.
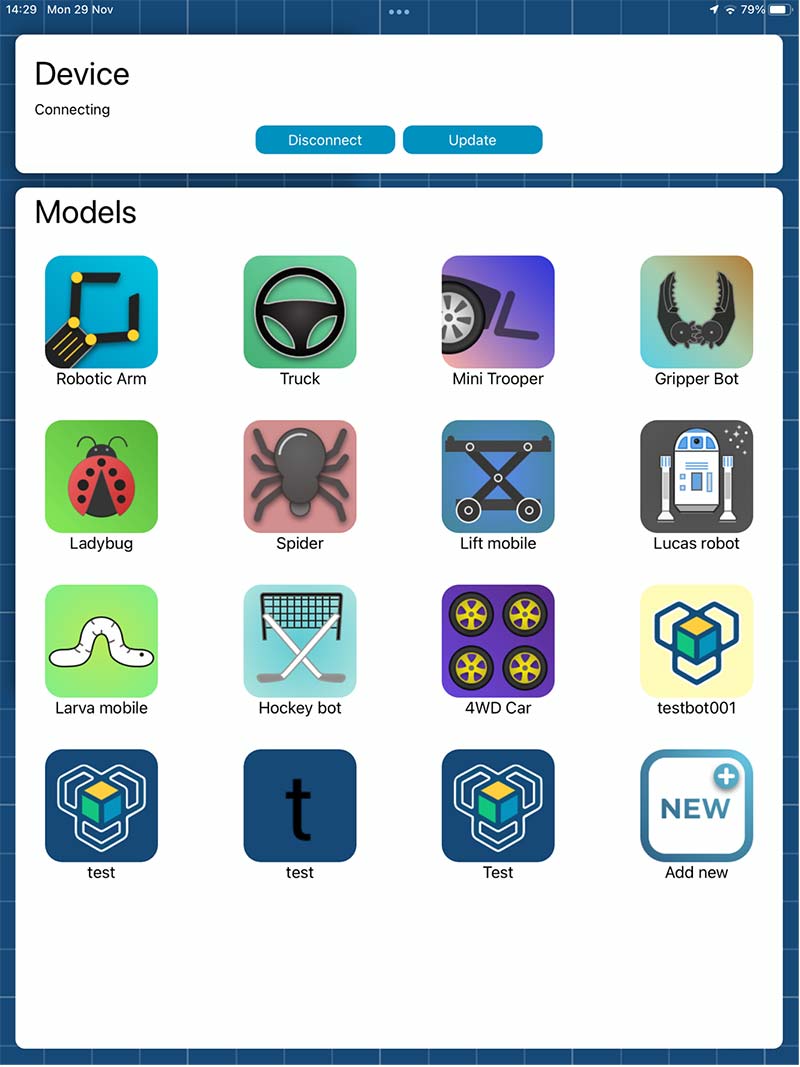
Figure 8: Home screen of the Totem app.
The top pane is labelled “Device.” This is where you connect to a Totem board which, in this case, is the Mini Control Board X3. The Bluetooth connection on the iPhone/iPad is a breeze because the app automatically finds the board and allows you to connect. I haven’t tried it on Android, but I expect it’s a similar experience.
In the bottom pane, we have the “Models.” These are control applications for various bots. The app comes configured with models for several Totem robots, including the seven in the kit and some other bots available for purchase on the Totem website.
Select your bot model from the main screen and the app displays an appropriate set of controls configured for it. Figure 9 shows the model for the Lucas Robot.
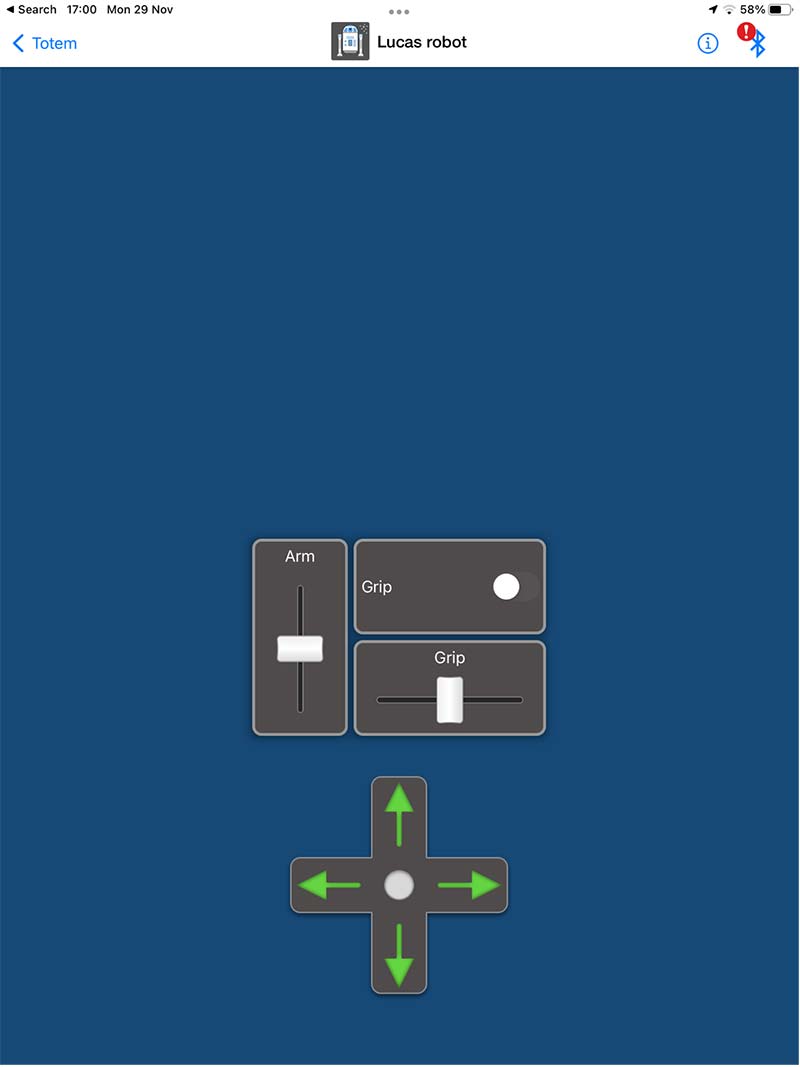
Figure 9: The model for the Lucas Robot. In the Totem app, robots are remote controlled by “Models.”
The controls are simple but effective:
- A joystick to control direction.
- A slider to extend and retract the arm.
- A slider to open and close the gripper.
- A toggle to fully open and close the gripper.
Apart from the built-in models, it’s easy to create a model for your own robots; just select “NEW” from the main screen. You’ll be asked to name your bot, and then you’re put into a drag-and-drop “Edit” mode where you can drag control widgets onto a canvas to create a remote-control interface for your bot. This is shown in Figure 10.
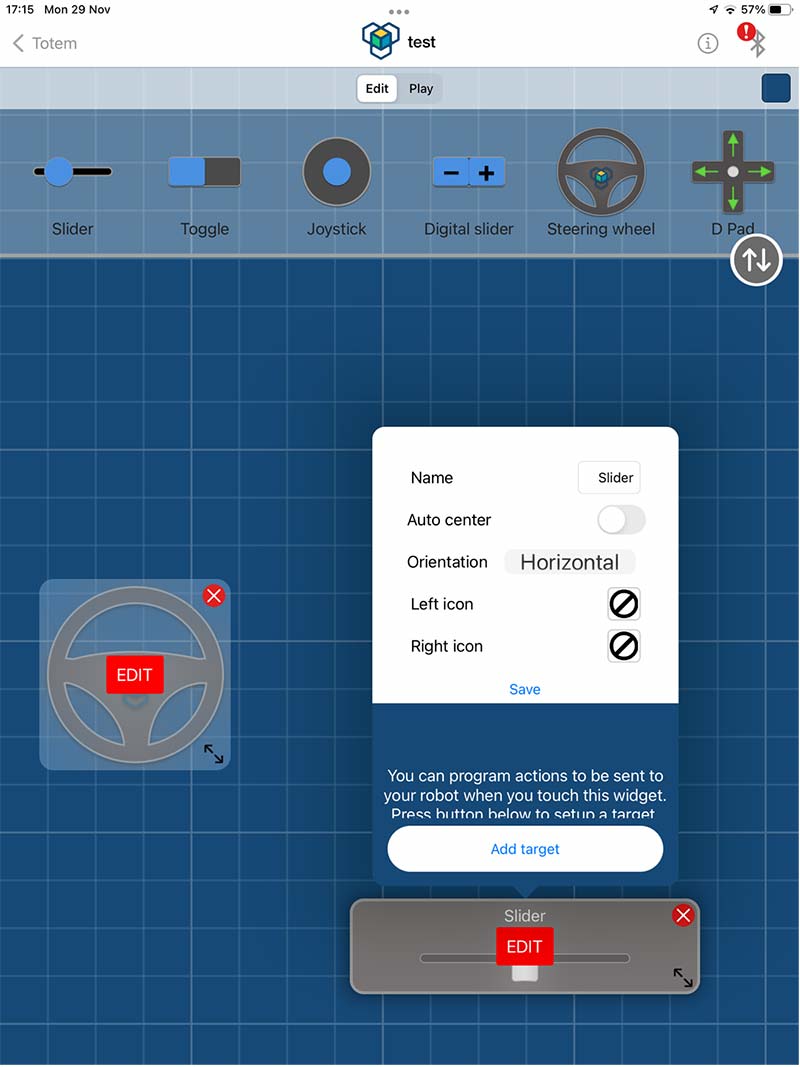
Figure 10: The Totem app in “Edit” mode. This allows you to create a model for your bot.
The canvas has two modes selectable at the very top of the screen:
- Edit – Allows you to create your model.
- Play – Allows you to run your model and control your bot.
There is a good selection of widgets:
- Button
- Slider
- Toggle
- Joystick
- Digital Slider
- Steering Wheel
- D Pad
Sadly, there’s no widget for the RGB LEDs on the control board. Once you’ve placed a widget on the canvas, you select the big red EDIT button. This takes you into a dialog box where you can configure it.
Figure 10 shows the edit dialog for the Slider widget. Configuration involves:
- Giving the widget a name and (optional) icon.
- Optionally changing a few parameters (depends on the widget).
- Giving the widget a target.
Clicking on the “Add target” button (Figure 11) allows you to select a control board for that widget.
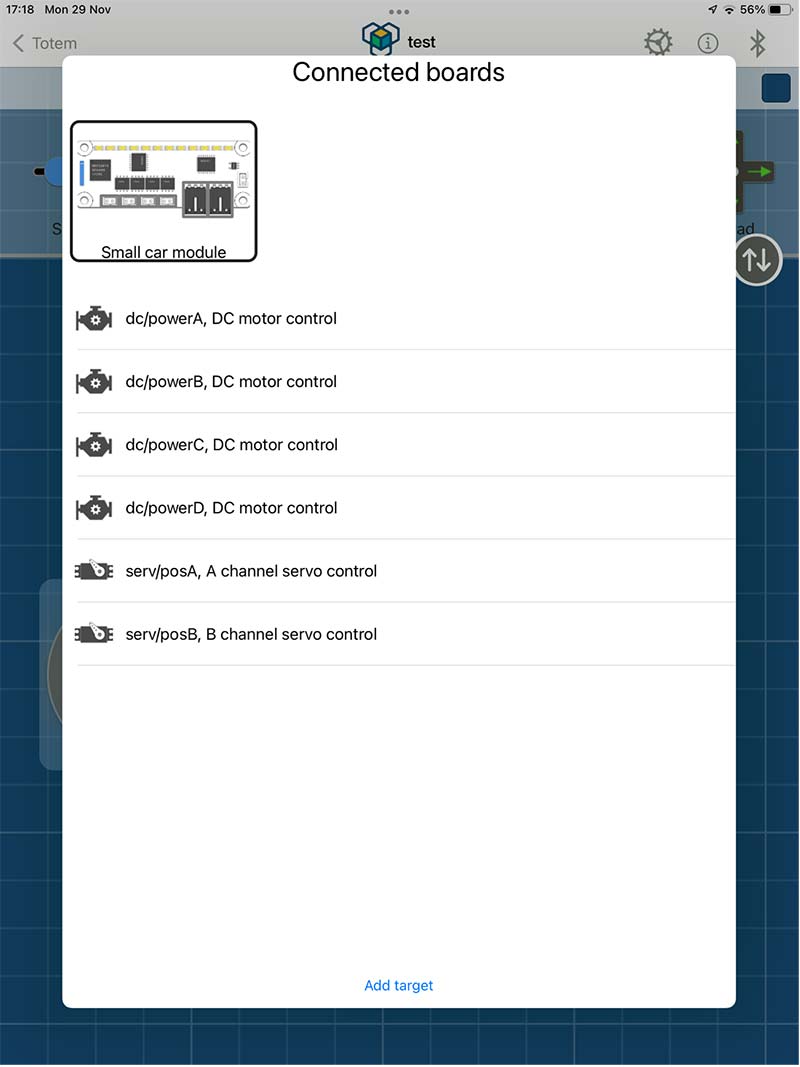
Figure 11: Adding a target for a widget.
It looks as though you can have several boards connected, but as I only had one, I had no way to test this. The Mini Control Board X3 is listed as the “Small car module,” but as there is also a picture of the board this isn’t really a problem.
When you select a board, you see a list of the motor control ports for the board, and you can make one of these the target for the output of a widget. This allows the widget to control a particular motor on your bot. The mechanism is simple and effective.
The simplest widget is the button which has a single editable parameter called “Intensity” that can be set to a value from 0 to 100. If you set Intensity to 50 and connect the widget to a motor, the motor will rotate in the forward direction at 50% (approx.) of maximum speed whenever the button is pressed.
You can optionally invert parameters, which makes the motor go the other way.
Overall, it’s very easy to create custom models for your bots. If something doesn’t do what you want, then you just tweak the parameters of the appropriate widget until the bot behaves. No programming is required.
Building the Robots
I started with the simplest bot (4WD) and progressed through all seven. It was a very positive experience! I had no problems with any of the instructions, and the bots all worked as advertised.
It’s a good idea to build the bots in the suggested order because they start simple and rapidly gain in complexity.
4WD
This is the simplest bot (see Figure 3, top right). It’s essentially just a chassis with a motor and wheel at each corner. The 4WD model comprises a four-way joystick that allows you to move the robot forwards and backwards and turn it left and right. It’s agile and moves well.
As you might imagine, this is the easiest bot to build and is a great introduction to building with the Totem system. Despite being simple, it’s still good fun.
Gripper Bot
This is where it gets more interesting! This bot (see Figure 3, right-hand side, third from top) has two high torque motors so that you can steer it; one servo to control the extension of the gripper arm; and the gripper itself, which is equipped with its own micro servo.
This bot is surprisingly easy to build and utilizes several 3D printed components to aid construction:
- Two N20 motor brackets.
- One servo bracket.
- Gripper with built-in micro servo.
- 3D printed jig for aligning the servo motors.
The gripper works very well, and you can easily pick up small objects and carry them around. The bot is great fun and I was quite sorry when I had to disassemble it to make the next bot.
A couple of things to note about this build: Firstly, you must choose the right set of 3D printed N20 motor brackets. There are two sets of these for different bots, so you need to check the build instructions carefully to ensure you use the right ones.
Secondly, the N20 motors are mounted using tiny M1.6x3 bolts that are a bit fiddly and very easy to lose. You get five of these (there’s one spare), but I would have appreciated a few more spares just in case.
The app has a four-way joystick to control movement and two sliders. The first slider controls the extension of the arm, and the second slider controls the opening and closing of the gripper.
Mini Spider
This is a more complex build. There are a few points to note:
- If you’ve already mounted the N20 motors on 3D printed brackets for the Gripper Bot, note that the Mini Spider needs them mounted on a different set of 3D printed brackets. The difference is the brackets for the Gripper Bot have a recess and the Mini Spider brackets don’t. However, it can be a bit hard to see this difference in the assembly instructions.
- There are a lot of crossing aluminium beams, and you need to get these in the right crossing relationship to each other. The instructions are clear on this, but you’ll need to follow them carefully.
- The M3 lock nuts are pretty much single use, and once you have reused them a few times, they don’t lock very well. Try to use new ones for this bot because it does tend to shake them loose.
Once again, the assembly in structions are excellent and if something isn’t working, check the instructions again and you’ll find the solution.
The Totem system allows easy disassembly, so it’s generally simple to fix any problems. I had to replace the N20 brackets (yes, I used the Gripper Bot ones by mistake) and it was no problem.
The interesting feature of this bot is the way rotary motion is converted into the back and forward movement of the legs. The mechanism is very clever, and you can learn a lot from a study of it.
The bot has no feet, just cut beam ends, so it can slip a bit. Once it gets going, it goes well, and the scuttling motion is highly entertaining. It certainly got the seal of approval from my cat who actually woke up for a moment to watch it.
The app has a four-way joystick, and there are also two sliders to individually control each motor.
Lucas Robot
Yes! This is the droid you’re looking for! This complex build — both in terms of geometry and mechanism — starts to show what you can do with Totem. Construction of the vaguely R2D2 shaped chassis illustrates how to create octagonal structures.
This is done using special 45 degree brackets and plastic pieces called “double side fillers” to fill in the gaps when the beams are joined at 45 degree angles.
At first, you might think these fillers are just cosmetic, but they aren’t. They make the structure significantly stronger.
The result is very strong, rigid, and neat looking, and is an excellent illustration of the cleverness and attention to detail you get with this system.
There are a few points to note about the construction:
- Because it’s so complex, it’s built in 11 parts that are finally assembled. Provided you build each part as described in the build instructions, you won’t have any problems. Be careful with part 5 to insert all the 6x10 nuts in each of the C structures. Somehow, I managed to forget a couple, but managed to insert these later in the build when I found out they were missing.
- The N20 motor mounts are the recessed ones used in the Gripper Bot.
Having two wheels with high torque motors and a caster, the bot is fast, agile, yet controllable. The app allows you to steer the bot, raise and lower the arm, and open and close the gripper. The app has the usual four-way joystick to control movement. It also has a slider to raise and lower the arm, another slider to control the opening of the gripper, and a switch that sets the gripper to fully open or closed.
Hocky Bot
This is another very interesting robot! It has a castor and two powered wheels, so it’s very fast and steerable with forward, backward, left, and right controls. There are two other controls to operate an arm which acts as a hockey stick.
The first control causes the servo to pull the arm back and hold it, thereby storing energy in a stretched elastic band. The second control turns the servo further, causing it to release the arm. The elastic band then flicks the arm forwards. The action is very clever, and the bot can hit a ball quite hard. You can certainly imagine having great fun playing a game of robot hockey if you had a couple of these.
Compared to the Lucas Robot, this is a relatively quick and easy build, but it demonstrates how you can store energy in an elastic band and release it on demand very well. The app has a four-way joypad to control motion. There’s a button to draw back the arm and another button to release it.
Larva Mobile
The Larva Mobile behaves a bit like an inchworm or caterpillar. It pulls itself along by extending an arm, and then pulling the rest of its body after it. The movement is achieved using two servo motors where one motor extends and retracts the arm, and the other motor controls a castor, so the bot is (somewhat) steerable. A very simple rachet is applied to the wheels so they can only turn in one direction. This stops the bot moving backwards when it pushes the arm forwards. The rachet means that the bot can only go forward and turn left or right. It can’t reverse.
The bot looks very odd, but the build is quite easy. I didn’t come across any gotchas or problems.
The app is very simple, and there are only two controls. The “Extend” button when pressed extends the arm and retracts it when it’s released. This pulls the bot along. The “Slider” button allows you to turn the castor on the front part of the bot left or right so that it can be steered.
Lift Mobile
The Lift Mobile has four wheels on each corner just like the 4WD. It adds to this a platform that is raised and lowered using a scissor mechanism driven by two servos. This mechanism pulls the front and back wheels closer together, causing the platform to raise in height but stay level. The bot illustrates the scissor lifting mechanism very nicely indeed. However, I did have a small problem with the platform not self-levelling. The platform is pivoted on one end and rests on two supports at the other. Gravity should be enough to keep it level, but I found that there was too much friction in the pivot, which I could not reduce.
While the platform would go up nicely, it did not self-level on the way down because the pivot was sticking. The problem was easily solved by putting a small weight on the platform. The build is quite straightforward, but you need to take your time getting the servos correctly aligned using the special jig. Also, because of the unusual geometry of the bot, the assembly diagrams can look rather complicated and it’s easy to get things the wrong way around. However, if you follow the instructions carefully, it’s a lot easier than it looks.
The app for the bot comprises the four-way joypad (like with 4WD) to steer forwards, backwards, left and right, a slider to raise and lower the platform, and two controls that set the back wheels turning forwards or backwards while keeping the front wheels fixed.
I don’t really see the point of these last two controls because they just cause the bot to shuffle forwards, backwards, or around in a circle depending on the friction between the wheels and the floor. Because both Lift Mobile and 4WD use the same motor configuration, their apps are interchangeable, so you can use the Lift Mobile app to drive the 4WD motors and vice-versa.
Final Thoughts on the Builds
A few things stand out to me. Firstly, the build instructions are excellent with every step clearly diagrammed and labelled. I didn’t find any errors. Secondly, the build process is generally easier than it looks. When you first look at the build instructions, they can seem complicated, but when you have the physical components in your hands, it becomes obvious how things must fit together.
All the bots work as advertised and are great fun to build and operate. Each demonstrates an interesting engineering principle as promised in the documentation.
There are just enough components to build the larger bots. I was able to build 4WD and Gripper Bot, but then I had to disassemble them to build the other bots. You can buy extra components from Totem if there is a bot you particularly want to keep.
Final Thoughts
I thoroughly enjoyed using the Totem Robotics Kit. The completeness is first rate. You can just open the box and start building. There are also many other positives:
- The ease of use.
- The ability to easily size beams and, to a lesser extent, plates.
- The flexibility in being able to put a connection point almost anywhere.
- The obvious care and thought that has gone into the whole system.
- The excellent documentation.
- The thoughtful selection of bots to build.
Are there any negatives?
- I don’t like the plastic board cutting template (even though it does work) and I recommend investing a little more money to buy the Totem Board Pro-Cutter.
- I would like a few more of those tiny M1.6x3 bolts because they’re easy to lose.
Apart from these two minor points, I can’t find anything at all to dislike. It does exactly what it promises to do, and it does it well. What more could you want? Is there anything I would improve? As the box says, these bots are “real life engineering examples” and as such, it would be nice if there were some supplementary materials that went into a bit more detail about the engineering principles demonstrated in each bot.
Another nice option to have would be if the Totem app allowed you to control the 12 RGB LEDs on the controller board. I think this would really add to the fun.
Finally, I think the app could allow the built-in models for each of the seven bots to be editable (or at least viewable), so you can see how they are set up. This isn’t currently the case.
Is there anything I would like to add? The kit is complete, but it’s the sort of thing that leaves you wanting more. It would be nice to see an add-on kit of some sort that includes a programmable board, some sensors, and designs for a range of programmable bots. After building the seven remote control bots, programmable bots with sensors are the next logical step.
I have had a great time building the seven bots and I can wholeheartedly recommend the Totem Robotics Kit for anyone wanting to get into robotics. I imagine it will be very useful in educational establishments, but I must stress that this kit is not just for beginners or education.
The incredible elegance and flexibility of the Totem Maker system provides much of interest even to the advanced builder, and as I already mentioned, each bot demonstrates interesting engineering. As for me, I shall continue to use Totem in my future robotics projects and for chassis for my electronics projects in Nuts & Volts where appropriate.
So, to answer the question I raised at the start of this review: Have I found a simple, effective robot building system that has all the necessary tools and other bits and pieces, that doesn’t require extensive mechanical engineering skills, and that is reasonably priced?
The answer is yes! It is the Totem Robotics Kit. SV
Resources
Totem Robotics Kit
https://totemmaker.net/product/robotics-kit-7-real-life-engineering-examples/
Totem Maker
https://totemmaker.net
Totem Maker 3D Printable Parts (Printables)
https://totemmaker.net/wikis/printables/
Totem Blog – See what you can do with the system
https://totemmaker.net/blog/
3D Printed Tools for the Totem Maker System (by Jim Arlow)
https://www.prusaprinters.org/social/164654-jsa/collections/90757
SoftPot Ribbon Controller – Nuts & Volts, Issue-6 2020
LASERVox Article
https://www.nutsvolts.com/magazine/article/build-the-laservox-midi-laser-theremin
FLiPVox Article
https://www.nutsvolts.com/magazine/article/build-the-flipvox-laser-theremin
Parallel Processing with the Propeller FLiP by Jim Arlow
https://www.nutsvolts.com/magazine/article/parallel-processing-with-the-propeller-flip
Nuts & Volts – 2019 Issue 3 – page 40
Eurorack
https://en.wikipedia.org/wiki/Eurorack
Behringer Crave
https://www.behringer.com/product.html?modelCode=P0DPX
Dreadbox
https://www.dreadbox-fx.com/chromatic-modules/
Patch & Tweak
http://patchandtweak.com
East Coast vs. West Coast Synthesis
https://reverb.com/news/the-basics-of-east-coast-and-west-coast-synthesis
Article Comments