
The Self-Playing Xylophone
By Karina Melgar, Zoe Chen, Harris Miller View In Digital Edition
Programmed to play 23 snippets of our favorite songs on a toy xylophone!
This project combines our love for music and electronics into a xylophone capable of playing some of our favorite songs through servo-controlled mallets driven by an RP2040 microcontroller. Users simply specify their chosen song through a serial interface and then just sit back and relax!
We developed a system that can play a user-specified song on a toy xylophone with low-cost electromechanical components.
| Part Name | Vendor | Part Number | Qty |
| 2-in-1 Baby Piano Xylophone | Toysery | - | 1 |
| Micro Servos | Deegoo-FPV | SG90 | 8 |
| Jumper Wire Kit | Austor | - | 1 |
| Breadboard | HiLetgo | MB-102 | 2 |
| Raspberry Pi Pico | Raspberry Pi Foundation | - | 1 |
| Krazy Glue | Krazy Glue | KG517 | 1 |
| Foam Padding | Homchek | 796917971358 | 1 |
| NPN Optocouplers | Vishay Semiconductors | Lite-On | 8 |
Table 1. Off-the-shelf components.
| Part Name | Size | Qty |
| Acrylic Xylophone Mallets | 6 grams | 8 |
| PLA Printed Stands | 14 grams | 4 |
| Birch Wood Servo Mounts | 7 mm2 | 1 |
Table 2. Customized components.
Our “self-playing xylophone” contains 23 programmed songs, ranging from a simple major scale to Christmas songs such as the “Carol of the Bells” to pop songs like “Love Story.”
The user requests a song via a graphical user interface accessed through a serial monitor, then listens as the mallets strike out the tune on the xylophone. The system consists of an RP2040 microcontroller that controls eight servomotors — each with a xylophone mallet attached to its horn.
Mechanical Structure
We first designed a structure to hold the servos that strike the xylophone. Our laser cut wooden structure accommodates eight vertically oriented servomotors, so that the shaft sticks out of the side. The 3D printed legs raise the servo mount platform to sit stably on top of the xylophone’s edge. We adhered custom laser cut acrylic xylophone mallets to the horn of each of the servos using super glue and positioned each mallet above a xylophone key. Finally, we inserted another laser cut wooden cover above each of the servo mounts to lock them in place.
The CAD assembly of the structure is pictured in Figure 1.
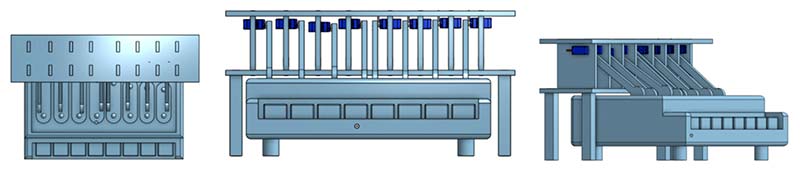
Figure 1. CAD assembly for mechanical structure of servo mounts and xylophone mallets.
We clamped down the structure to the table with sliding bar clamps to ensure minimal movement while a song was being played and alignment between the mallets and keys. During the first few iterations of our design, we noticed that some of the servomotors would jitter after striking a key. We eliminated this issue by adding foam padding for mechanical damping between the upper servo mount platform and the servo mallets (see Figure 2).
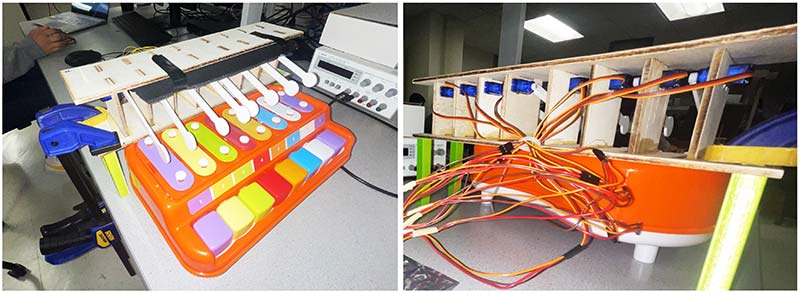
Figure 2. Integration of servo mount structure and mallets with xylophone.
System Overview
On program start, the serial monitor interface displays all the numbered song choices and prompts the user to choose a song as shown in Figure 3.
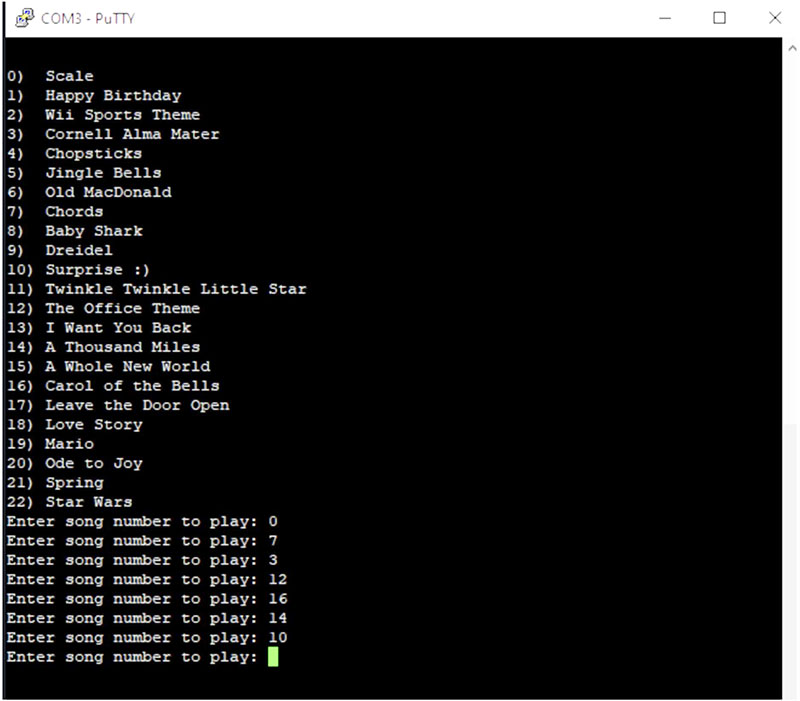
Figure 3. Song selection prompt in serial monitor.
Once the user indicates their desired song by inputting its corresponding number, the program configures its settings using that song’s data. The data includes an array of “notes” for the song, which describes when each servo mallet should hit its respective xylophone key. The data also includes the song’s “beat period,” which is used to set the tempo of the song.
The program loops through the note data until it reaches the specified “end beat.” After a song is done playing, the user can choose a different number to enter into the serial monitor interface to play another song. System functionality can be viewed in our video demonstration at https://www.youtube.com/watch?v=wW3F7tXd-qc&t=198s.
Hardware Design
During the planning phase of our project, we debated whether servomotors or push-pull solenoids were more suitable for controlling the xylophone mallets. The servomotors would need a structure to attach to the shaft and rotate with it to strike a key, whereas the solenoid itself could be used to strike a key as the plunger extends and retracts.
Although it would have been cheaper, a large external mechanical structure would also be needed to mount the servos so they can strike the keys from above — which may lower the presentation quality of the final prototype — and attachments between the servo horns and the xylophone mallets may present a challenge.
Unlike the servos, solenoids could be integrated inside the toy and hit the xylophone keys from below quickly, making faster songs more possible. However, finding solenoids whose specifications match the xylophone’s dimensions could have been difficult.
We ultimately decided to use SG90 micro servomotors and create xylophone mallets to adhere to the servo horns because of the various noises that solenoids can produce (e.g., loud banging, buzzing), which could interfere with the user’s musical experience. We also already had the servos on hand which were easier to use than searching for solenoids that would be small enough to fit inside the xylophone.
Also, we’d have to determine how to package them inside without breaking the xylophone. The driving factors behind these decisions were the need to produce a functional prototype within four weeks and the knowledge that our electrical and software engineering skills far surpassed our mechanical design abilities.
Our project features the Raspberry Pi Pico: a development board based on the RP2040 microcontroller. We connected eight pulse-width modulation (PWM) output pins to opto-isolators and used the output of each for an SG90 micro servo. Independent 50 Hz PWM signals with a duty cycle ranging from one to two milliseconds, corresponding to an angle of rotation of -90 to 90 degrees, control each of the SG90 micro servos.
We used opto-isolators to isolate the lines between the microcontroller and the servos, as the level of noise generated by the servos posed a danger to the microcontroller. Additionally, this allowed us to power the servos according to their own ratings (four to six volts), which is greater than the microcontroller’s capability (3.3 volts).
For hardware peripherals onboard the RP2040, we used the PWM module, the timer module, and one of the UART modules. The setup section of our program configures these hardware modules. The RP2040 features two ARM Cortex-M0+ cores, but we elected to only use one for this project (Figure 4).
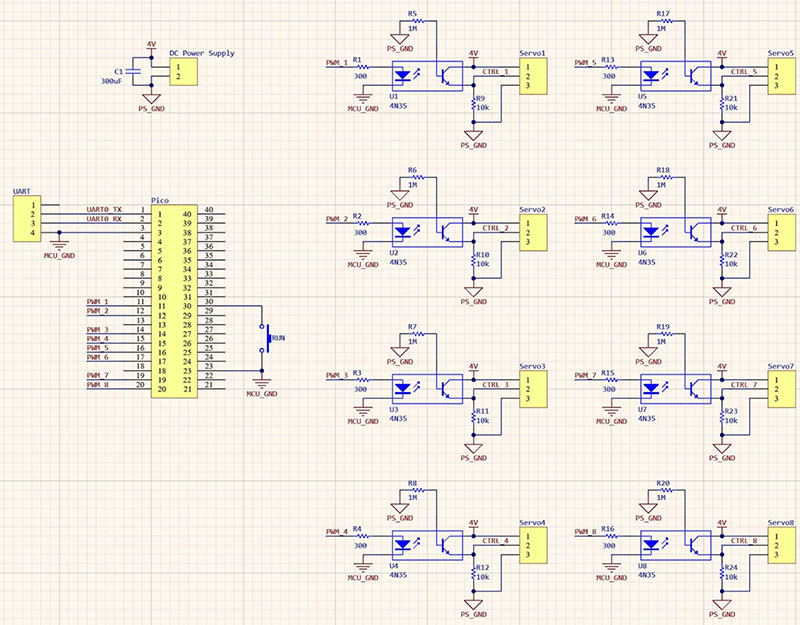
Figure 4. Electrical schematic.
Generating Songs
We generated a song’s note data which is used for determining when a servo mallet should strike its key from hard-coded arrays of 0s and 1s for each servo. Rather than manually inputting hundreds of values for each song, we developed tools to help simplify the process of generating song data.
We first created Excel spreadsheets in which a column corresponds to each key of the xylophone (using column A for the lowest key and H for the highest key) and each row corresponds to a single beat period in milliseconds. With this scheme, a single cell in the spreadsheet maps to both a pitch and an instance of time. We entered 1s into cells to indicate that we wanted a particular note to be played during a certain beat.
For example, if we entered a “1” into cell H1 and cell A2, the highest note would be struck first followed by the lowest note after one beat period had passed. Note that a “beat” in this case could represent a quarter note, eighth note, sixteenth note, etc., in sheet music and be varied based on the song for convenience in entering data. We didn’t try to standardize around a row representing a certain rhythmic value. We developed a Python script that parsed these Excel files and generated C structs that contained the data for storing and playing each song. The script automatically inserts 0s wherever there was not a 1 in the spreadsheet, which made the music creation process faster. We decided on this structure because it was easier to visually read and add only 1s to the spreadsheet than it would be to write the arrays of both 1s and 0s from scratch, since 1s were always sparser.
We also found through testing that it was best to add an extra 0 to the front of every array so that the servos pause for a single beat before beginning to play. Without this, sometimes the first note would be played late, making two consecutive notes at the beginning sound as if they were played off-beat.
Once the script processes all the data in the spreadsheet, it prints out the name of the song (from the title of the spreadsheet), a default beat period of 250 milliseconds, the nested note arrays, and the end beat calculated from the row of the final entry (while also accounting for the extra 0). This script formats the output in C syntax for a struct so that we could easily copy and paste it into the music data C file. We updated the beat period parameter while testing each song and tuning its value to produce a desired playback speed (Figure 5).
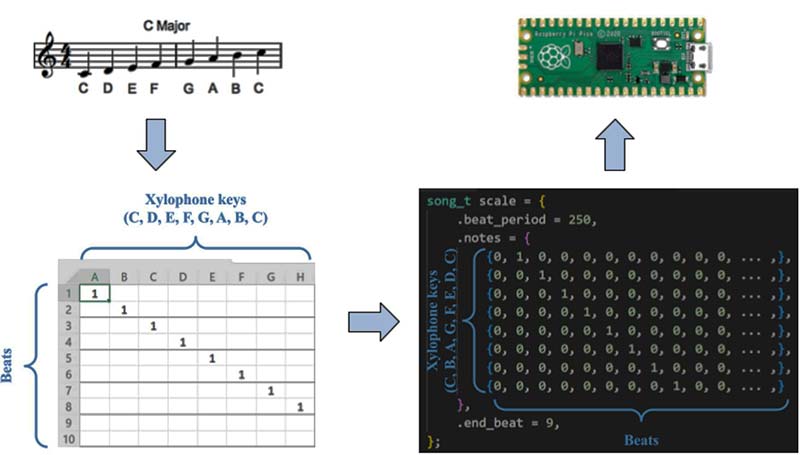
Figure 5. Translation of C major scale from sheet music, to spreadsheet, to code (note: the ellipses in the notes werea not part of the actual code but were only included for abbreviation).
We chose the song list to test the different capabilities of the system. We began with a simple C major scale that played each of the notes from lowest to highest pitch sequentially to verify that each of the servos could be controlled independently. To test playing multiple notes at once, we wrote a simple chord progression that played 3-4 notes simultaneously and verified that all the notes in a chord were synchronized. We also wrote songs to stress test the timing capabilities of the servos.
We created our “Baby Shark” song for testing the repetition of a single note quickly to see if the servo had enough time to strike down, return upright, then strike again on the subsequent beat. We wrote our “A Thousand Miles” song to test how quickly we can switch between different notes. We used both songs to determine the minimum beat period possible with our system. After we devised a set of songs to stress test the system, we filled in the gaps with more fun songs that we enjoyed.
Since the xylophone only contained a single octave of “white keys” (C to C), we were restricted to creating songs whose range could fit onto the xylophone. This meant that some of the songs needed to be transposed to a higher or lower key or have some notes be slightly modified to use one of the available keys. (For example, the xylophone played the final “happy” in the “Happy Birthday” song on a pitch slightly lower than the actual melody of the song.) If we couldn’t make these modifications in a way that retained the essence of the song, then we didn’t program that song.
Software Design
Our program starts by initializing all the hardware modules. First, we activated the UART module and associated it with a pair of GPIO pins to provide communications with the interface over serial. Before initializing any of the PWM channels, we set all the PWM duty cycles to a value that sets the servo mallets to an upright position just above the keys, since the duty cycle of a servo’s PWM input signal controls its position. This prevented the mallets from moving into an invalid position if the PWM channel were initialized immediately.
We then initialized all eight PWM channels by configuring the period of the signal to 20 milliseconds (for a 50 Hz signal). We configured the PWM channels to request an interrupt when they wrap.
After setting up the channels, we enabled interrupts and defined an interrupt service routine (ISR). We used this ISR to update the desired duty cycle for each channel if state transitions requested a change, then to clear the interrupt request.
Our program also has various global variables that store the PWM channel parameters associated with each servo, the state (e.g., mallet up, mallet down, mallet wait) of each servo, the PWM duty cycle values associated with the servo’s resting and hitting positions, a pointer to the current song, and the song’s tempo.
We initialized a repeating timer with an interrupt time of one millisecond and tied it to a callback function that ran whenever there was a request to the interrupt. We used this timer to handle the timing between beats and determine when a servo mallet should strike the key based on the song’s data. Each time the program runs the callback, an internal counter variable increments when loading a song; otherwise, it always remains zero. This provided a simple but time-accurate representation of the number of milliseconds that have passed.
When the user selects a song through the interface, the serial thread sets a current song pointer to the appropriate place in memory that stored the data. The callback function sees this valid song and begins incrementing the time counter. When the counter’s value exceeds the current song’s beat period, the program is ready to play the next note of the song. We also had another counter that tracked the current beat of the song.
At this point, we reset the millisecond counter, looped through all eight state machines, changed the servo position if it had a note to play at that given beat, and incremented to the next beat. This cycle continues until the number of elapsed beats exceeds that of the song’s length. The song then terminates, and the program resets all counters to the default state.
Our program consists of two protothreads: one for handling serial input via a UART interface and one for handling the state machine associated with each servo. Protothreads is a non-preemptive threading library written by Adam Dunkels and ported to the RP2040 by Bruce Land. We added these threads to the scheduler using a custom RP2040 protothreads library. Our serial protothread starts by printing out all the available song options with its corresponding number and waits for a serial input. Once the user provides a valid song option, the program sets the current song pointer to the appropriate song pointer.
Our music-playing protothread provides the rest of the state machine transitions and functionality besides the initial transition provided by the timer ISR. It loops through all the servos and plays the song to completion as described previously before printing all the song options again to the serial monitor. The state machine corresponding to each servo is shown in Figure 6.
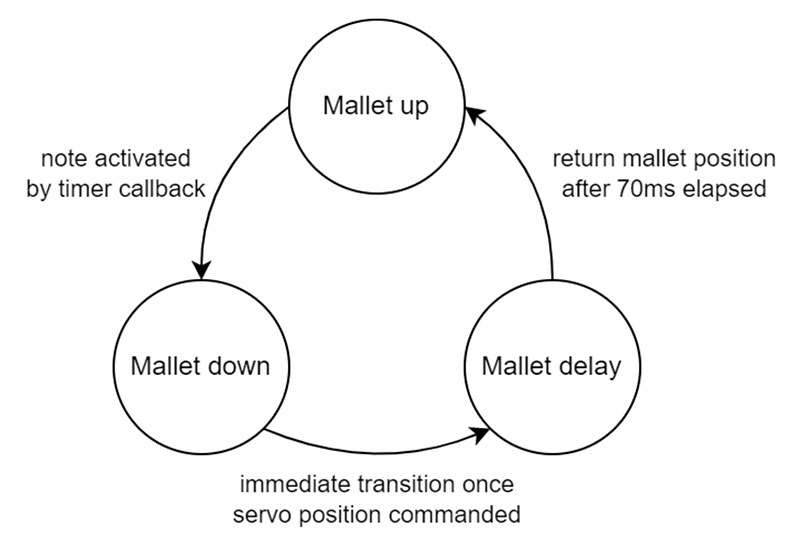
Figure 6. Servomotor state machine diagram.
Results
At the conclusion of this project, we successfully programmed the system to play 23 different songs on the xylophone. Our final song list spans across several genres, from nursery rhymes to holiday tunes to pop songs. The end results of the songs were also easily recognizable to someone less familiar with our system, showing that we achieved proper timing and control of all the servos. All 23 songs can be viewed in our playlist of video recordings at https://www.youtube.com/playlist?list=PLWEfVeX8HZ9Sb3anjh87LhdFNXQEhJz67.
While testing, we did encounter a few difficulties and limitations with our design. One significant issue that arose was the jittering behavior seen in some of the servos. Occasionally, the servo mallet would continuously oscillate up and down after striking a key until we tapped it to stop moving. We found that this was more common when powering the servos at higher voltages than at lower voltages, so we decided to keep the power supply at four volts. It was tedious to keep tapping the mallets while testing and it took away from the self-playing aspect of the xylophone.
After doing some research, the results suggested that these servos were dying, but we couldn’t replace them because they had been glued into the servo mounts. As a solution, we added a layer of foam padding between the tops of the servo mallets and the top lid of the mounting structure to act as mechanical damping. This eliminated the oscillation produced by the jittering servos.
We also discovered issues from playing multiple notes at the same time. To initially test timing and our state machine, we programmed all eight servos using the same PWM channel. We found that playing more than four notes at once resulted in the desynchronization of these servos, which we believe was due to power limitations.
Later, we also attempted this when we controlled each note with an independent PWM channel, but we saw the same response. We decided to leave this issue unresolved due to time constraints and kept it in mind when generating songs, which worked out since none of the songs we wanted to include would ever be playing more than four notes at once. The system performed better than expected with even our fastest songs, such as “A Thousand Miles,” which ended up being our personal favorite. We were limited to a minimum beat period of approximately 130 milliseconds due to the timing requirements of state transitions for moving down and up, but this proved to be sufficient for our songs.
Conclusions
There were some aspects of the mechanical design that we would want to change if given the opportunity. While we encountered issues with servo jitter, we had considered replacing the servos, since we thought the jittering meant that the servos were dying. However, we were not able to easily swap them out since we had hot glued the servos into their mounts as noted. If we could revise this design, we would instead put more thought into how to mount the servos to make them easy to remove. Additionally, we would want to improve the way the foam padding used for damping is added so that it’s neater and more secure.
In terms of electrical hardware, we would want to experiment with using solenoids instead of servos to strike the xylophone keys if we had more time and money in our budget. This would be good to test if we can achieve a faster reaction time from using solenoids, which could enable us to play even faster songs by requiring less time to strike a key. Another hardware experiment would be to try powering the servos at a greater voltage (five volts) after the addition of the foam padding to see if the jittering was still a problem.
For future software changes, we would try to improve our timing by using both cores on the microcontroller, since we had only used a single core on our project. Instead, each core would control half of the servos, which could potentially improve performance. We also would like to determine if we can have the size of our note arrays be different for each song; we currently programmed each to have a fixed length of 160 with extra 0s appended to the end, but that may not be necessary if the size of the array in the struct doesn’t matter.
Overall, we were extremely satisfied with the results of this project. The system can showcase a wide range of musical ability, including crisp synchronization of notes, quickness and agility with fast or repetitive melodies, and realistic recreations of well-known songs. We didn’t expect to be able to play all 23 songs that we had written as intended (or that we would even be able to write and include that many) in our four week timeline.
We had predicted there would be some limitations from both software and hardware that would require us to modify the songs, such as by forcing a song to play at a slower (and less satisfying) tempo or eliminating harmony due to servos not being in sync. However, we still achieved a system that is capable of reproducing each of these songs to our standards and creating music for all to listen to and enjoy. SV
Resources
V. Hunter Adams, “Digital Systems Design Using Microcontrollers,” 2022, https://ece4760.github.io.
Raspberry Pi, “RP2040 Datasheet, A Microcontroller by Raspberry Pi,” https://datasheets.raspberrypi.com/rp2040/rp2040-datasheet.pdf.
Downloads
202205-Melgar.zip
What’s In The Zip?
Code Files
Schematic
Scale Excel File
Music Files
Article Comments