Robotics: How to Get Started — Part 7: Reusable Behaviors
By John Blankenship View In Digital Edition
Experienced programmers often use reusable modules as tools to make it easier and faster to create new projects. This article provides an in-depth study of how to create a reusable robotic behavior.
Earlier articles in this series have covered many aspects of the hardware and software needed to build a robot. While hardware is typically the most expensive part of a robot, it’s the software that gives your robot personality and purpose.
When you first start programming a robot, your initial goals are generally just how to make it move around, followed by how to obtain data from the available sensors. As your abilities progress, you will move on to developing algorithms to accomplish simple tasks. As your understanding of basic algorithms evolves, you’ll consider projects that are more complex and more exciting.
Unfortunately, when most hobbyists reach this stage, they can become overwhelmed every time they start a new project because they typically have to develop all the necessary software from scratch. It’s not that they don’t have a basic understanding of the algorithms that they’ll need, they might have even developed very similar algorithms in the past for other projects.
In many cases though, those previously written algorithms were integrated into the code needed for a different task and that can mean the old code has to be dissected to even understand how the original algorithm worked.
A Solution
One solution to the above problem is to isolate the necessary parts of the specific algorithm into a modular structure that can be reused whenever that robotic behavior is needed. Think of the module as a tool that can be used when building bigger projects. Obviously then, in order to be effective, this tool should be somewhat generic in nature so that it can be used in a wide variety of situations.
Building a reusable robotic behavior will certainly take longer than just developing an algorithm for a specific task, but the next time you need that action for a new project, you’ll realize the value of your efforts.
If you’re new to robotics, you might have found the above discussion somewhat confusing, so let’s focus on a specific example to demonstrate the principles I’m trying to convey.
An Example
Let’s assume you’re working on a simple project where you want your robot to move down a hallway until it reaches a door, then go through it. To keep the example easy to follow and duplicable by everyone, we’ll use the robot simulator in RobotBASIC: a language I helped write and give away free at www.RobotBASIC.org.
We can create one of the hallway walls and a door using the code in Figure 1.
// draw wall with door
LineWidth 10
line 10,100,360,100
line 440,100,640,100
// locate robot
rLocate 80,130,90
rInvisible RED
rPen DOWN
LineWidth 2
Figure 1.
After the robot is located at an appropriate position, three more lines allow the robot to leave a red trail as it moves. Figure 2 shows the output when the code is executed.

Figure 2.
We can move the robot to the door and through it using the code in Figure 3.
// move to door
rForward 320
// go through door
rTurn -90
rForward 40
Figure 3.
When executed, the output is shown in Figure 4.

Figure 4.
Back to the Real World
The action shown in Figure 4 works great for a perfect robot, but in the real world, a robot’s wheels can slip on the floor. This and other imperfections can create errors in the robot’s movements. RobotBASIC can simulate this by adding the command rSlip 5 to the code after the robot is located.
This gives a realistic random 5% error in the simulated robot’s movements as shown in Figure 5.

Figure 5.
Notice that the more realistic robot does not follow a straight line and it’s far from centered as it starts through the doorway. This type of movement is obviously not acceptable. One way to solve the problem is to utilize the robot’s sensors to allow it to hug close to the wall until it gets to the doorway. This can be done with the code in Figure 6.
while 1
rForward 1
d = rRange(-80)
if d>100 then break
if d>30 then rTurn -1
if d<30 then rTurn 1
wend
end
Figure 6.
The code inside the while loop in Figure 6 moves the robot forward a tiny amount and then measures the distance to the wall using the simulated robot’s ranging sensor (which is mounted on the very front edge of the robot).
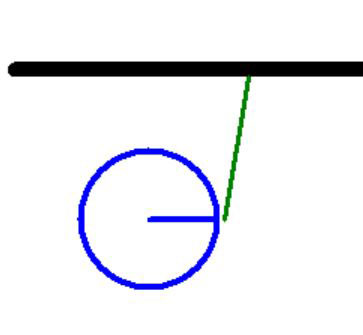
The parameter of -80 in the rRange command causes this measurement to be taken 80° to the left of the robot as shown by the green line in Figure 7.

Figure 7.
In this program, the robot will turn towards the wall if the distance measured is greater than 30 units (pixels for the simulator), or away from the wall if the distance is less than 30.
This basic algorithm for turning the robot based on its distance from the wall should ensure that it follows the wall even if there is wheel slip (because the robot is always self-correcting its distance based on the latest measurement). This action is shown in Figure 8.

Figure 8.
Notice that the robot in Figure 8 quickly moves away from the wall until the measured distance is 30 pixels and then it retains that distance. Even though you can’t see the tiny corrections in the figure, the robot is constantly turning toward or away from the wall when the random wheel slip alters its course.
Using sensors in this manner ensures that even a robot with significant mechanical errors can adjust its movements to achieve the desired goal.
The code back in Figure 6 terminates the loop if a doorway is encountered. It assumes this happens when the distance to the wall increases dramatically. Notice in Figure 8 that the robot stopped when the beam measuring the distance (see Figure 7) is no longer obstructed by the wall. Before reading further, see if you can determine why the range reading is taken at -80 instead of just directly left of the robot (-90).
Measuring the Distance at an Angle
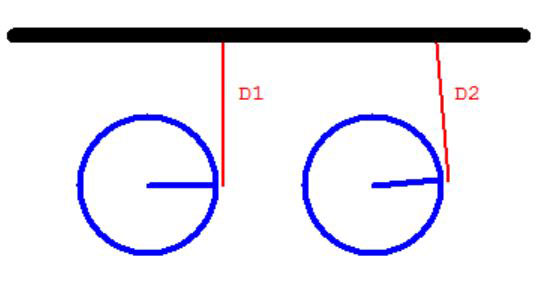
Let’s answer the question about measuring the distance to the wall at an angle (Figure 7). Assume that the robot is running parallel to the wall but has slowly drifted a little too far away. It can correct itself by turning slightly to the left. If the distance to the wall is being measured directly left, then turning the robot to the left could cause the current measurement to increase because the measurement is now slightly behind the last measurement point (see Figure 9).

Figure 9.
The original measurement is D1. Assume the robot is too far from the wall and turns left, creating the new measurement as D2. Since that distance is possibly longer than D1, the robot would still think it’s too far from the wall and turn left again. This process could continue until the robot collides with the wall but such a result is not certain. Larger turn angles and the use of a narrow beam IR ranger instead of a wide beam ultrasonic can increase the chances of this type of failure.
Measuring the distance to the wall with a slightly forward angle can dramatically improve a wall-following algorithm and eliminate the chance for the problem above. Understanding such complexities can be helpful when developing any algorithm, so this topic was worth mentioning. For now, let’s get back to our primary goal of building reusable behaviors.
Reusable Behaviors
In the above example, the code implements a valuable behavior: the ability to follow a wall. It may not be obvious at this point, but the ability to follow a wall can be a useful tool when developing even more complex behaviors. Let’s examine the tool analogy.
What if you had to build a new saw every time you wanted to cut a new piece of lumber? Obviously, the reason we purchase a saw is so that it can help us make cuts whenever they’re needed.
The same is true of our wall-following behavior. Now that we understand how it works, we could write the code to implement it whenever it’s needed in a future program. So, what if we could make this algorithm — this behavior — into a reusable tool? Think of how this could improve your programming productivity with future projects.
Versatility
If we’re going to build such a tool, then it needs to be able to handle as many situations as possible. Let’s look at some examples.
The wall being followed in the previous examples was straight. We might want to make sure the algorithm we implement can handle a moderately curvy wall, or maybe you expect your robot to encounter jagged walls with sharp angles. And perhaps the wall can be on the robot’s left side, as in the earlier example, but it should be expected that our tool should be versatile enough to follow a wall on the robot’s right side too.
In our example, the robot stopped when it encountered a doorway. Maybe the tool should be able to also follow the wall for a specified distance or until some other situation occurs (like the end of a hallway, for example).
Obviously, it could be a daunting task if we wanted our tool to be able to handle every possible situation. It’s reasonable that if we’re going to create a behavior, that it should be versatile enough to handle the situations we generally expect our robot to deal with.
A Reusable WallFollow
Figure 10 shows a WallFollow module that can handle the features needed for a hobby robot as described in this article.
Sub FollowWall(Wall,Amount,Dist,&DoorFound)
DoorFound = False
for i=1 to Amount/2
// measure distance
d= rRange(-80*Wall)
// check for doorway
if d-Dist>20 then DoorFound=True/break
if d>Dist then rTurn -1*Wall
if d<Dist then rTurn Wall
rForward 2
next
return
Figure 10.
It’s implemented in RobotBASIC because of its usability, readability, and free accessibility for hobbyists. It’s worth mentioning, though, that many professional languages offer OOP (Object Oriented Programming) capabilities for building reusable modules that are far beyond that of RobotBASIC. Research OOP if you have a greater interest in this subject.
We pass the function in Figure 10 three parameters to control its behavior. The value of Wall tells the module if the wall is on the right (-1) or on the left (+1). Amount is the linear distance the robot should move along the wall. For the simulator, the units are pixels but a real robot could use inches or centimeters.
This module will stop the robot’s movements if a doorway is encountered before the specified distance is reached. The Dist parameter indicates the distance from the wall that the robot should maintain. It’s assumed that the robot is located an appropriate distance from the wall and facing in the proper direction before the module is called. The wall does not have to be perfectly straight, but we’ll assume that deviations will be moderate.
Let’s see how the module works. It starts by setting DoorFound to FALSE to assume a doorway has not been found. The variable will be set to TRUE if one is found later. The value of this variable is returned to the calling code so that it can easily determine if a door was found within the specified travel amount.
The FOR loop will repeat half the number of units that the robot should travel along the wall. The reason for half is that the robot in this example moves forward two units at a time (the rForward 2 statement). Inside the loop, the current distance to the wall is measured.
If that distance is significantly larger than the desired distance to the wall, then it’s assumed that a doorway has been encountered and the loop is terminated. This leaves the robot paused at the edge of the door as shown in Figure 8.
To make this code as small and efficient as possible, the value of Wall is used to alter some of the actions being taken. For example, when Wall has a value of +1, indicating the wall is on the robot’s left, the rRange measurement will be taken at -80 degrees. If the wall is on the right, the measurement is made at +80 degrees.
In a similar manner, the value of Wall also forces the robot to always turn towards or away from the wall in an appropriate manner (no matter which side the wall is on).
Notice that this process only works because the possible values of Wall are -1 and +1. If they had been any other two numbers, the value of Wall would have to be checked with IF statements to determine how measurements and turns should be made.
Study this code as it’s a great example of how a little advanced thought and planning can make programming much easier.
Using the Behavior
Now that our wall-following, door-finding algorithm has been implemented in a reusable form, let’s see how it can be utilized when programming various situations. A sample program is given in Figure 11.
Main:
WallOnRight = -1
WallOnLeft = 1
gosub Walls
call InitRobot(770,130,-90)
call FollowWall(WallOnRight,200,30,Found)
if Found then call GoThroughDoor(WallOnRight)
end
sub InitRobot(x,y,dir)
rLocate x,y,dir
LineWidth 2
rInvisible RED
rPen DOWN
rSlip 5
return
Sub GoThroughDoor(Wall)
rforward 60
rturn -90*Wall
rForward 60
return
Figure 11.
Notice the two new modules that have been added to help with programming. Of course, you need to also include the FollowWall module and write a Walls subroutine to draw the environment you want to use.
If you run the program in Figure 11, it produces the output in Figure 12.

Figure 12.
The robot stops after moving 200 pixels along the wall and not finding a doorway. If you increase the travel distance to 600 (well past the doorway), the same program will produce the result shown in Figure 13.

Figure 13.
The action of moving through the door is accomplished without the help of any sensory data (although that certainly is an option). This is possible because the needed movements are very short and the WallFollow behavior leaves the robot in a known position and orientation, relative to the doorway. Notice also that the robot has no trouble following imperfect walls.
Handling Two Doorways
The main program in Figure 14 uses the same modules to find the second doorway on a long hallway as shown in Figure 15.
Main1:
WallOnRight = -1
WallOnLeft = 1
gosub TwoDoors
call InitRobot(100,130,90)
call FollowWall(WallOnLeft,300,30,Found)
if Found
rForward 100 // pass door
else
print “Door not found”\end
endif
call FollowWall(WallOnLeft,300,30,Found)
if Found
call GoThroughDoor(WallOnLeft)
else
print “Door not found”
endif
end
Figure 14.

Figure 15.
This code also demonstrates how different options can be taken depending on whether a doorway was found or not. The robot is able to move past a doorway without using sensors because the wall-following behavior ensures it’s aligned parallel with the wall.
What’s Next?
As you can see, you can use the modules discussed in this article to handle a variety of situations. Download your own copy of RobotBASIC and experiment with these modules and wall environments of your own design.
In the next installment of this series, we’ll see how the WallFollow behavior can be used to help the robot navigate through a known environment. SV
If you have ideas for additional topics in the How to Get Started Series, please send them my way at RobotBASIC@yahoo.com.
Article Comments