Robotics: How to Get Started — Part 2
By John Blankenship View In Digital Edition
Programming is Important
The first installment of this series explored how the hardware available to hobbyists has changed over the years. No matter how a robot is physically built though, the software is its most defining factor. A robot’s programming gives it personality and purpose. Improving your programming skills will not only help you build better robots, it can make the whole process easier and more exciting.
When you build a robot, it’s important to have well defined goals for what you eventually want it to do. If it will be mowing your lawn, for example, it’s going to need much bigger motors and batteries than a house-bound bot. The sensors and manipulators needed for a robot that will be navigating through your home will be totally different from one that can load a dishwasher or play ping pong with you.
Even though the physical characteristics of these example robots will certainly be different, the differences in the software that controls them can be even more dramatic. Furthermore, if you truly understand programming principles and algorithms, then you will find yourself thinking about how your robot will be able to accomplish its goals before you start to build it — and that will help you decide on the sensors your robot will probably need.
This simply means that programming is arguably the most important skill needed to build a robot. And, because it’s so important, it’s vital that the novice hobbyist give it the attention it deserves. Knowing how to program is far more than just learning the syntax of a language.
Let’s explore this assertion by looking at loop structures and other organizational programming tools.
Syntax vs. Function
I’ve met hobbyists that certainly knew the syntax for the standard loops in languages such as C (for, while, and do-while). Most of them could explain why they would use a for loop, but many can’t really explain why they would use a do-while instead of a while.
In fact, I have met quite a few hobbyists that have never even used a do-while loop.
Let’s look at some examples to see why loops are so important, and why most languages have three general kinds. Before we start though, let me give my opinion of one of the biggest mistakes made by programming teachers.
Relevant Examples
As you would expect, most teachers (or books that teach programming) use examples to demonstrate how a particular programming statement works. Unfortunately, in many cases, the examples used are the same.
When teaching how a for loop works, for instance, a standard example is to print a range of numbers, perhaps from 1 to 10.
Such an example does show how a for loop increments a number and how that number can be used inside the loop, but it would be far more effective if the example used was pertinent to why the student wanted to learn programming.
If the student was studying to be an accountant, a better example might involve some accounting problem such as printing the paychecks for 56 employees. Someone wanting to be a video game developer might benefit from an example that demonstrated a simple animation technique.
It makes sense then, that since I want to help you see why programming is needed for robotics, I should use examples that involve robots. And since readers of this article might not yet own a robot, we’ll use RobotBASIC: a language I helped develop and give away free at www.RobotBASIC.org.
RobotBASIC has a built-in robot simulator that makes it easy to explore many robot-related topics without building anything.
RobotBASIC’s Robot Simulator
Obviously, we need a little background on the simulator before delving into loops. Look at the program in RobotBASIC’s IDE (integrated development environment) shown in Figure 1.
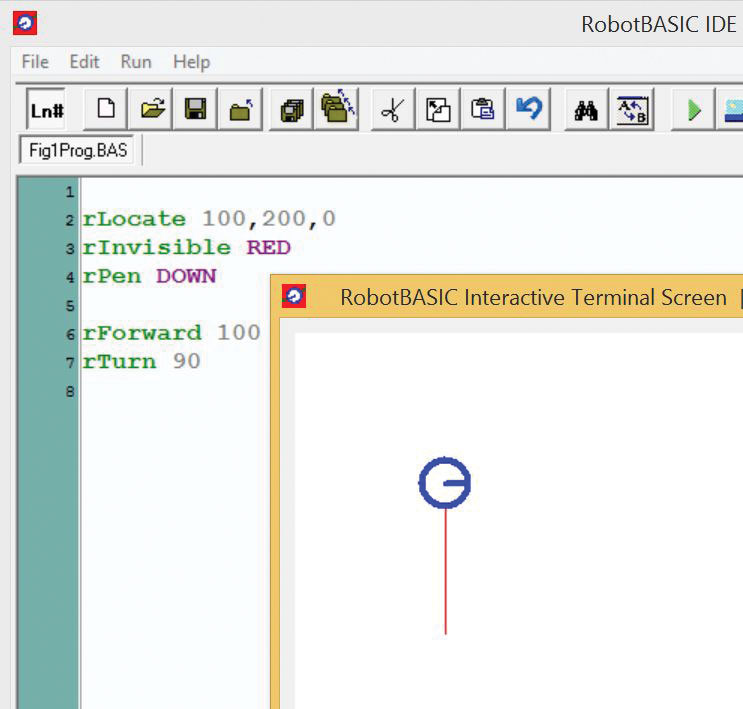
FIGURE 1.
It uses an rLocate command to position the robot on the screen at a specified x,y position (100,200 in this case) and pointing straight up (angled at zero degrees).
There are a few other commands that make the robot drop a PEN, so that the robot leaves a RED trail as it moves.
The rInvisible command renders red objects invisible so that there is no collision when a red line is encountered. The first color in the invisible list is automatically used for the pen. Once the robot is initialized, there are two lines in the program that show how the simulated robot can be moved.
In this case, the robot is moved forward 100 pixels and then it turns 90° to its right. These actions can be seen in the Terminal Screen (output) also shown in Figure 1.
A For Loop
Let’s assume we want the robot to move in a manner to draw a square. We could just repeat the two movement statements in Figure 1 three more times. However, we could do this much easier if we use a for loop as shown in Figure 2.
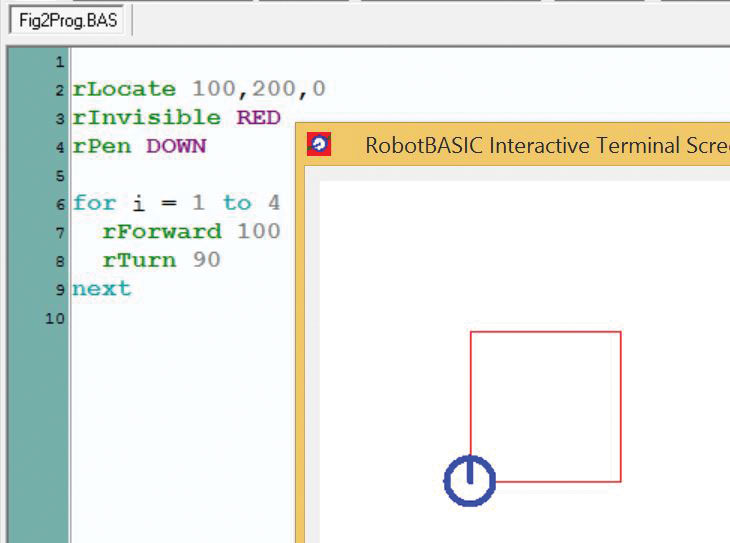
FIGURE 2.
In this example, everything between the for and the next statements will be repeated four times, with the variable i having an initial value of 1 and incrementing with each pass through the loop.
Notice that the statements inside the loop are indented for clarity. (Note: To save space, the top of the IDE will be cut off in this and all remaining figures.)
Nested Loops
Often, it can be advantageous to place one loop inside another. The program in Figure 3 shows how a second loop can draw the square 18 times, with each new square rotated to the right by 20°.
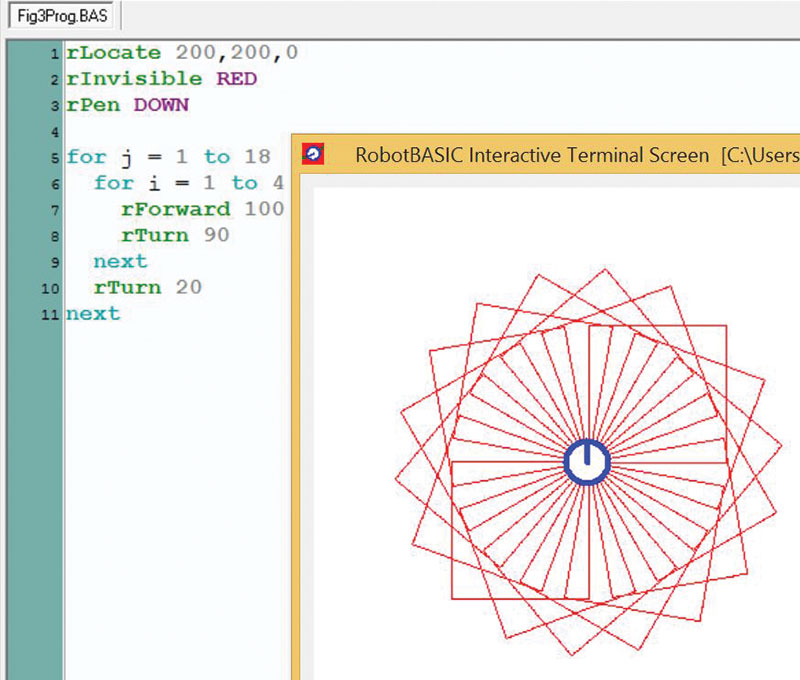
FIGURE 3.
It’s unlikely you would want to make your robot move like this, but it’s an interesting example to show how nested loops can produce a lot of activity with very few statements.
Modular Structures
As programs get more complicated, they can become harder to follow. We can solve that problem by reorganizing much of this program as a group of modules as shown in Figure 4.
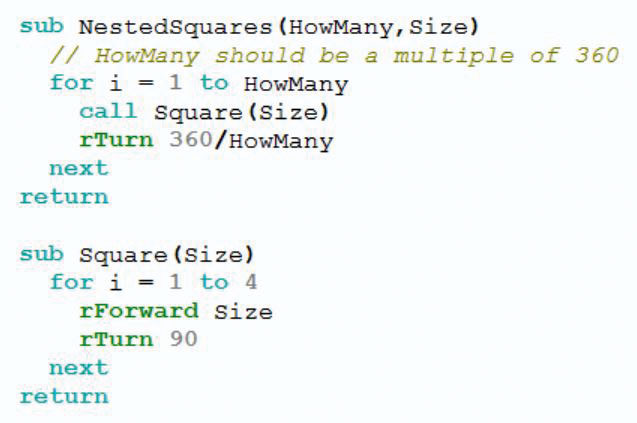
FIGURE 4.
Each module is a RobotBASIC subroutine. These differ from normal BASIC subroutines because they allow variables to be passed when the routines are called. The variables affect how the routine performs its actions.
In these examples, you can pass a number that tells Square how long to make each side. Two numbers are passed to NestedSquares that indicate how many squares to draw and what size they should be. Notice also that once the subroutine Square has been defined, it can be used to make it easy to build other modules (such as NestedSquares). Building tool routines and then using them to build more complicated routines, etc., is a powerful concept.
Figure 5 shows a short program that makes calls to the routines in Figure 4.
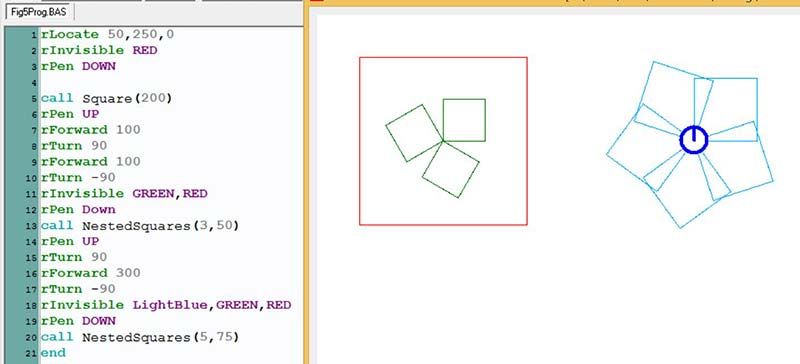
FIGURE 5.
When a module is called, it’s executed until a return is encountered. At that point, execution continues immediately after the calling statement. When run, the program produces the output shown.
Notice that the use of modules makes this program easy to write as well as easy to follow and understand. And, notice how the parameters passed to these modules give an enormous amount of power and flexibility to the programmer.
Understanding the power of this kind of flexibility is far more valuable than knowing syntax alone.
Just Scratching the Surface
These few programs were only intended to demonstrate that learning how to program can be exciting if the right examples are used. We have only just begun to see the power of a for loop though. If this discussion was in a book instead of a magazine article, more programs could be used to demonstrate how the index variable of the loop can be used with formulas and arrays to control many more aspects of the program’s operation than we have seen here.
For now though, let’s see how other types of loops can help our robot to move more intelligently.
The While-Wend Loop
RobotBASIC’s while loop can monitor the simulated robot’s sensors and use them to determine its behavior. Look first at Figure 6.
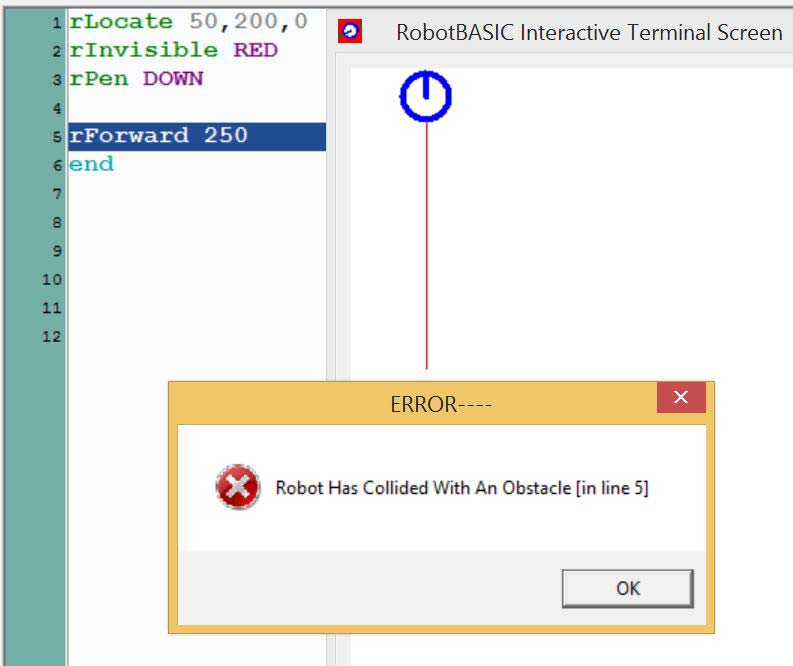
FIGURE 6.
It shows a program that tries to move the robot upward 250 pixels, but unfortunately, there is wall only 200 pixels from the robot’s starting position. When the robot collides with the wall, an error is generated as shown in the figure.
To solve this problem, we need to advance the robot in tiny movements of only one pixel, and before each movement, we can check to see how far the robot is from the wall. When the robot is too close to the wall, we can stop its movement.
This can be accomplished because the simulated robot has a ranging sensor whose data can be accessed with the function rRange that determines how far it is to objects or walls in the robot’s path.
Figure 7 shows a program that uses a while loop to move the robot forward, as long as the robot is more than 20 pixels from the wall.
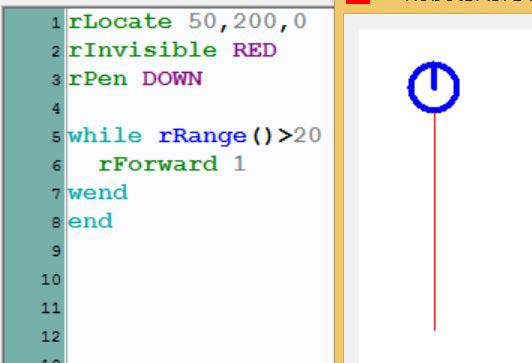
FIGURE 7.
It’s easy to change this parameter (20) to control how close the robot gets to the wall before it stops. As long as the expression following the while is true, all the statements between the while and the wend will be repeatedly executed in a looping manner.
The Repeat-Until Loop
Figure 8 shows a program that accomplishes the same thing as the one in Figure 7, but this time a repeat-until loop is used.
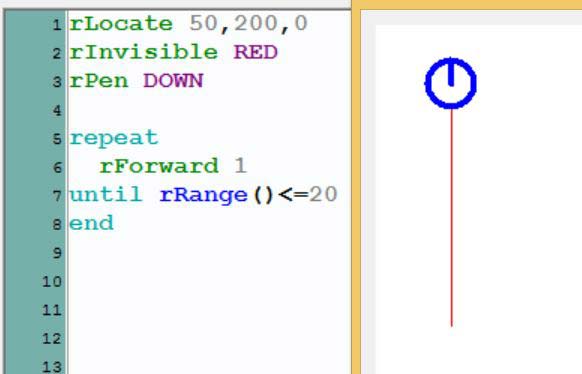
FIGURE 8.
At first glance, it seems that a while-wend and a repeat-until are just different ways of accomplishing the same thing. In many cases, this can be true, but these two loops differ in a very important way.
A while loop decides at the beginning of the loop whether to execute the statements inside the loop. This means that if the controlling expression is false when the loop starts that the statements inside the loop will NOT be executed at all.
A repeat-until loop will always execute the statements in the loop at least once because the decision as to whether to repeat the loop is not made until the end of the loop.
Let’s look at a hypothetical situation. Suppose the robot is now out in the open as shown in Figures 7 and 8. Imagine that it has been exploring its environment and currently just happens to be almost touching an object directly in front of it. Perhaps that object had been beside the robot and only came into view after the robot turned a significant amount.
If the robot starts to move in this situation, the while loop in Figure 7 would work fine because the object would be detected before the move is made. The repeat-until would fail though, because the robot would move (causing a collision) BEFORE the until statement checks to see if an object is in the way.
When moving a robot, a while loop is generally preferred over a repeat-until for the reasons given above. If space permitted, other examples could demonstrate various situations where one of these loops would be preferred over the other. The important point is that a good programmer just doesn’t know what programming statements do. He or she must also understand the programming principles that help dictate how and why the statement should be used.
This kind of understanding allows the programmer to better utilize logic to accomplish the intended goals. Furthermore, it helps ensure that finalized programs won’t fail when some simple — yet unanticipated — situation occurs.
Another major point to be made here is that people that truly understand the how’s and why’s of programming structures can learn to program in almost any language relatively easily.
If, for example, they need a loop that counts or a loop that decides whether to terminate at the beginning or the end of the loop, they just need to find the syntax for that structure in the language they are using.
Figure 9 shows both the RobotBASIC and C syntax for some examples of the loops discussed earlier.
RobotBASIC Loops C Loops
for v=1 to 10 for(v=1;v<=10;v++)
// place loop {
// statements // place loop
// here // statements here
next }
while a<b while(a<b)
// place loop {
// statements // place loop
// here // statements here
wend }
repeat do
// place loop {
// statements // place loop
// here // statements here
until c>d }
while(c<=d);
FIGURE 9.
The left column shows the RobotBASIC syntax; the C versions are in the right column. There are significant differences in syntax for sure, but both versions of the loops perform in the same manner.
The point is that if you understand programming principles and know what you want to do, it’s easy to just need to look up the syntax for how to do it in the language you are using.
Summary
If you want to build a robot, you certainly will need to learn about hardware. However, if you want a robot that can interact appropriately with its environment, you need significant programming skills. A magazine article will never have enough space to teach you everything you need to learn, but hopefully you’ll now approach learning how to program with more enlightened goals.
Next time, we’ll examine how algorithms can be used to develop robotic behaviors. SV
Article Comments