Robo-Dancer: Build Your Own Computer-Controlled Dancing Robotic Arm
By V S Rajashekhar View In Digital Edition
I used to wonder during my dance performances how the RGB lights changed their colors, matching the beats of the song. A few months ago, I found that it can be done in a simple way by controlling the pulse width modulation (PWM) signals; you assign the root mean square value of the song’s wave. I decided to extend this to servo motors and then later to a robotic arm. You can also do this for other robots such as humanoids, spider robots, etc. You can execute this project in any platform like Mac OS X, Windows, or Linux.
So, what’s my definition of a computer-controlled dancing robot? To use a computer which has the song in its database, which when played should be able to control the movements of a virtual robot as well as similar robot hardware.
What You’ll Need to Build Your Song-Controlled Robot
Here’s what you’ll need to complete this project:
- A hot glue gun and hot glue sticks.
- A very strong object such as a brick or a small portion of a table.
- A thick piece of cardboard.
- A cardboard cutter.
- Arduino Uno with USB-UART cable.
- A breadboard.
- Three 9g servo motors.
- A few male-to-male jumper wires.
- Power supply for the servo motors.
Building the Hardware
The conceptual diagram of the robotic arm that is going to be built is shown in Figure 1.
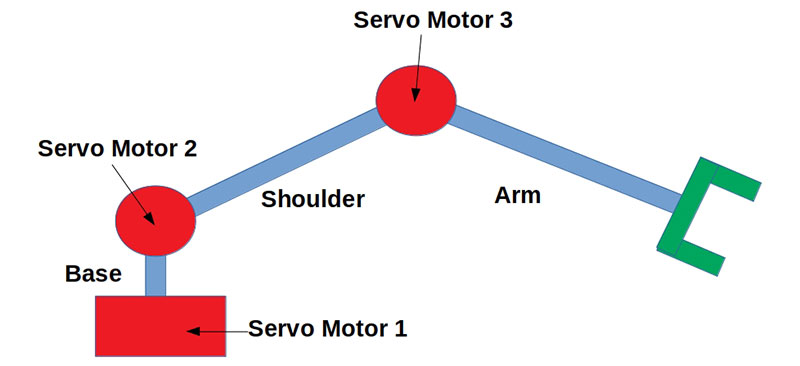
FIGURE 1.
It has servo motors 1, 2, and 3. Servo motor 1 connects the ground and the base link. Servo motor 2 connects the base link and the shoulder. Servo motor 3 connects the shoulder and the arm.
These three servo motors will be controlled so that the entire robot dances.
A. Mechanical Setup
The forces generated during the motion of the robotic arm while it dances will be high. Hence, you need to affix the robotic arm on a heavy base (say, at least one kilogram). If you have a brick, attach servo motor 1 to it by using the hot glue gun. If you don’t have a brick, then attach it to the surface of the table.
Next, attach a small piece of carboard on the top of the horn of servo motor 1 using hot glue. Allow it to cool. Then, similarly as shown in Figure 2, attach servo motors 2 and 3. Once finished with this, your mechanical hardware setup needed for the project is complete.
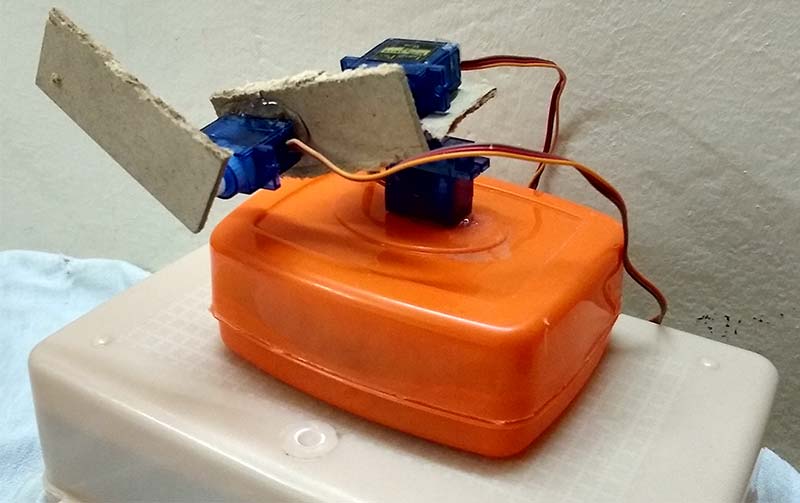
FIGURE 2.
B. Electronic Setup
As shown in Figure 3, connect the motors to the breadboard using male-to-male jumper wires. Then, connect the ground of the Arduino Uno to the ground of the power supply. Set up the PWM signals as follows: Pin 9 to the base servo motor; pin 10 to the shoulder servo motor; and pin 11 to the arm servo motor.
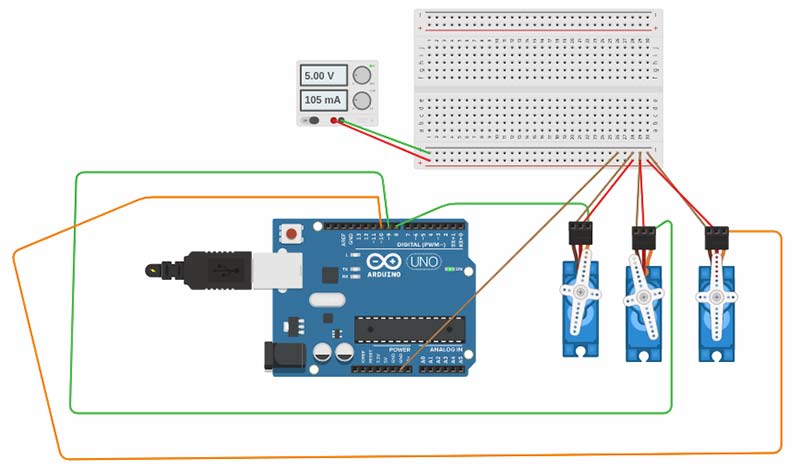
FIGURE 3.
Connect the power supply. Once done, your electronic hardware setup is now ready.
Working on the Software
A. Microcontroller
Download the Arduino software needed by your operating system from https://www.arduino.cc/en/Main/Software.
Use the code located in Examples > Firmata > StandardFirmata. Upload the StandardFirmanta code to the Uno microcontroller. Once this is complete, the Arduino is ready to receive signals from the computer. Do not disconnect the entire setup throughout the project!
B. Graphical User Interface
You can download the Processing software for your operating system from https://processing.org/download. Install it and open it.
Open the file “servo_sound_dance.pde” that is available with the article downloads.
Look for this line: arduino = new Arduino(this, “/dev/ttyACM0”, 57600);.
Replace “/dev/ttyACM0” with the Port name to which your Arduino is connected to. Don’t forget to use the double quotes!
Now, run the Processing program. You should get the screen as shown in Figure 4.
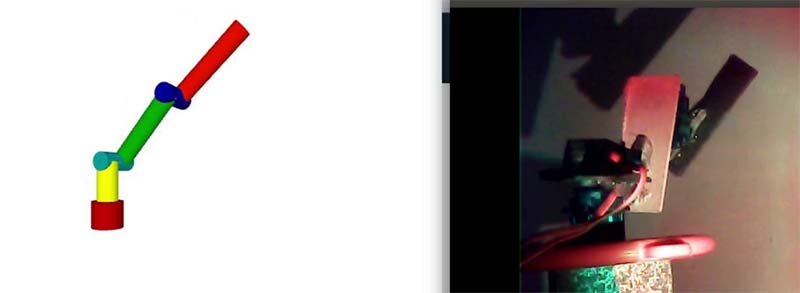
FIGURE 4.
The song will start playing and the virtual robot will dance. Synchronously, your hardware robot will also start dancing.
You can connect a camera and view the output on the screen.
Watch the song controlled robotic arm dancing at https://youtu.be/FL7c1pXmqt4.
I hope you enjoy this short project working with computer-controlled robots! SV
Article Comments