iRobot Create2 + Raspberry Pi = PiCreate
By Christopher Cantrell View In Digital Edition
I’m sure you’re no stranger to the world of STEM (Science, Technology, Engineering, and Math). After all, you’re reading a technology magazine aimed at the robot innovator. But did you know there are millions of people out there who have never blinked an LED with a program? These unfortunate folks — some living right next door to you — have never wired up a circuit on a breadboard or smelled a hot soldering iron.
It’s not because they aren’t interested. It’s because they aren’t exposed to STEM hobbies in their day-to-day lives. You and I grew up browsing racks of resistors and logic chips at RadioShack. People today have more resources available to them than we did: hordes of inexpensive robot platforms and processors like the Arduino and Raspberry Pi. However, those products live online way up in the cloud. The world today needs STEMinists to drag that technology down to the masses.
The STEM programs in our schools give kids a very personal hands-on introduction to science and technology. I’m a mentor for a FIRST robotics team at a local high school. Every year, I show a new batch of eager minds the magic of robotics, microcontrollers, and programming. I get to witness those life first moments — the first time someone ever uses a hand drill or the first time someone uses super glue. You can learn all about super glue from a TV commercial, but you don’t really know super glue until you’ve accidentally sealed your fingertips together.
Our robotics team participates in several outreach events throughout the year. We take our robots to Girl Scout gatherings and STEM events like NASA in the Park. The PiCreate Roomba bot was particularly effective at STEM-Night, which is sponsored by the local hockey team. We joined other clubs and companies in hosting information tables and demonstrations in the walkways outside the hockey arena. We put our team flyers on top of the Roomba robots and drove them into the crowds. We literally lured kids to our table with signs on the robots that said “Come to our table and drive me!”
Most people have seen a Roomba. It is familiar, friendly, and approachable. Few people have driven one, however. We used web-based remote controls on phones and tablets. (I’ll show you this software later in the article). For some folks, it was their first experience with a tank-drive. They noticed the Raspberry Pi on top and asked, “Is it hard to hack a Roomba?”
Let me show you here how easy it is.
The iRobot company was founded in 1990 by three roboticists from MIT. You know iRobot as the makers of Roomba, but they do much, much more. Their robots have explored the Great Pyramid of Giza, helped troops in the Middle East, and searched the rubble after the 9/11 attack in 2001. The Roomba vacuums didn’t come along until 2002.
Every Roomba since October 2005 has a built-in serial port you can use to talk to the robot. Most models have a physical seven-pin connector, but newer Wi-Fi models expose the command API through a network socket connection. iRobot maintains a detailed Open Interface PDF document you can download from their website.
You control the robot’s motors and LEDs by sending intuitive serial commands. You can send serial commands to query the robot’s buttons and many sensors: battery charge and current; any IR commands from a base station; and detailed information about bumps, walls, and cliffs.
We love our Roomba floor vacuum at home. I lifted the handle one afternoon and found the clearly labeled “serial port.” I chatted with iRobot support and asked why they would include a serial port and control firmware on a mass-produced consumer product.
The official line is that the port is for upgrades and diagnostics. They discouraged me from hacking my Roomba as it would void the warranty. Yet, there is the fully functional serial port. That’s like handing me a Dachshund puppy and telling me not to play with it!
The iRobot company does encourage hobbyists to buy the Create platform they make explicitly for robotics innovators. In 2007, the first version of Create featured the standard iRobot serial port along with many signals brought out to the DB-25 connector in the large cargo bay.
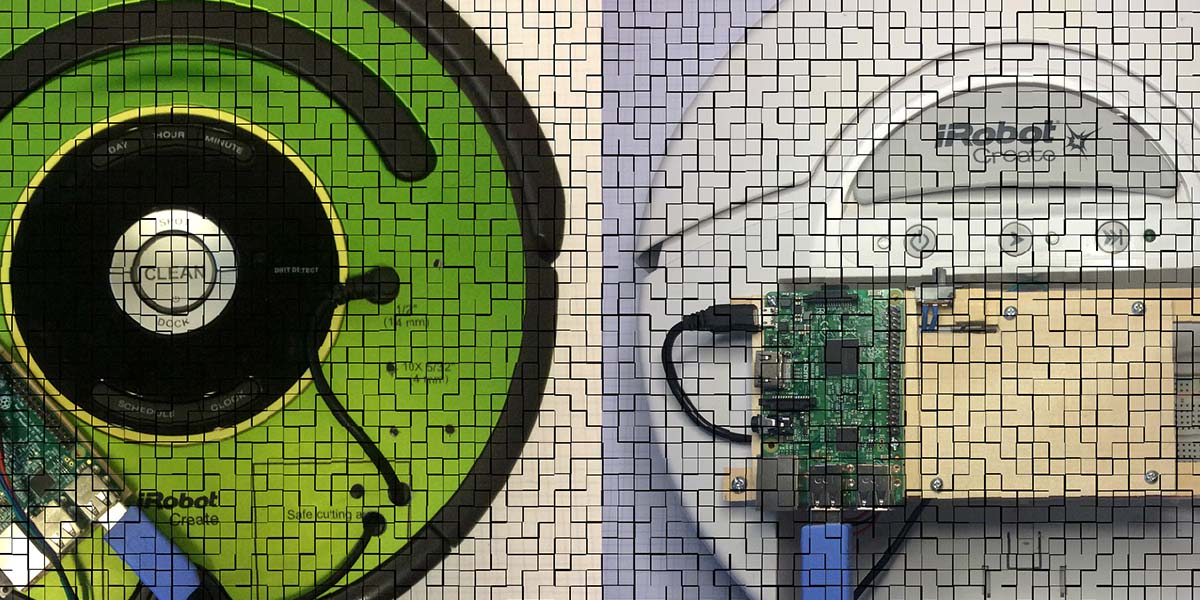
In 2014, iRobot replaced the Create line with the Create2, which is built from remanufactured 600-series Roombas. You can see both models in Figure 1.
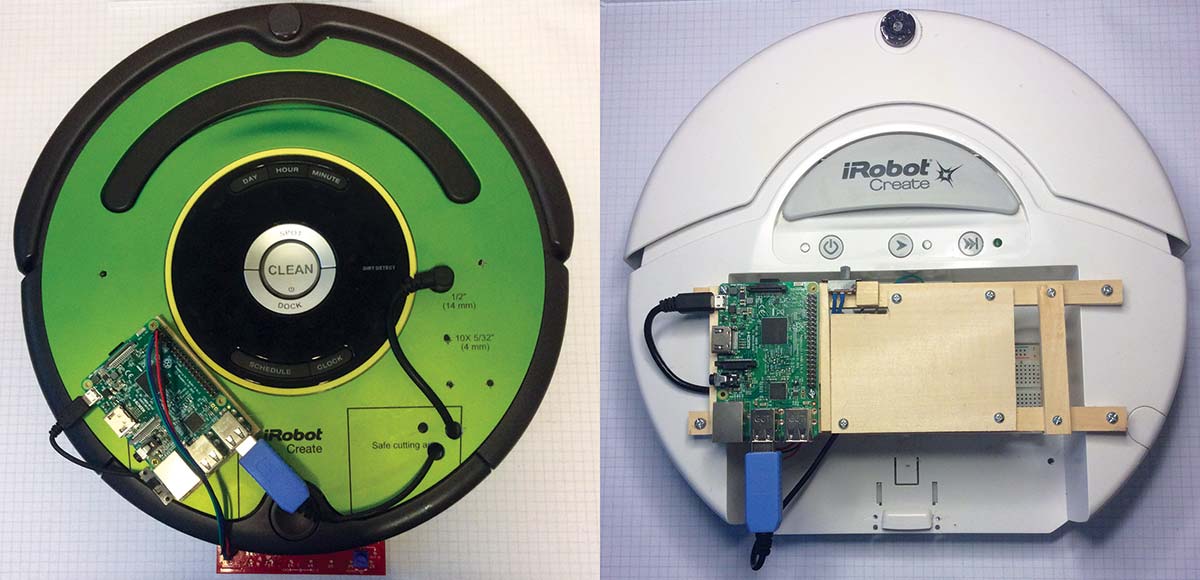
FIGURE 1. The iRobot Create2 (left) and Create1 (right). Both are controlled by Raspberry Pis. The red board in the bottom left is the SparkFun line follower array.
iRobot supports an active Create community that shares hardware projects and code in many programming languages. Have a look at their website. You’ll find 3D printer files to make accessories for the Create2. You’ll find links to tutorials, libraries, and ideas for using Create2 in a robotics curriculum. Plus, you’re encouraged to share your own projects back with the community.
The Create2 kit costs $200 (less than a Roomba). You get the well-crafted mobile platform, which holds up nicely when your code crashes the robot into a wall. You get the charging base station. The standard Roomba algorithm for finding and docking with the base station is built into the robot’s firmware. You can activate it by sending a serial command to the robot.
Connecting the Pi to the Roomba
The Create kit comes with a USB serial cable to connect your computer brain to the robot. The cable is long enough to experiment over a short distance using your immobile home computer. Or, you could walk around behind the robot carrying your laptop or mount your laptop to the top of it.
The Raspberry Pi 3 Wi-Fi makes a great robot brain. The USB serial cable plugs right into the Pi, and you can connect remotely to it over the Wi-Fi network from your less mobile computer or laptop. You can even power the Pi from the Roomba’s battery, which is available through the serial connector. You can’t use the 14 volts directly, of course. You need a 5V regulator to power the Pi. I used the UBEC 5V converter from Adafruit (see Parts List).
| Description | Adafruit Part# |
|---|---|
| iRobot Create2 | 2388 |
| UBEC 5V Converter | 1385 |
| Cable for Create2 | 2438 |
| USB to TTL Serial | 954 |
| Slide Switch (for power) | 805 |
PARTS LIST.
Take the cable you got with your iRobot Create and cut it clean through about eight inches from each end. You won’t need all that extra cable on your robot. Then, peel the cable casing back to expose all the wires and strip the ends off them. If you don’t want to hack your existing cable, you can make a new one from scratch. You can buy an iRobot cable and a USB serial converter also from Adafruit.
You will also need a micro USB cable to connect power to the Pi. Cut this cable about six inches from the “micro” end and strip the ends of the wires; you only need the +5 and ground. Use your multimeter on the wires on the other end of the cable to determine which one is what.
Then, there’s the small SPST power switch. You might be lucky enough to have a RadioShack or Fry’s Electronics nearby. If not, you can try local auto parts stores. Or, just order a switch online from your favorite supplier or Amazon. I used a slide switch from Adafruit.
Figure 2 shows how to wire all the parts together. A multimeter with a continuity checker is great for locating the correct wires. Beyond that, you can be as fancy as you want with the cable. All you really need is a wire stripper and some electrical tape.
If you’re coaching a robotics team, this is a good chance to have them practice basic soldering and shrink tubing. But DO NOT remind them to put the shrink tube on one wire before soldering two wires together — that’s a lesson everyone should learn the hard way. I still learn it regularly!
If you’re making your cable from scratch, remember to cross-over the transmit/receive lines between the robot and the USB serial dongle as shown in Figure 2. If you are re-connecting wires from your iRobot cable, then just connect the RX and TX wires as they were before you cut the cable (reconnect the same color). The wires are already crossed inside the USB serial dongle.

FIGURE 2. The Pi is powered from the robot’s batteries. Be sure to isolate the 5V regulator with a power switch. The Pi talks to the robot through a TTL serial connection. Be sure to cross-over the RX/TX lines.
Connecting to the PiCreate Remotely
You must enable SSH on your Raspberry Pi using the ‘sudo raspi-config’ [EDITOR command line text] tool. SSH allows you to push files and run commands from a remote machine. By default, it’s turned off, but it’s the first setting I change on all my Pis.
You also need a Wi-Fi network for the RaspPi. When I’m at home, this is no problem. My Pi is configured to connect to my home network, and from there it can get to the Internet when I need to install new tools. I configured my home network router to always give the same IP address to the Pi.
There’s no easy Wi-Fi access at robotics club. The high school does have a Wi-Fi network, but joining it requires credentials. Plus, I can’t configure the school’s router to give my Pi the same address. At outreach events, we rarely have Wi-Fi access at all.
I ended up buying an inexpensive Belkin N150 Wi-Fi router ($10 at Amazon) to dedicate to the robots. I configured the router to reserve IP addresses for all my bots, so they always have known addresses. I carry the router with me to outreach events and to robotics clubs.
I also pack a few TP-Link N150 USB Wi-Fi adapters (also $10 each at Amazon) to take to club events. These let the students connect to their school Wi-Fi network and to the robotics Wi-Fi network at the same time. You can never be connected to too many networks!
There are plenty of free tools that you can install on your computer to talk to the RaspPi over the network. The simplest is PUTTY, which allows you to open a remote command terminal on the Pi. You can then use Nano or VI on the Pi to edit code files on the Pi’s file system. When your code is ready, run it from the PUTTY command line.
WinSCP is another useful free tool. It presents a graphical file system viewer that lets you drag and drop files between machines. You edit the files on your PC, then use WinSCP to copy them to the Pi. You still need PUTTY to execute the code on the remote Pi, but with WinSCP, you can edit code on your computer using your favorite editor.
You can also configure WinSCP to watch for changes in a directory. Whenever you save your files on your computer, WinSCP automatically copies them to the Pi.
My personal favorite free tool is the Eclipse integrated development environment (IDE). Its ‘Remote System Explorer’ lets you move files, edit code, and run code all in the same tool. Figure 3 shows a sample coding session.
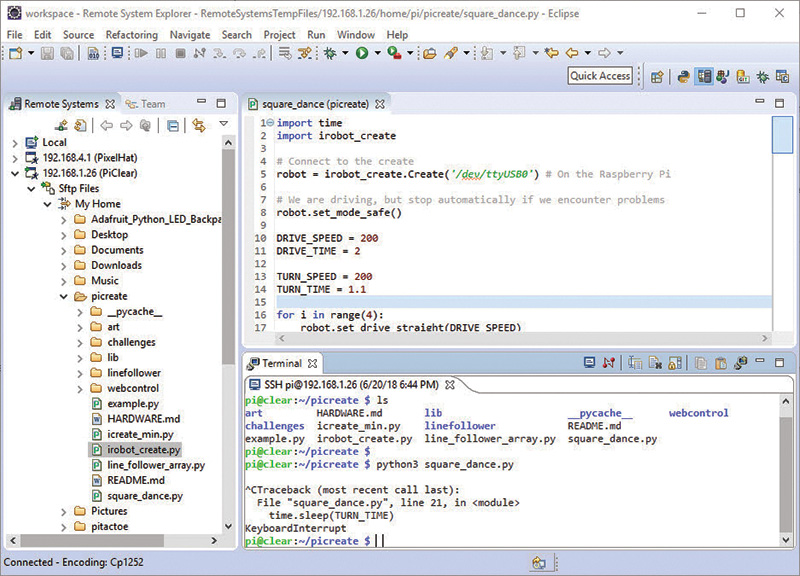
FIGURE 3. Eclipse lets you move files between a Pi and PC. Develop your code in the editor, and run programs at the LINUX command line — all without leaving the graphical IDE.
On the left, you can see the Raspberry Pi’s file system in a graphical tree explorer. Double-click on a file in the tree to open it in the text editor, which performs syntax highlighting for whatever code language you’re editing. In the upper right corner of Figure 3, I’m editing a Python file right on the remote file system. I then use the command line window (lower right of Figure 3) to run the updated code.
The robotics students like having all the tools together in the same window. They can focus on the code in a colorful editor, without having to keep up with different tools and how/when to use them.
The OI Serial Protocol
The Open Interface specification document describes 29 different commands you can send to the Roomba or Create. All commands start with a single-byte opcode followed by several data bytes depending on the command. The DriveWheels command, for instance, is opcode 145 followed by two words (four bytes): right-motor velocity and left-motor velocity. This command gives you raw control of the two motors.
The Drive command is opcode 137 followed by two words: velocity and turn radius. This command tells the robot to do the math and set the wheel speeds based on the velocity and radius you provide.
Some models of the Roomba have seven-segment displays used for entering a cleaning schedule. The Create2 doesn’t have these displays, but the spec describes how to control the LEDs if you’re using a Roomba that does.
The Create can store up to four short songs in memory. Command 140 lets you define a song by sending duration and MIDI note numbers for a sequence of notes. Then, you send command 141 to play one of the four stored songs. Our robotics students who are in band love the music system. We challenge them to enter the school’s fight song from their sheet music.
You read the robot’s sensor by sending the Read Sensor command: opcode 142 followed by the sensor packet you want to read. You can then read the data values from the serial interface. There are around 50 different sensor packets you can read: cliffs, walls, wheel encoder counts, motor currents, etc.
There are several sensor groups you can read. When you request a sensor group, you get back the data from multiple related sensors at once. For instance, group 3 includes six different readings for the battery: charging state, voltage, current, temperature, battery charge, and battery capacity.
The IO protocol is binary. You can’t use a simple terminal to type commands directly to the robot. Instead, you need a code library that converts parameters to data bytes as needed by the robot.
The library must convert the multiple bytes of sensor data into a form your code can use. The library is conceptually easy; it’s just a big mapping function from code objects to the OI byte protocol. You can write the library yourself. In fact, it’s a great learning exercise for your robotics team. Or, you can use one of the many libraries shared on the iRobot site. The community writes them in all language flavors.
You can also get my own Python implementation of the library from the article downloads. My library is heavily documented with information from the Open Interface spec so that users can read about the parameters without having to open the spec itself. This is great for when you’re working in an editor that pops up completion hints and documentation as you type.
Coding Challenges
I created several code challenges for the students in robotics clubs. Each challenge had a “badge” image the students could print and proudly display when they completed the challenge. Gamification keeps students motivated to learn.
Figure 4 shows my solution to the simple “Out and Back” challenge. The code gives you an idea of how easy it is to write Python for the PiCreate.
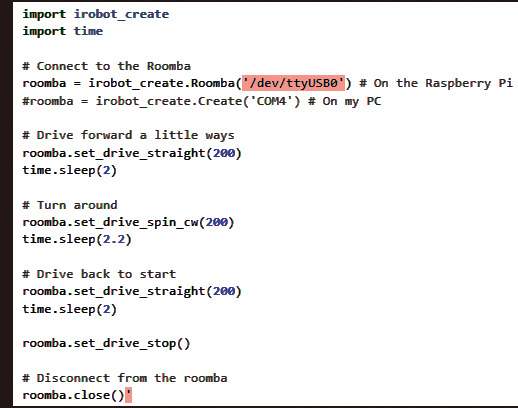
FIGURE 4. My Python library lets you focus on your robot’s algorithms. Simply create a robot object and script its commands in friendly Python code.
First, the code connects to the Roomba’s serial port. Then, it drives straight for a couple of seconds, turns around clockwise, and drives back. It sounds easy, but the students learn how frustrating it is to tune the times and motor speeds for such a simple task. They learn how different driving surfaces affect the timing values and how small errors along the way add up to big errors at the end.
Other challenges combine reading sensors and controlling motors to make a reactive robot. The students learn about wheel encoders and counting pulses for precise distances. These skills carry forward to the FIRST robot they build later in the season.
Web Remote Control
At an outreach event, there isn’t time to teach the visitors how to program. We just let them drive the robots around. For outreach, the PiCreate runs a simple 32-line web server written in Python, and we connect to the robots with a web browser using a phone or tablet. You’ll find all the web-control source code in this article’s download section.
Figure 5 shows the web browser remote control. There are two basic modes: DRIVE and PROGRAM. In DRIVE mode, the user clicks the buttons to move the robot around. In PROGRAM mode, the user builds up a script of buttons for the robot to execute when the RUN button is clicked. We set out a couple of orange cones and challenge the visitors to write a script to navigate around them.
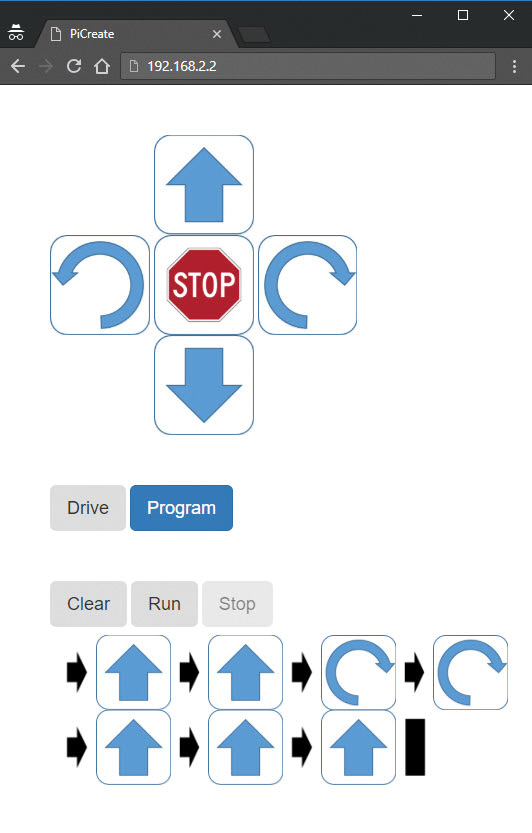
FIGURE 5. The web remote control has two modes. In DRIVE mode, you press the arrows to control the robot manually. In PROGRAM mode, you drag the arrows into a script of commands at the bottom of the page.
Learning to Swim with PiCreate
Teaching robotics is a lot like teaching students how to swim. The PiCreate offers fun and challenges for all levels of students. Some students are inexperienced — a little scared of the water/technology. They like piddling around in the kiddie pool. Just make the cable shown back in Figure 2 and let them write a few lines of Python to move the wheels.
Eventually, their curiosity will lure them to the shallow end of the pool where their peers are combining sensors and motor commands to make amazing reactive robots. Then, one day, they find themselves bravely venturing into the deep end where the older students are adding new I2C modules to the robot — like a SparkFun line follower array or an Adafruit NeoPixel LED grid.
STEM students are given the opportunity to learn valuable hands-on skills and lessons. What happens if your “print hello” function calls itself? You can read about recursion all day long, but there is something magical about coding up your first stack-overflow.
We lifeguards/mentors foster creativity and curiosity but always under a professional protective eye. Curiosity killed the proverbial cat. Less dramatically, in everyday life, curiosity and creativity gives us wonders like duct-tape wallets and peanut butter and Nutella sandwiches. SV
Resources
The official iRobot Create site with 3D printer files, project resources, and complete documentation (including a detailed PDF document describing the serial protocol):
https://www.irobot.com/About-iRobot/STEM/Create-2/Projects.aspx
Roomba Open Interface Specification:
https://www.irobotweb.com/-/media/MainSite/Files/About/STEM/Create/2018-07-19_iRobot_Roomba_600_Open_Interface_Spec.pdf?la=en
The official Raspberry Pi Foundation:
https://www.raspberrypi.org
Article Comments