Servo Magazine ( February 2016 )
Mini Wi-Fi Video Cameras
By Eric Ostendorff View In Digital Edition
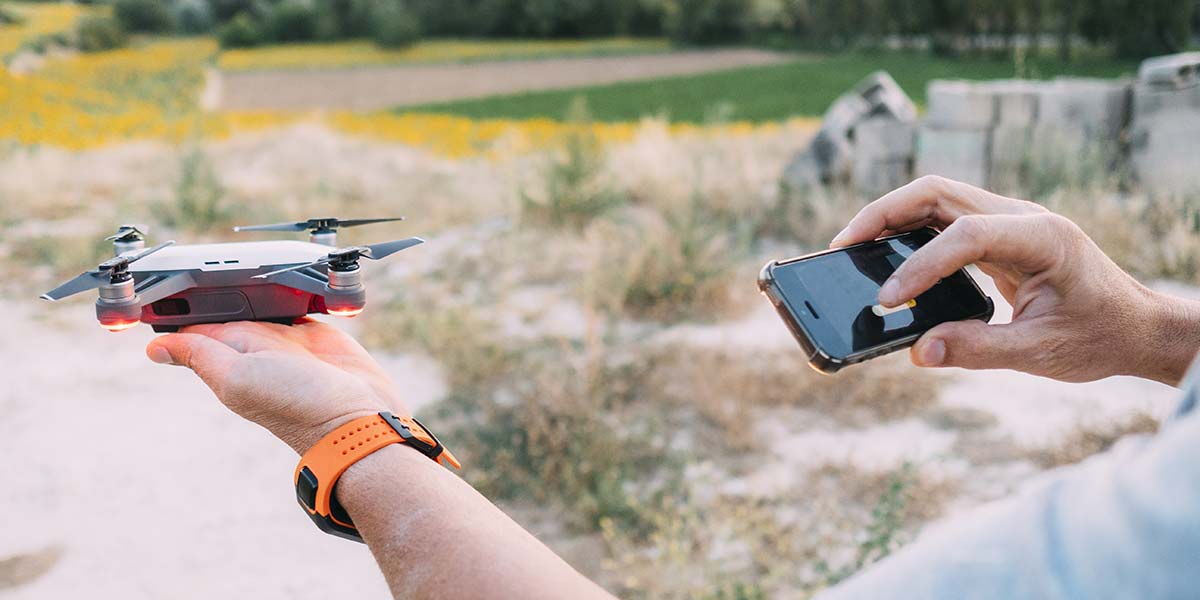
Stream live video from your drone or mobile robot to your smartphone on the cheap.
First Person View (FPV) camera systems are all the rage with drone pilots especially these days. A small onboard camera and transmitter send live video to a dedicated receiver and video display or goggles. The video transmission system (typically 5.8 GHz, a.k.a., 5G8) is fully independent of the drone's radio control system. Image quality can be excellent with no lag, and video range often exceeds the radio control range.
A complete starter system such as a FatShark Teleporter V3 can be purchased for $200-$300, including goggles. Alternatively, Wi-Fi provides a cheaper medium for streaming live video. Several toy-grade drones carry self-contained camera/transmitter modules. These lightweight modules stream live video (no audio) over a Wi-Fi signal to a smartphone or iPad, giving an FPV experience at a greatly reduced cost. There are also small non-drone Wi-Fi “spycams” which stream video and audio to smartphones, which are suitable for baby monitors or nanny cams.
Each camera has its own free app which is required for viewing. Videos and photos may be recorded and stored on your phone for sharing. Each camera can be viewed on more than one phone simultaneously as there are no passwords. Also, multiple cameras can be used simultaneously — each with their own SSID — broadcasting their own separate Wi-Fi signal. So, you can select which camera to view.
Note that these are not like home security IP cameras which connect to the Internet through your Wi-Fi router. These don’t connect to the Internet at all. They do not use a hotspot — they ARE a hotspot, so they show up on your phone as a new network which you will connect to. In some cases, you must disconnect from your home router in order to connect to these. Therefore, they can be used anywhere — far from a router — whether your phone has four bars or none.
The Wi-Fi drone cameras aren’t a huge threat to the $200+ 5.8 GHz units. The range is limited to about 50-75 feet outdoors, and less indoors. There’s nearly a second of lag in the video feed, and significantly more audio lag in the spycam. An inexperienced pilot would have his hands full keeping a fast moving drone out of trouble, but for a first FPV experience on a budget, I think a lot of people will relish the challenge of flying around the house and checking out what’s going on with the rest of the family.
While I like flying drones as much as anyone, I’m more interested in using these Wi-Fi cameras in ground-based applications. Mounting them onto an RC car or mobile robot allows me to inspect the crawl space under the house (maybe even pull a cable) or simulate a rover mission on another planet. In these slow-moving, physically nearby situations, we’re much less affected by the range limitations and video lag. Unlike an airborne drone, a simple rolling vehicle can safely stop, allowing the telepresence driver to take a break or get reoriented.
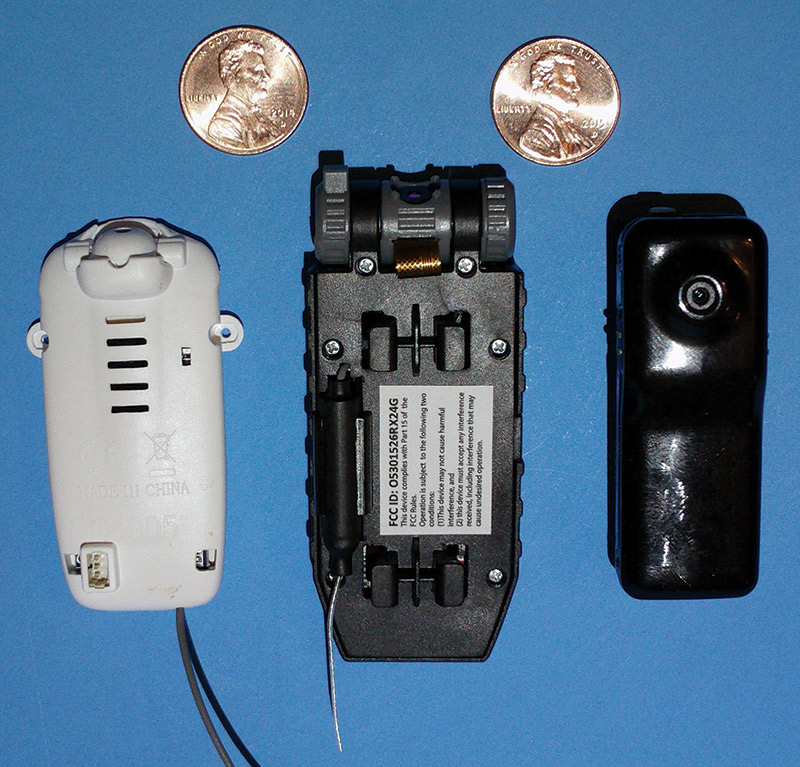
For this article, I tested the two drone cameras and mini spycam shown in Figure 1.
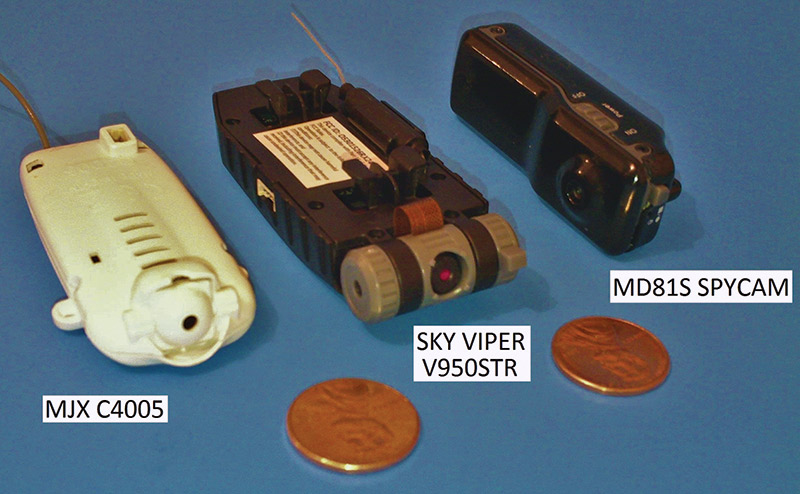
FIGURE 1.
They all emit a Wi-Fi signal to transmit video directly to an Android, iPhone, or iPad. The two drone cameras are somewhat similar, so let’s talk about those first.
The MJX C4005 is a camera add-on kit for a drone ($26 at Amazon). The Sky Viper V950STR is a complete flying drone which comes with a removable camera ($90 at Toys R Us). They are both small and lightweight, have external antennas, and must be connected to an external battery. Both come with plug-in cables to connect to the drone’s 3.7V LiPo battery, but we can use any suitable battery in the four volt range. I used 18650 Li-Ion cells in my tests. Both cameras draw around 250 milliamps and get slightly warm in use, so choose a battery with enough capacity for your needs.
If you use alkaline cells (three new AA, C, or D cells would be 4.8V), add an inline silicon diode to drop the voltage down to 4.1V-4.2V which is what the stock fully-charged LiPo delivers. Speaking of the stock configuration and its intended use, be mindful that these drone cams are designed for light intermittent duty in flight with a cooling airstream. Maximum flight times are 8-10 minutes on these drones. It might be unrealistic to expect them to work continuously in a hot mission-critical environment.
MJX’s C4005 camera weighs 10.5 grams. The housing has two flat mounting tabs and a molded shutoff used to attach to the stock drone. The kit includes screws and a screwdriver for attaching to the drone. Those flanges may be used to mount the camera anywhere if you like. The camera can be mounted “upside down” if desired, because the app has an option to invert the image and the lens can be tilted up and down somewhat.
The kit includes two different length cables for drone/helicopter installations. Choose either one to modify. Plug the white three-pin connector into the camera, then make standard power connections: red wire to positive 3.7V; black to negative/ground; and no connection to the green wire. Note that the red connector also fits, but the wire colors are not standard. When in doubt, refer to Figure 2.
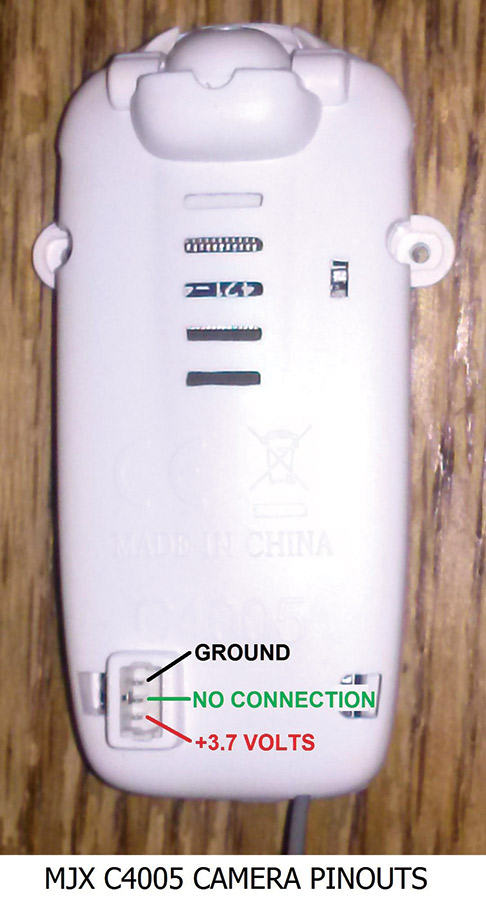
FIGURE 2.
The pin closest to the rear edge is positive with no connection to the center pin, and the pin closest to the front/lens is negative. Install a power switch inline with the battery connections. Current varies around 250 mA, and maxed out at 300 mA in my tests. The mounting position of the wired external antenna affects range, so experiment with different positions and orientations to maximize distance for your particular installation. The kit includes brackets to hold the antenna in place, as well as a phone holder and other hardware.
Once the camera is connected, download the MJX C4005 FPV app (NOT 4006) for the Android or iOS from the following links:
- https://play.google.com/store/apps/details?id=com.mjxrcfpv&hl=en
- https://itunes.apple.com/us/app/mjx-c4005-fpv/id959823602?mt=8
- www.mjxtoys.com/down/70.html
For proper power-up, follow these steps in order:
- Turn on the camera power (green LED), then wait ~15 seconds for the flashing red LED.
- Have your phone search for the “MJX C4005 FPV” Wi-Fi network and connect to it. You may have to disconnect from your default wireless network first. No worries if you get the message “MJX C4005 FPV is no response from the Internet.”
- Start the MJX C4005 app on your phone and press “MONITOR.” You should start receiving the video stream. It’s a very simple app; a screenshot is shown in Figure 3. Function buttons L-R are: video start/stop, snapshot, file folders, invert camera image, Wi-Fi icon, and go back. Photos and videos may be viewed within the app, and they are stored in system folders named MJXRCFPV_P and MJXRCFPV_V, respectively.
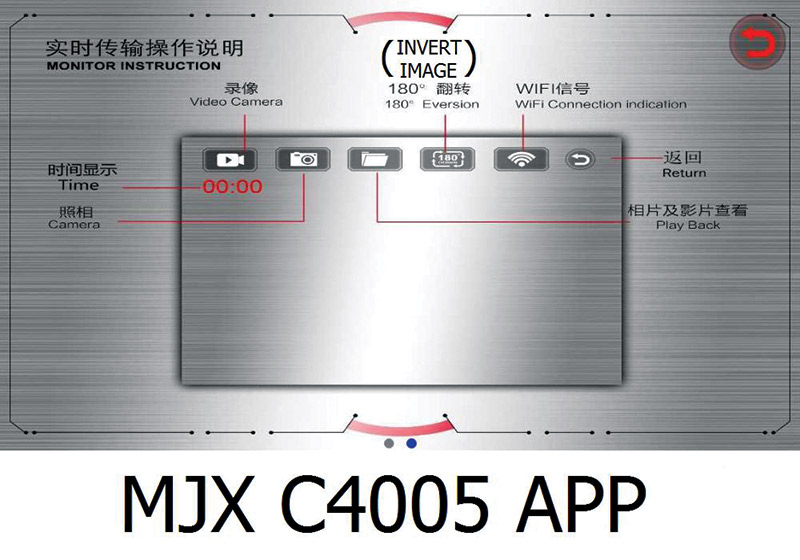
FIGURE 3.
My quick test rig in Figure 4 took about a minute to construct since I used one of my twin girls’ RC car. They were eager to drive the camera car around. The video shows the setup and our test drive.
FIGURE 4.
and another shows the walk-around camera test.
The camera delivers good quality video with decent range, and is easy to mount and use.
Sky Viper’s camera (Figure 5) is slightly heavier at 14.0 grams and integrates the antenna into the housing instead of leaving it dangling as the MJX unit does.

FIGURE 5.
Slide the camera forward to detach from the drone’s underside, and carefully unplug the power cable from the side of the camera. There is a short four-wire cable included in the package. One end plugs into the side of the camera; the other directly to the drone’s 3.7V 650 mAh LiPo battery. Note that you must remove a recessed Phillips screw on the drone’s battery door to open it. The polarized JST battery connector makes it pretty foolproof in getting the right polarity.
If you want to roll your own connections, carefully note the wire callouts in Figure 6.
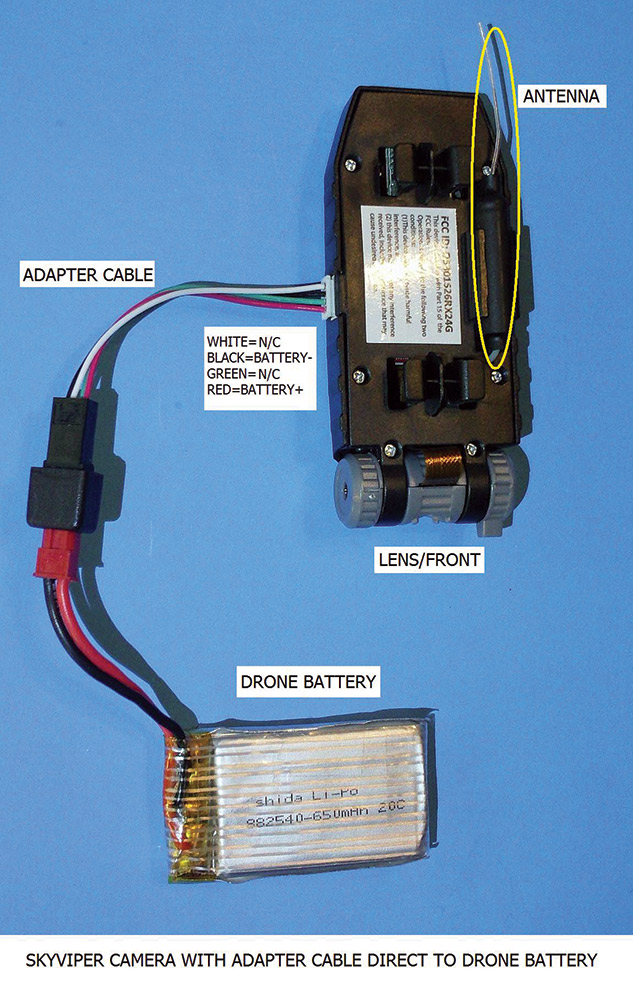
FIGURE 6.
The positive red wire goes to pin 1 closest to the lens, and the negative black wire goes to pin 3, which is the second pin from the rear of the camera. (We don’t use the green and white wires, which tell the drone electronics if the camera is connected to limit the stunt functions.) Once again, you are free to connect most any 4.2V (max) battery type, and consider adding an inline power switch to turn the camera on and off instead of constantly yanking on the battery connectors. Always pull on the connectors, not the wires.
This camera lacks mounting tabs, so you’ll need to get creative to attach this to a drone, robot, or something else. Thick foam tape may come in handy here. It’s also okay to mount this camera upside down since the app can invert the image for you. An internal nearly invisible red LED flashes when the Wi-Fi signal starts, but it’s only visible through the mounting tab holes on top. Spycam users may prefer the stealthy Sky Viper camera to MJX’s C4005 with its highly visible steady green and flashing red LEDs.
Download the Sky Viper app (Figure 7) from either https://play.google.com/store/apps/details?id=com.newskyviper or https://itunes.apple.com/us/app/sky-viper-video-viewer/id1004871562?mt=8 and watch the official Sky Viper pairing video at www.youtube.com/watch?v=kqQ_j5PoiOE.
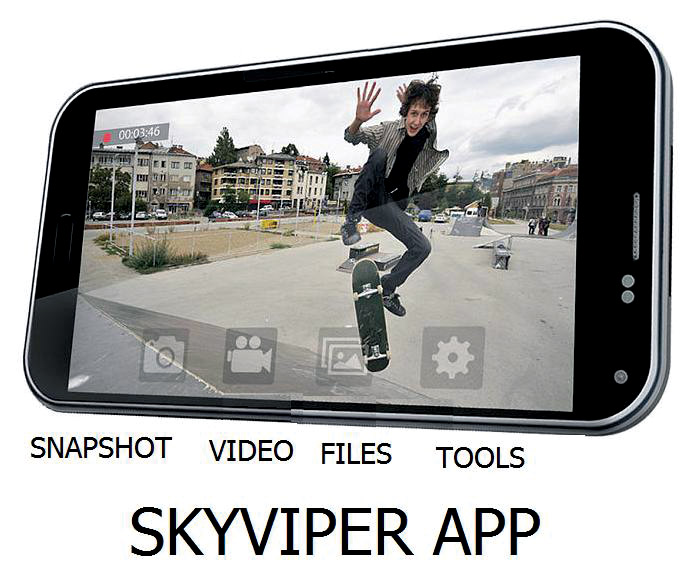
FIGURE 7.
Here’s my preferred sequence for surefire pairing:
- Power-up the camera and wait 20 seconds for the Wi-Fi signal to start.
- Do a Wi-Fi search and connect to the “Skyviper_xxxxxx” network. Again, you may have to disconnect from your home Wi-Fi signal first, and no worries if you get a “no response from the Internet” pop-up message.
- Open the Sky Viper app; it will connect and display the live video image.
The well-designed app has aspect ratio, brightness, and contrast controls in addition to mirror and flip image functions already mentioned, plus video start/stop, photograph, file access, and help commands per Figure 7. I posted two demo videos
and
Photos and videos are stored in the phone’s system folder named “Sky Viper Album.”
I bought my MD81S DV spycam from eBay China for $25 (Figure 8); there are many available now from US sellers, such as eBay #181910165487.
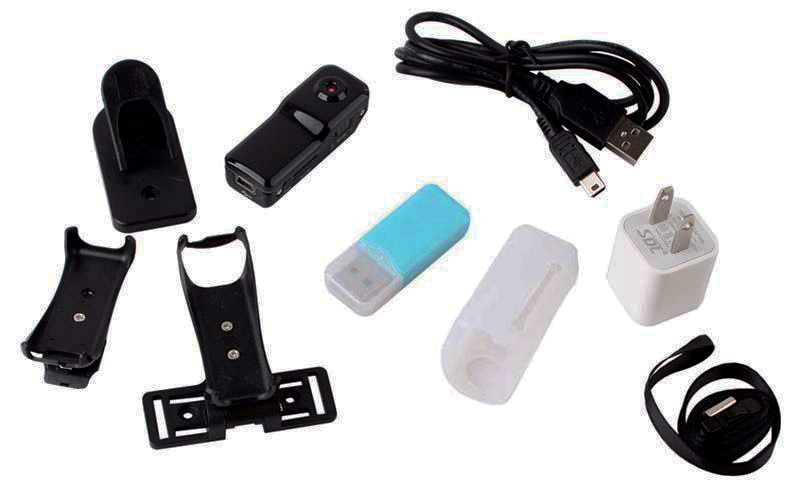
FIGURE 8.
This 17.3 gram self-contained camera differs from the drone cameras in several ways. It has its own rechargeable battery — which ran for about 30 minutes in my tests.
Secondly, the camera came with a bracket and several mounting clips and accessories which make it easy to attach and use. Third, it has no external antenna which looks tidy, but likely reduces the transmitting range. Fourth, the video image is higher quality than either of the drone cameras.
Finally, this is a multipurpose camera; it is also a webcam and digital video recorder (there is a slot for a micro-SD) with motion and sound triggers. I didn’t use any of those features, just the streaming Wi-Fi video signal (audio optional) sent to my Android phone.
I will add a cautionary statement here that I have only used one of these cameras, and the poorly translated instructions were very unclear. Everything I am relating here was achieved by thorough experimental testing, and is accurate for my device. I am believing that similar cameras sold by many different sellers all work similarly.
I have noticed some labeling differences in the camera function switches. Per Figure 9, my mode switch says Wi-Fi on top and HD Video on the bottom (bottom is what I used and sure seemed backward to me), whereas the photo from that US seller shows the Wi-Fi label on the bottom.
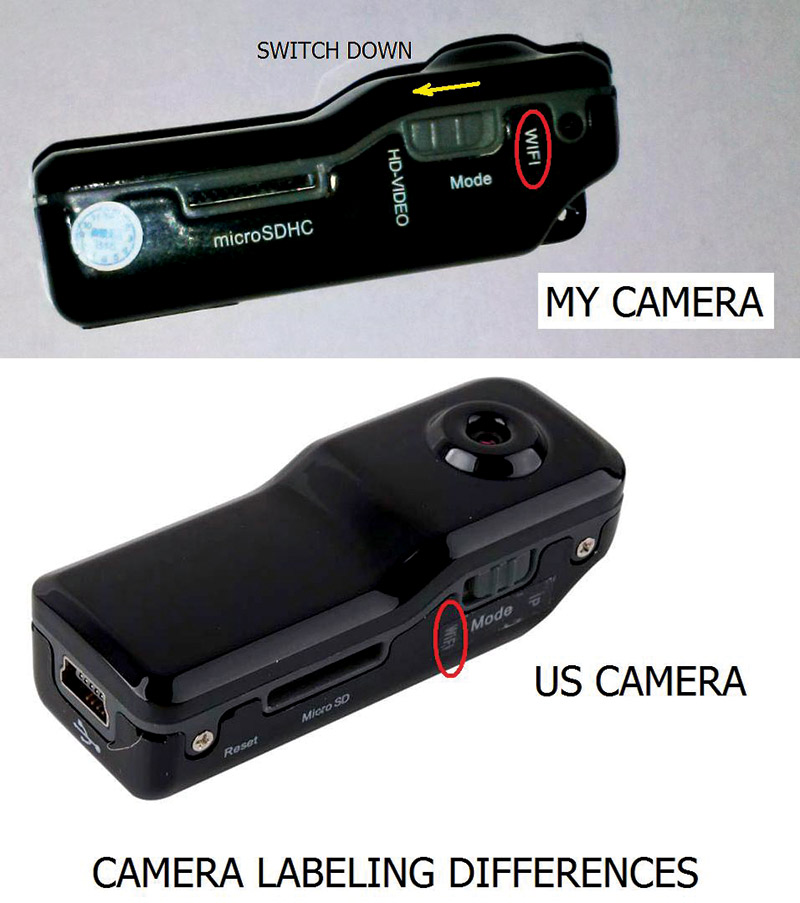
FIGURE 9.
I’m betting that the switch should always be in the bottom position in spite of different labeling. If it doesn’t work, try the other setting. My MD81S has one recessed blue LED on top. Some new ones may have more than one LED on top from descriptions I have read.
The camera instructions say to search for a “9527” app on Google Play and the Apple store, which led me to https://play.google.com/store/apps/details?id=x.p2p.cam&hl=en or p2pCamviewer by Yibo Chen for my Android phone. It looked a bit dodgy at first, but it works great! The same app for iPhone/iPad is at https://itunes.apple.com/us/app/p2pcamviewer/id595047004?mt=8, although I have not tested it myself. Please leave some feedback if you try that. Here’s what I have learned from my experimental testing:
- Charge the camera by USB cable for an hour or more (power off), but remove the USB cable for use; it will disconnect the camera after a short while.
- No micro-SD card is required; make sure the mode switch is down, toward the empty SD slot.
- Turn the power switch on and the blue LED stays solid for ~15 seconds. It then blinks once/second for ~25 seconds, then slows to one blink each four seconds to indicate the Wi-Fi signal is on. Connect to the “MD81S” wireless network and start the app, which has a “Plug & Play” icon.
- At the LOGIN screen, just tap LAN at the bottom, which takes you to a camera list. You should see your camera listed by its ID (which is printed on its sticker). It should say “Online,” so tap the icon — not the blue circle arrow which takes you into settings.
You should have a live video feed now with a high quality image as in Figure 10, which shows some of the function buttons. The app stores your photos and videos inside a phone folder named “Plug2view,” in a subfolder named “Record.”
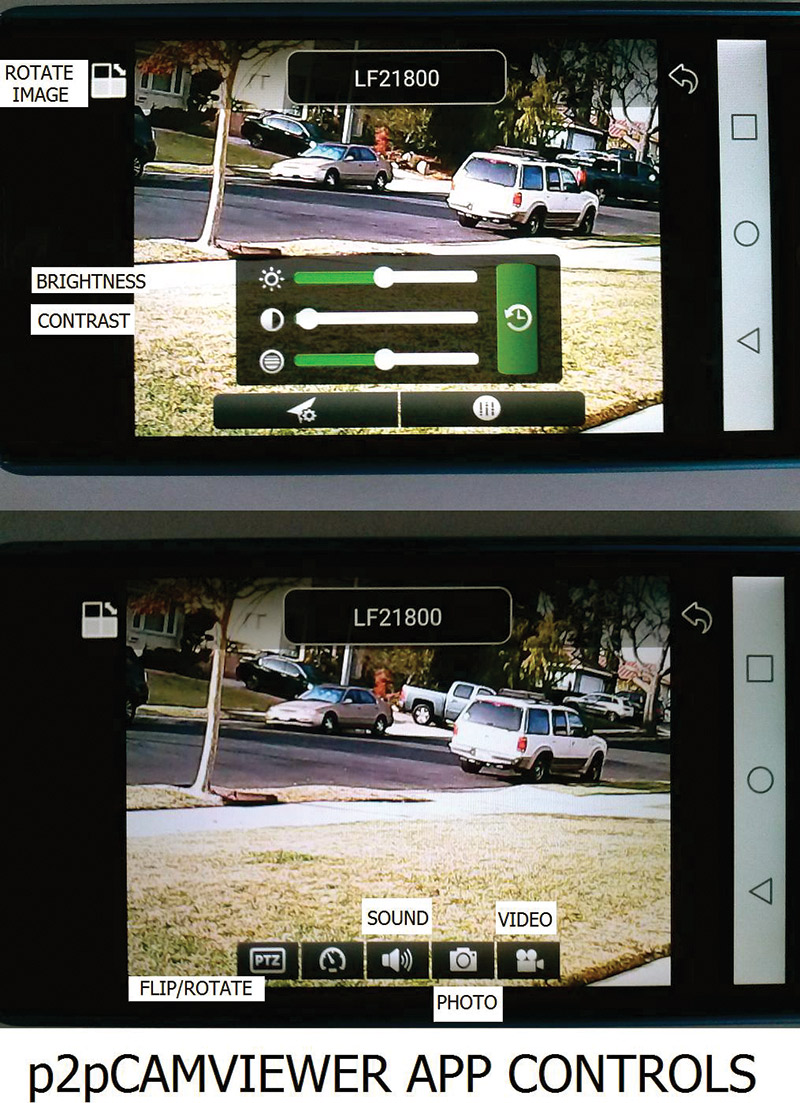
FIGURE 10.
The app has lots of features (I posted a demo video below). I found a few quirks in the flip and rotate functions, but you get what you pay for. To use the audio function, press the speaker icon, then the headphone icon. There is static plus several seconds of delay, but it’s the only one of these three cameras which sends sound.
All things considered, I find this spycam to be an amazing piece of technology. From my initial tests, it has shorter range, but a higher resolution image than the drone cameras. I haven’t mounted it on a mobile vehicle yet, nor have opened it up to see if a bigger battery and a better antenna can be attached. Plus, I have yet to delve into its many other features. Add all that to my “to-do” list.
Final Developments
Streaming Wi-Fi cameras are here, they are affordable, and they have lots of potential. If you already have the smartphone, that’s half of the system. Technology is like a fast moving train. You can get on board or get run over by it.
What will you do with a streaming Wi-Fi camera? Feel free to post your comments online; I’d really like to hear what people decide to do. As they say, “the only limit is your imagination.” Have fun! SV
Corrections
Note: Since this FPV camera article went to press, I found and tested a PC program which allows the MD81 spycam (only) video stream to be viewed on a Windows computer with a Wi-Fi connection here: www.eazzydv.com/c644.html
The program works well, using the bigger PC screen to an advantage to display the streaming video feed. While the software can record and play back the video stream, it uses an obscure and proprietary .hkv format which befuddles VLC player and YouTube. There is no video converter. The software’s bundled player “Play” is the only way to view, so you can’t share videos easily. Still images can be shared, and saved as standard .jpgs in the default location C:/Video/Monfile. Some users may find the PC software useful.
Android users: I have further tested alternative viewing apps which work differently on various Android devices for the MD81 spycam. If you experience any issues with the ‘p2pcamviewer’ app recommended in the article, you may want to try SYSM or ‘mysmartcam’—all by Yibo Chen and available on Google Play. They all have a similar UI and allow viewing, but their ability to record and playback video varies between devices.
Eric Ostendorff
Article Comments