
Build the Diet Buddy
By Dave Prochnow View In Digital Edition
Curb Your Late Night Fridge-Raiding Snack Cravings With This Little Bot That Cares
Sit at that soldering station too long and you could develop a strong case of the munchies — you know, those snack cravings that can only be satiated by a raid on the kitchen refrigerator. Unfortunately, this itching for a slice of leftover pizza and soda pop can lead to some ill-advised enlargement of your waistline. Even worse, concentrated bot building at the workbench can also promote prolonged amounts of time devoid of physical activity. Studies show that over-indulgent snacking coupled with inactivity can lead to poor health.
So, what’s a poor roboticist to do? Get some help, man. Or, more specifically, build yourself a Diet Buddy. Built around the venerable LM386N audio operational amplifier (op-amp) IC, your Diet Buddy sports one big beautiful brown eye.
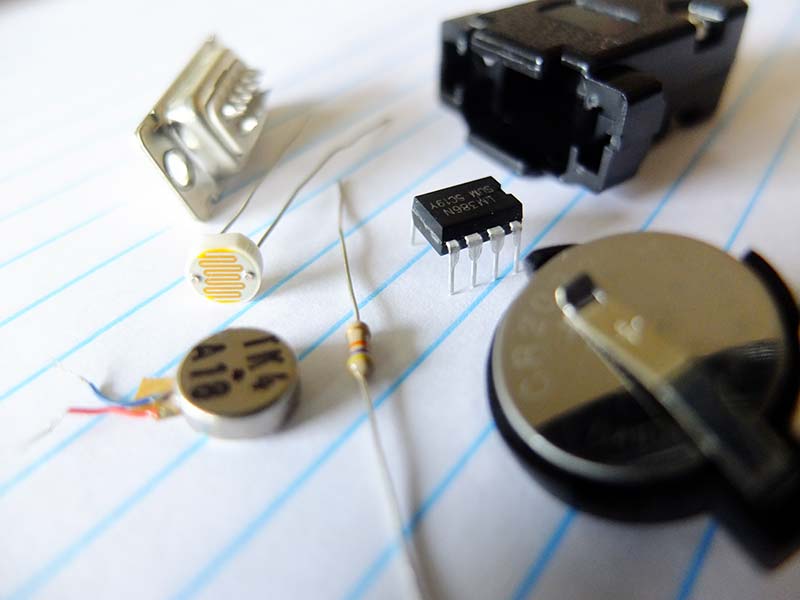
The Diet Buddy circuit is low on parts count but high on saved calories. (NOTE: The trimmer pot is missing from this photo.)
This eye — actually, a cadmium sulfide (CdS) light-dependent resistor (LDR) or photoresistor — stares thoughtfully at you as you open the fridge door searching for a quick bite. That’s when all hell breaks loose — literally.
The CdS light-dependent resistor responds to the refrigerator light and activates the LM386. The awakened op-amp sends electrical pulses to the attached vibrator motor, and soon your Diet Buddy begins dancing around the fridge shelf, begging you to reconsider your late night food raid.
Housed inside a recycled DB-9 serial cable hood, the Diet Buddy is a potent light-activated 3V robot that is an easy beginner’s project. When switched on by any light source, the small vibrator motor is able to give the Diet Buddy some fairly aggressive movement.
Therefore, you should be careful which food shelf you assign it to. Prolonged light could cause Diet Buddy to hop outta the fridge and land on the floor. (Remember Humpty Dumpty?)
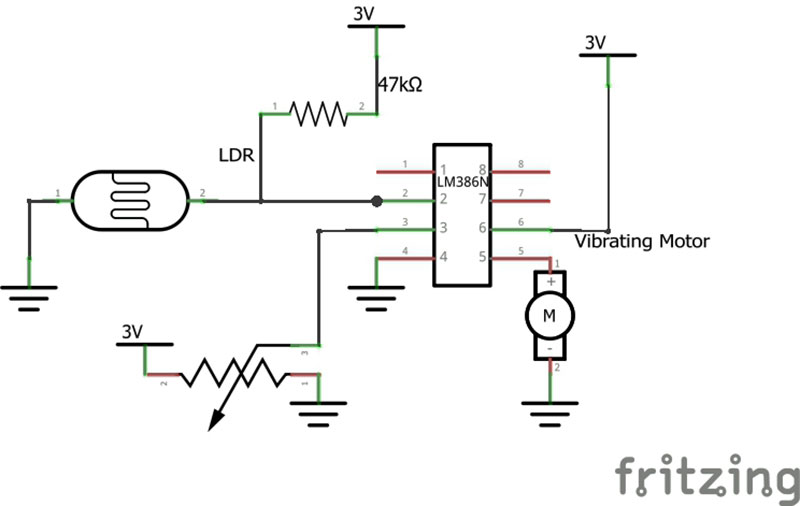
Diet Buddy schematic diagram.
Sharp-eyed robot builders will recognize the Diet Buddy circuit as similar to Randy Sargent’s venerable BEAM bot, Herbie. His BEAM — or Biology, Electronics, Aesthetics, and Mechanics — robot sported two “eyes,” along with a pair of wheels for propelling Herbie in its search for light. This light-attraction behavior is the feature that makes your Diet Buddy sound the alarm when the refrigerator door is opened.
There are several circuit differences between Herbie and the Diet Buddy:
- The gain pins (pin 1 and pin 8) on the LM386 are left open.
- Only one LDR is attached to the LM386 (pin 2), along with a trimmer potentiometer connected to the other op-amp input, pin 3.
- One motor is used for vibration. This motor is connected to pin 5 and GND.
- No wheels are used.
Seasoned builders know that the light/dark resistance in an LDR is extremely variable (no pun intended). Therefore, a 50K or 100K trimming potentiometer can be used for the pin 3 input. Likewise, the fixed resistor in the circuit can vary between 1K Ω to 47K Ω. In the case of our circuit here, a 47K Ω resistor is used. Additionally, this trimmer pot will enable you to fine-tune your Diet Buddy’s dark-to-light reaction time.
Step-by-Step Guide
This circuit is built “freeform” — without a circuit board. Additionally, the wiring for the LDR (i.e., one GND connection and a connection from pin 2 of the LM386 IC) is routed to two solder tabs on the inside of the DB-9 serial connector plug.
Wiring this connection to the inside of the DB-9 plug enables the LDR to be “plugged” into the outside of the DB-9 hood. This is aesthetically pleasing and will make any BEAM builder proud.
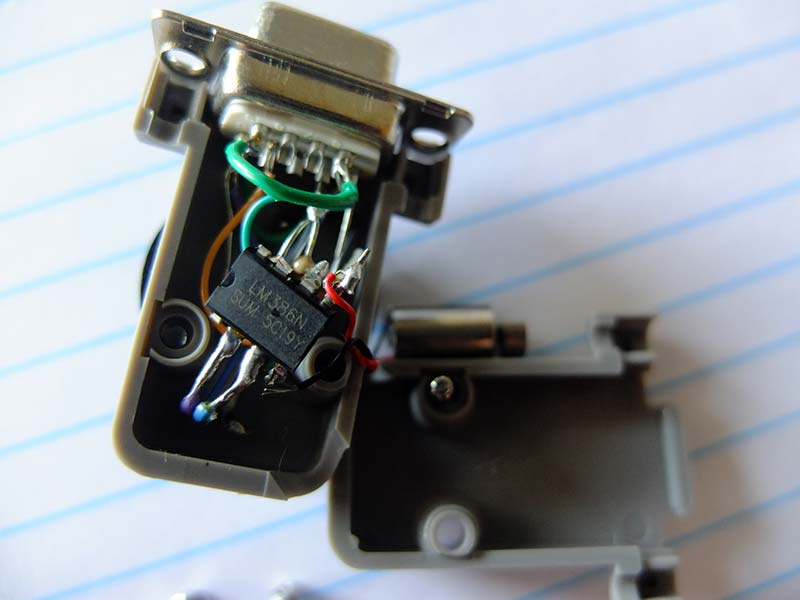
Build the circuit freeform inside the DB-9 hood shell.
Let’s begin:
Step 1. Snip off LM386 pins 1, 7, and 8. These connections will not be used.
Step 2. Solder a wire to pin 2 and connect the wire’s other end to a solder tab on the inside of the DB-9 serial connector plug. This connection will be used by the LDR on the outside of Diet Buddy.
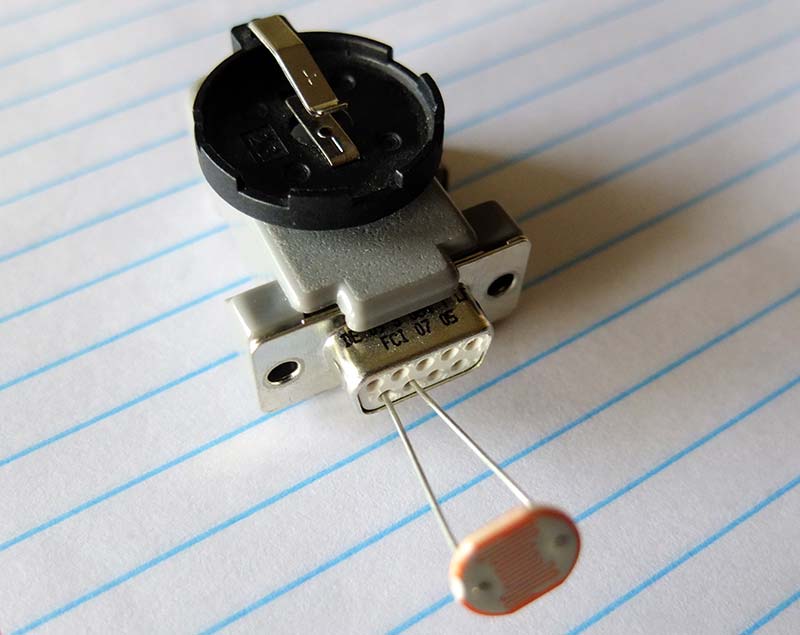
By soldering the LM386 pin 2 and GND terminal to a pair of DB-9 solder tabs, the LDR can then be plugged into the two appropriate external receptacles.
Step 3. Drill two holes matching the power terminals of the CR2032 battery holder in the top of the DB-9 hood. These holes will be used for routing the V+ and GND wires from the CR2032 battery holder.
Step 4. Solder one wire to each of the CR2032 battery holder terminals and glue the holder to the top of the hood.
Step 5. Solder the GND wire to a solder tab on the inside of the plug. All of the circuit’s other ground connections can be ganged onto this tab, too.
Step 6. Connect the fixed resistor (e.g., 47K Ω) between pin 2 and V+. The wiper connection on the trimmer pot (e.g., 100K) is connected to pin 3, and one of the remaining pot pins is soldered to V+. The third and final pin is connected to GND.
Step 7. Ground pin 4 to the circuit’s GND terminal and solder pin 6 to V+.
Step 8. Attach the vibrating motor’s positive lead to pin 5 and its negative lead to GND. Don’t worry if you get these leads backwards or you are unable to correctly ID the lead’s polarity. The motor will just run “backwards,” but it should still vibrate.
Step 9. Most pancake-style vibrating motors are supplied with a sticky pad. Peel the carrier sheet off from the sticky pad and attach the motor to the inside bottom half of the DB-9 hood.
Step 10. Carefully insert all of the components inside the DB-9 plastic hood and attach the two retaining screws. Insert the LDR leads into the two plug receptacles used in steps 2 and 5. It doesn’t matter which lead goes into which receptacle. Insert a CR2032 battery into the holder and test the circuit for light sensitivity. If your Diet Buddy is calm in the dark and agitated in the light, it’s ready for the fridge. If the motor runs continuously, adjust the trimmer pot and try to balance the light/dark resistance values.
Diet Buddy is now ready to help you watch your waistline. Now, all we need is a robotic drill sergeant to get your couch potato butt up and turn you into a lean, mean bot-buildin’ machine that matches your brawn with your brains. SV
| QTY | ITEM |
| 1 | LM386N audio op-amp |
| 1 | CdS LDR |
| 1 | Fixed 1K to 47K Ω resistor (NOTE: a 47K Ω resistor was used in this circuit.) |
| 1 | Pancake-style vibrating motor |
| 1 | DB-9 serial cable hood |
| 1 | CR2032 3V battery |
| 1 | CR2032 battery holder |
| 1 | 50K or 100K trimming potentiometer (NOTE: This circuit used a 100K pot.) |
Make a Donut Run
A recent study suggests that reduced exercise might contribute more to obesity than increased caloric intake. The data, analyzed by the National Health and Nutrition Examination Survey (and subsequently published in the American Journal of Medicine) found that during a 20 year span between 1988 and 2010, US adult women who reported no physical activity jumped up from 19.1% to 51.7%. Similarly, during the same time period, the absence of physical activity for US adult men increased from 11.4% to 43.5%. According to lead investigator Uri Ladabaum, MD, MS, Associate Professor of Medicine, Stanford University School of Medicine, the higher rates of obesity did not show "any significant population-level changes in average daily caloric intake." So, you can eat that donut, just make sure you run to go get it.
Article Comments