An Asteroid Prospecting Primer for Roboticists
By Bryan Bergeron View In Digital Edition
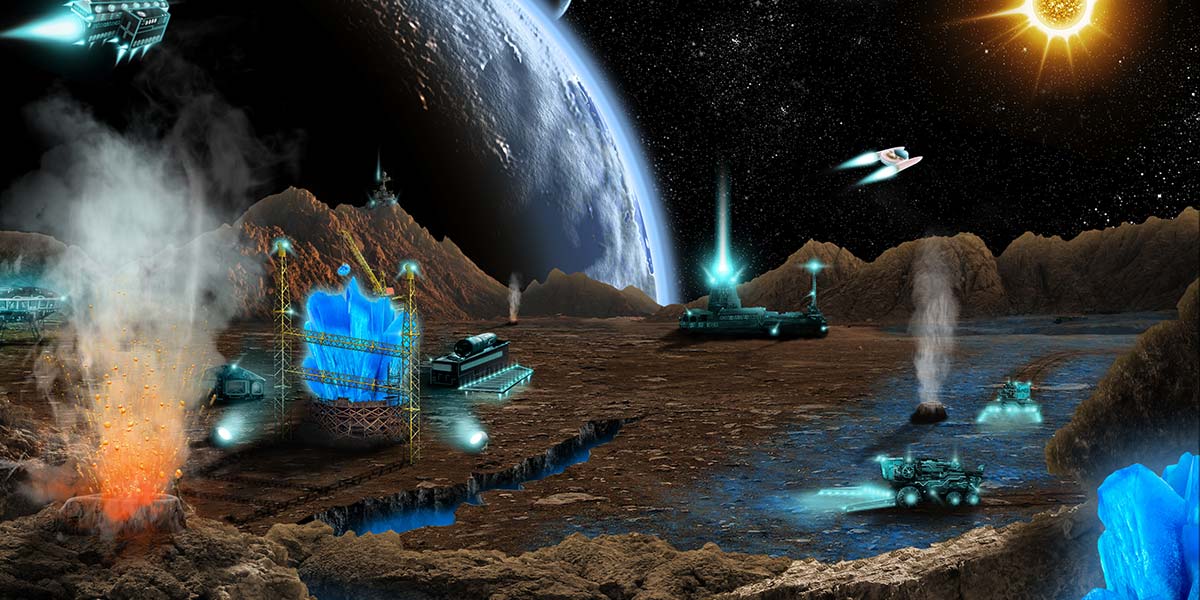
It’s the not-to-distant future and you’ve just spent your life savings on an asteroid lease and launch fees for an autonomous prospecting drone of your own design. If you’ve done your homework, you’ll be able to license mining rights to a major developer and buy your own launch vehicle. If that future appeals to you, then you’ll have to start now to develop an understanding of geology — especially how to identify rocks and minerals. Hence, this primer on geology with a focus on prospecting with sensors.
THE PLAN
If your goal is to one day build an autonomous prospecting drone to scour the asteroid belt for rocks and minerals, then you should first learn about the physical and chemical properties of rocks and minerals here on earth. Next, you’ll need to leverage this knowledge with a few simple tools to master identification of various rocks and minerals.
Finally, you’ll have to use your knowledge of geology and robotics to develop the sensors and software to automate the prospecting process.
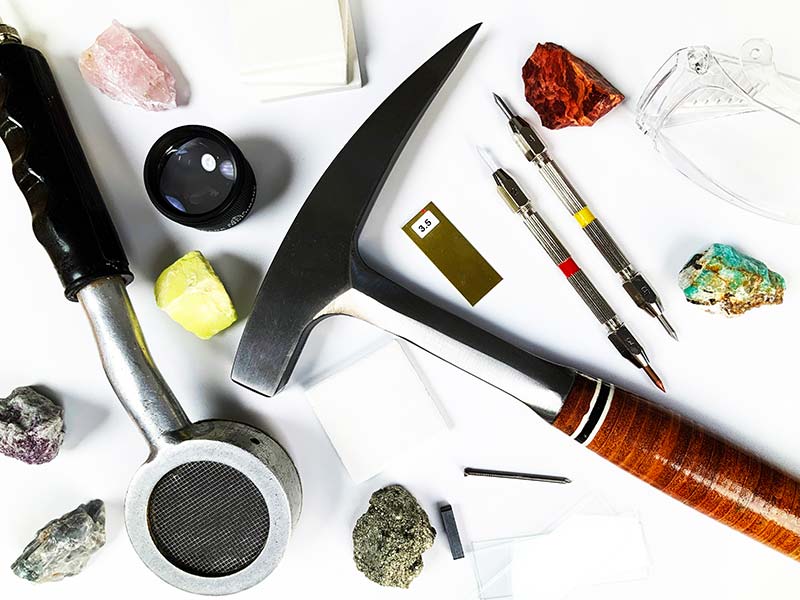
Figure 1. Basic tools of the earth-bound geologist.
GEOLOGY 101
Geology encompasses earthquakes, volcanic activity, and other phenomena — much more than the identification of rocks and minerals. However, for our purposes, we can focus on locating and identifying common rocks and minerals. There are several excellent books on rocks and minerals. I have The Illustrated Guide to Rocks & Minerals, by John Farndon. It’s filled with colorful high-resolution photographs.
Then, there’s the visual Rock Database (fossweb.com) that lets you compare images of different rock types side-by-side. However, images can only go so far. The identification of rocks and minerals is largely a contact sport that relies on more than imaging. As such, you can acquire a collection of common rocks and minerals, such as the “Washington School Collection” in Figure 2 and examine each specimen carefully.
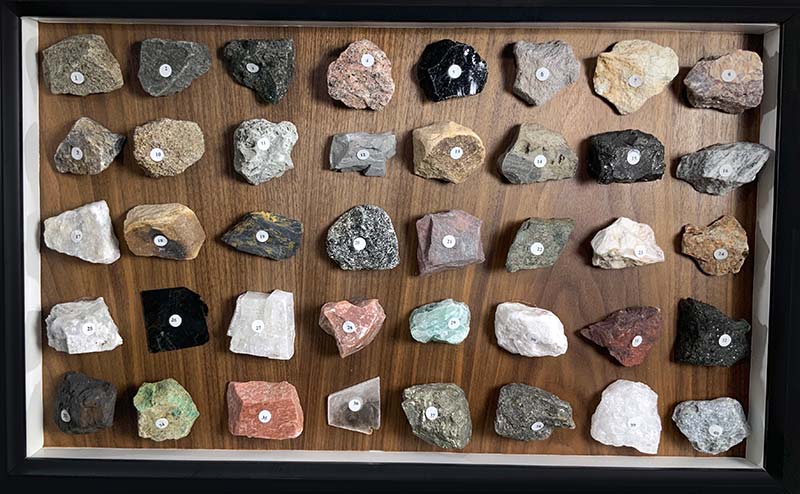
Figure 2. The “Washington School Collection” of rocks and minerals.
I purchased the collection of 40 rocks and minerals from Carolina Biological Supply. Less expensive sets with smaller stones are available on Amazon and eBay. After examining each rock or mineral, I mounted it — examination side down — with silicon glue in a wooden frame I built from 3/4 inch plywood. Each specimen is three inches in width, or the size of a navel orange. The numbers affixed to each specimen reference the standard Washington School Collection index.
The first five samples in the first three rows (from left to right and top to bottom) are igneous rocks, sedimentary rocks, and metamorphic rocks. The first five items in the last two rows are minerals.
Minerals
Minerals are solid chemical compounds with a well-defined composition and, in pure form, a crystal structure. Sulfur, mica, quartz, and talc are examples of minerals.
Rocks
Rocks are aggregates of minerals. Geologists approach the task of categorizing rocks by identifying how they were formed. Igneous rocks have solidified from lava (volcanic eruptions) or magma (liquid rock below earth’s crust). Examples of igneous rocks include basalt, granite, hornblendite, obsidian, and pumice.
Sedimentary rocks, which are formed by the deposition of minerals followed by cementation include chalk, coal, limestone, and sandstone. Metamorphic rocks are formed by the transformation (i.e., metamorphosis) of one type of rock through heat and pressure to another type of rock.
Metamorphic rocks include marble, quartzite, slate, and soapstone. Rocks in a given category have similar characteristics. For example, limestone and sandstone — which are both sedimentary rocks — can be difficult to differentiate from each other visually.
IDENTIFICATION AND DIFFERENTIATION
Visual
The most obvious and fundamental means of identifying rocks and minerals is visual inspection (see Figures 2-7). Figure 2 hints at the various colors and textures represented by rocks and minerals. The samples in Figure 3 — chrysocolla, quartz, hematite, and pyrite — illustrate the variety in visual presentation.
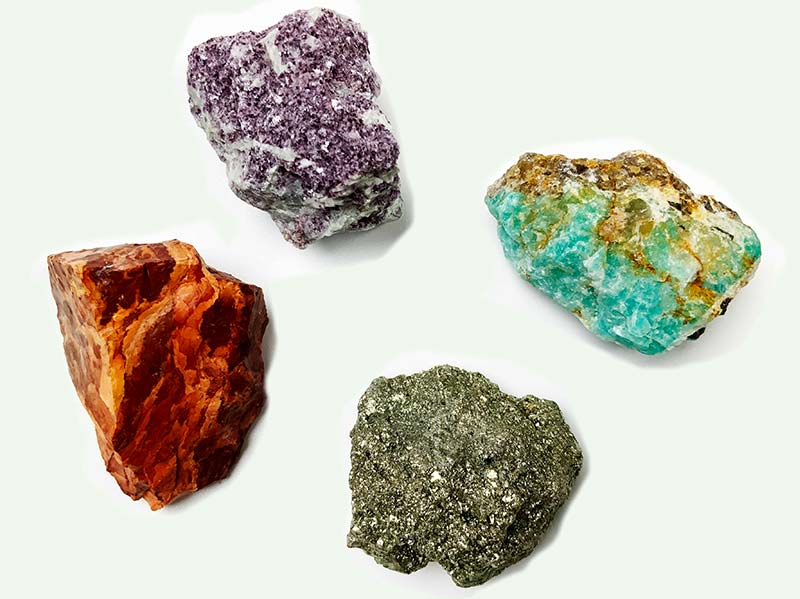
Figure 3. Clockwise, from top: chrysocolla, quartz, hematite, and pyrite.
Conversely, the minerals shown in Figure 4 — hornblende, peacock ore, and malachite — illustrate how similar different minerals can appear.
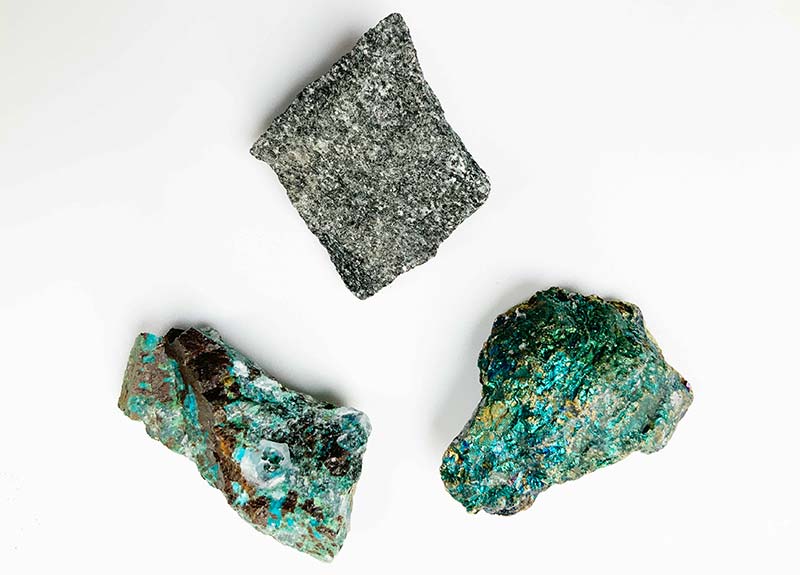
Figure 4. Clockwise, from top: hornblende (5-6 Mho), peacock ore (3-3.25 Mho), and malachite (3.5-4 Mho).
Figures 5 and 6 which show peacock ore and malachite at 200x illustrate how magnification can help differentiate samples.
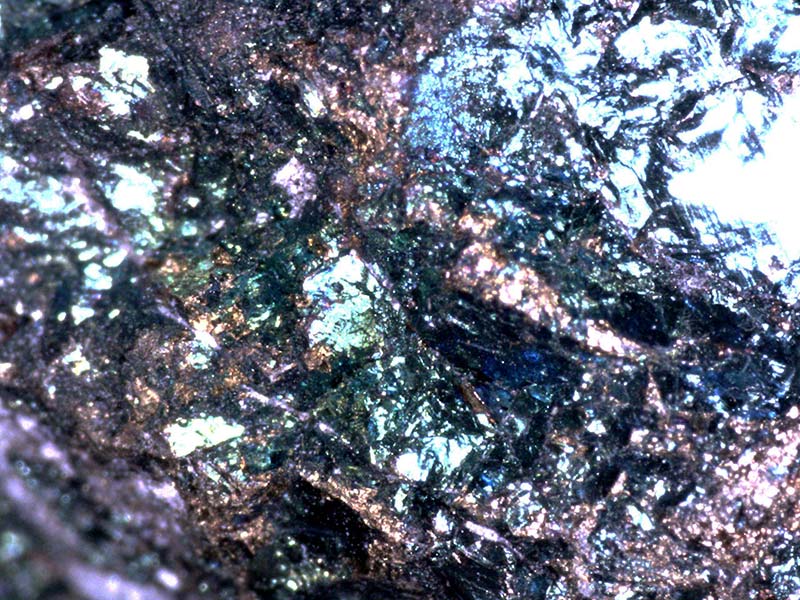
Figure 5. Peacock ore, 200x.
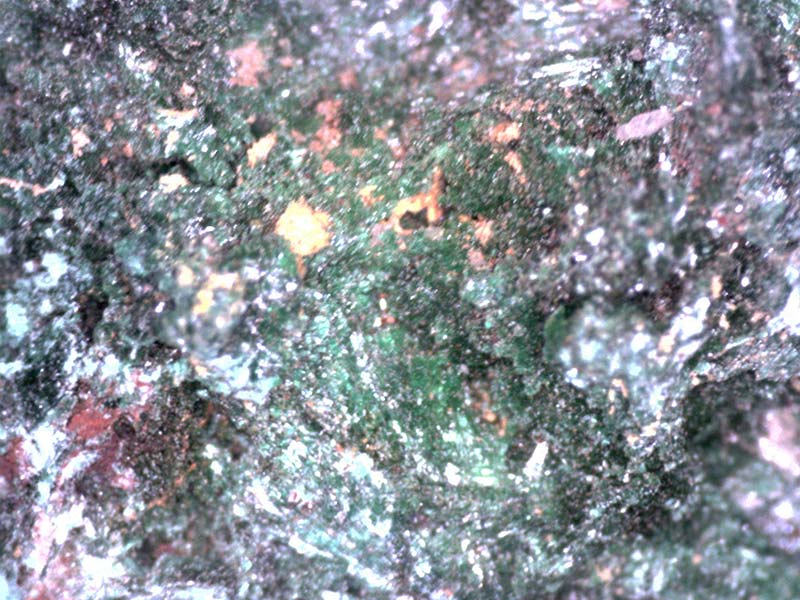
Figure 6. Malachite, 200x.
Figure 7 shows how mica can appear in flat sheets as well as spheroids.
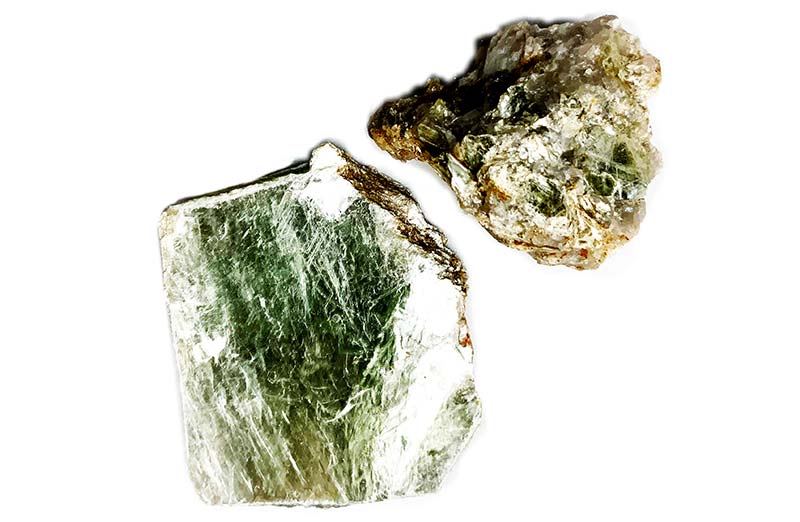
Figure 7. Mica sheet (left) and sphere (right).
Absolute and Relative Hardness
Assessing relative and absolute hardness (measured in Mhos) is the second most powerful means of identifying and differentiating rocks and minerals. Hardness measures range from the hardest (10) down to (1) for the softest. As shown in Table 1, this range encompasses diamonds (the hardest) and talc (the softest).
| Mho | Material |
| 10 | Diamond |
| 9.5 | Silicon Carbide |
| 9 | Corundum |
| 8.5 | Chromium |
| 8 | Topaz |
| 7.5 | Beryl |
| 7 | Ceramic Tile, Quartz |
| 6.5 | Steel File |
| 6 | Feldspar |
| 5.5 | Glass, Steel Nail |
| 5 | Turquoise |
| 4.5 | Nickel |
| 4 | Iron |
| 3.5 | Brass |
| 3 | Marble |
| 2.5 | Gold |
| 2 | Calcite, Gypsum |
| 1.5 | Sulfur |
| 1 | Talc |
Table 1. Hardness ranking, from hardest (Diamond, 10 Mho) to softest (Talc, 1 Mho) for common materials.
From the table, we can determine that diamond will mark or scratch every other rock or mineral.
For example, take a look at Figure 8 which illustrates the relative hardness of sulfur (1.5 Mho) and scoria (5-6 Mho).
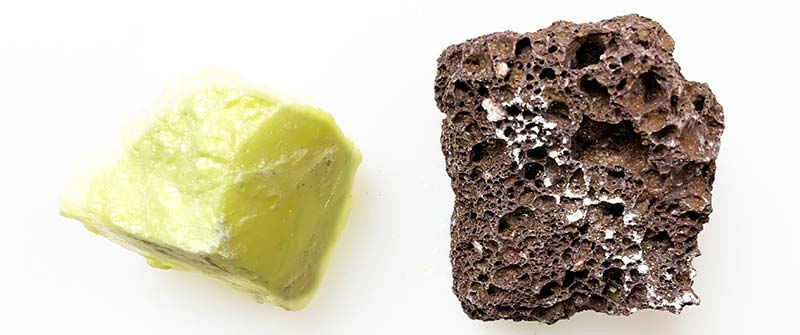
Figure 8. Sulfur and scoria, post-marking, showing soft sulfur (1.5 Mho) and marked harder scoria (5-6 Mho).
The soft sulfur marks the much harder scoria. Figure 9 shows how the softer pyrite (6-6.5 Mho) marks the harder white ceramic square (7 Mho).
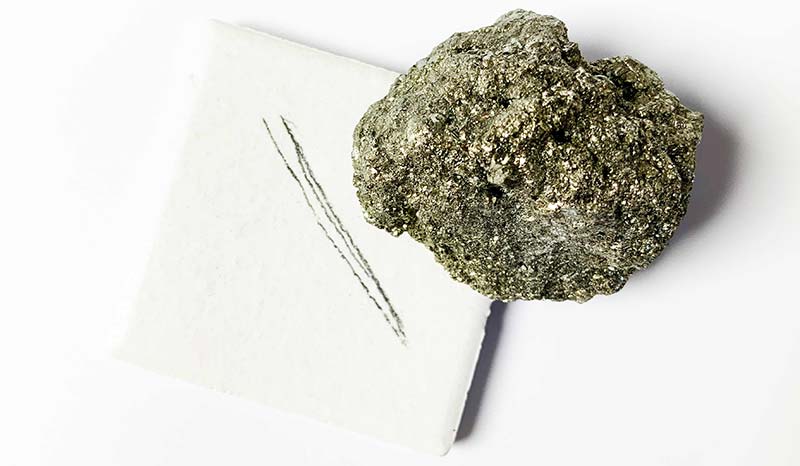
Figure 9. Pyrite (6-6.5 Mho) marking a white ceramic square (7 Mho).
Returning to the earlier samples in Figure 3, the hardness figures are: chrysocolla 3.4 Mho; quartz 9 Mho; hematite 8 Mho; and pyrite 3 Mho. Similarly, Mho values for the specimens in Figure 4 are: hornblende 5-6 Mho; peacock ore 3-3.25 Mho; and malachite 3.5-4 Mho.
That is, in looking for differences between the three specimens in Figure 4, peacock ore is the softest, hornblende is markedly harder, and malachite is somewhere in between.
Figure 10 shows a standard hardness test kit from mineralab.com.
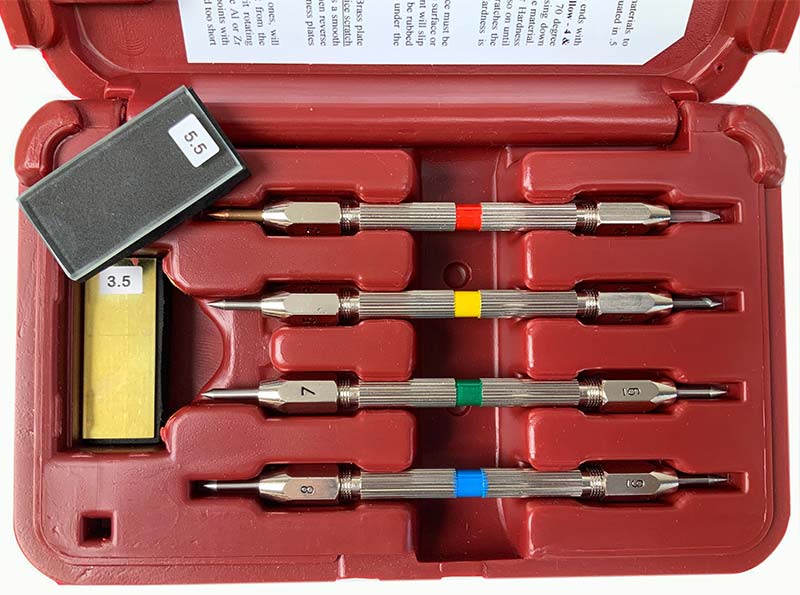
Figure 10. Mho hardness kit.
There’s a glass plate (5.5 Mho), a brass plate (3.5 Mho), and a set of pens with tips of specific Mho values (1-10). Figure 11 shows the kit in use on a sample of sandstone, which has a hardness rating of 6-7 Mho.
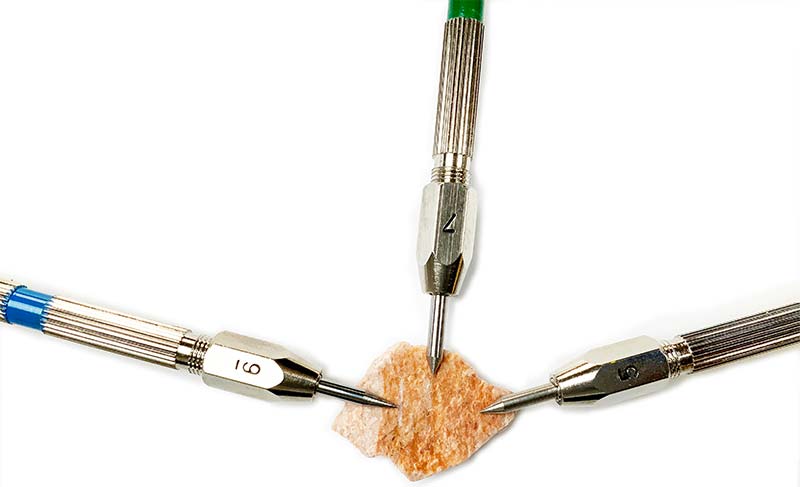
Figure 11. Sandstone (6-7 Mho) tested with 9 Mho (left), 7 Mho (center), and 5 Mho (right) hardness points.
This is consistent with the markings from the three pens. The #9 pen (left) creates an obvious scratch mark on the softer sandstone. The #7 pen (center) creates a mark that’s barely visible. The #5 pen (right) can’t scratch the sandstone.
Electrical Conductivity
We’re all familiar with the concept of electrical conductivity, or the inverse, resistance. A carbon composition resistor comes closest to the typical conductive stone or mineral.
Of course, ores of gold, silver, copper, aluminum, and other metals may exhibit lower resistance than, say quartz.
Some materials, such as pyrite, are good electrical (and thermal) conductors. This can be expected of pyrite because it’s composed of iron and sulfur.
Some rocks and stones have unique electrical properties that can be exploited to aid in their identification. For example, not only is pyrite a good conductor, it’s also strongly thermo-electric. It generates a current when heated.
Thermal Conductivity
Thermal conductivity or the ability to conduct heat is a good variable in identifying stones and minerals. It’s not surprising that crystals of minerals are generally good thermal conductors. As noted above, pyrite is another good thermal conductor.
The best thermal conductor of all is diamond, which is a much better thermal conductor than copper.
Specific Gravity
Pure samples of stones and minerals have characteristic specific gravity and density values. Recall that density is simply mass/unit volume and specific gravity is the ratio of the sample’s density with that of water at STP (standard temperature and pressure). For example, while gold has a specific gravity of over 19, pyrite or fool’s gold has a specific gravity of 5. Stated another way, gold has a much higher density than pyrite.
Melting Point
The temperature at which a solid becomes liquid is stone and mineral specific. For example, sandstone becomes liquid at 1550°C and marble becomes liquid at 825°C. Unfortunately, it takes a lot of energy (and engineering) to safely melt stone and minerals.
Reaction to Chemicals
Chemical reactions can be as simple as oxidizing; that is, rusting on exposure to water. Pyrite, composed of iron and sulfur, rusts on exposure to water. There are other reactions as well, such as the response of a base to a strong acid, such as hydrochloric acid (HCL). Limestone, composed primarily of calcite (CaCO3), reacts to HCL to form calcium chloride (a salt), carbon dioxide, and water. Refer to Figure 12.
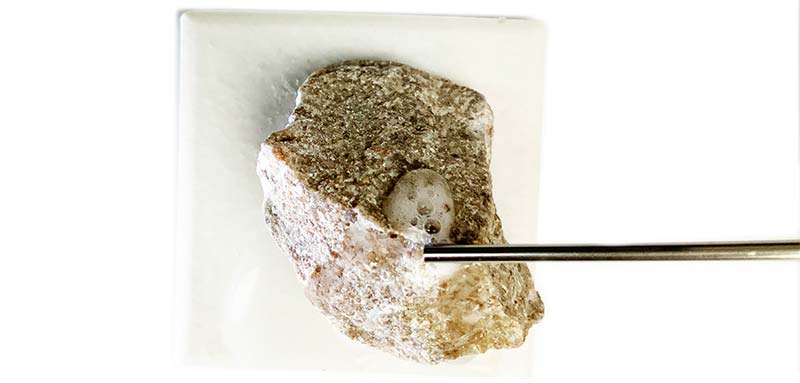
Figure 12. Limestone (2-4 Mho) with HCL drip.
Magnetic Attraction
Iron-containing rocks may exhibit magnetism or at least magnetic attraction to a strong magnet. It’s an easy way to differentiate, say, magnetite from sulfur (Figure 13).
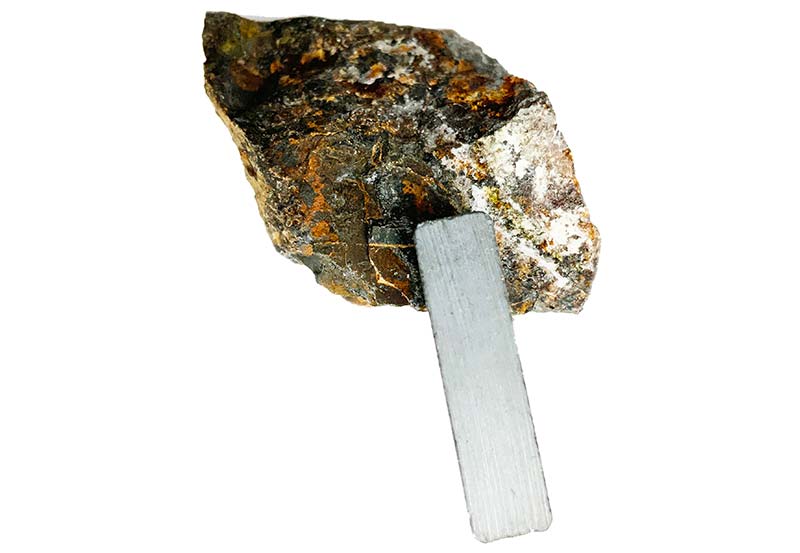
Figure 13. Magnetite (5-6 Mho) with rectangular magnet attached.
Radioactivity
If you’re prospecting for uranium, radium, plutonium, or other radioactive elements, then you need a device that responds to the particles emitted by the material. Uranium 235 ore like that in Figure 14 generates primarily low-energy alpha particles.
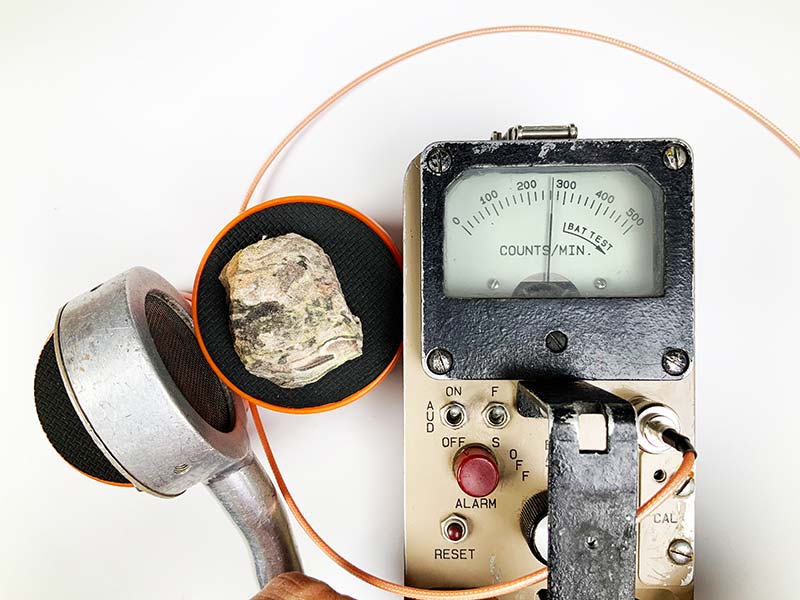
Figure 14. Uranium ore (6 Mho) tested with Geiger counter.
If you recall from physics, alpha particles (2 protons + 2 neutrons) are relatively large and stopped by a sheet of paper.
SENSOR DESIGN
If you haven’t done so already, get your hands on some rocks and minerals. I’ve found that eBay is a great source for inexpensive collections. So is walking down a trail in rocky terrain. Whatever the source, pick up a rock. Is it rough or smooth? Cool to the touch? Solid and relatively indestructible like granite or fragile and friable like mica? After you’ve identified the rock or mineral manually, try to design a sensor most appropriate for the rock or mineral. The following are suggested starting points.
Visual — A color camera such as the CMUcam ($70) and full spectrum, limited spectrum, UV, and IR LED illumination. Consider using reflected light vs. light transmitted through a thin slice of rock or mineral. Start simple. Your camera setup should easily differentiate, say, green malachite from yellow sulfur crystals. Then, move to IR or UV illumination. Can you use the specific spectra to differentiate or identify the type of rock or mineral?
Absolute and Relative Hardness — Consider building a claw containing a progression of Mho values. When used with a camera, you should be able to visually identify the number and location of scratch marks on a specimen. The next step is to use a lookup table to identify the most likely rocks or minerals.
Similarly, consider using glass, ceramic, nails, and other rocks together with your camera setup to determine the relative and absolute hardness — and ultimately the identity — of a rock or mineral.
Electrical Conductivity — Simply take out your DMM and with the probes separated, say 5 mm apart, measure the resistance across the face of the specimen. Graphite and iron ore will read considerably less than quartz.
Thermal Conductivity — Jewelers use thermal conductivity to differentiate fake from real jewels. In designing a sensor intended to measure subtle differences in thermal conductivity, I’d start with a probe featuring a resistor and thermistor in close proximity.
Energize the resistor, bring the probe to working temperature, and touch the probe to the face of the specimen. Record the change in resistance over time and compare it to tests you’ve run on known rocks and minerals. Recall that the rate of thermal transfer is dependent on the relative differences in temperature. Ambient temperature can be a factor as well.
Specific Gravity — This one is a little more complicated because you’ll have to establish the volume of the specimen before weighing it. This might include a robotic arm and a beaker of water or other solvent and a lab-grade scale. Alternatively, you might be able to estimate the volume of a specimen with enough accuracy to come up with a good specific gravity estimate.
Melting Point — You may be able to create an insulated crucible and torch system capable of melting sulfur (melting point 235°F/113°C). Otherwise, there isn’t much use for this sort of sensor on terrestrial rocks.
If your system was actually going into space, then chunks of comets and potentially some asteroids composed of frozen gasses could be the target of a simple melting point sensor. You’d likely learn a lot by creating a melting point sensor for sulfur.
Reaction to Chemicals — I’d focus on differentiating limestone from other rocks using HCL or even tabletop vinegar. Whatever reaction you choose, you’ll likely have to devise a visual means of detecting the reaction — such as the bubbles in HCL applied to limestone.
Perhaps use a carbon dioxide sensor (about $25 on Amazon or Mouser) to detect the gas as it bubbles off the surface of the limestone. Or, perhaps detecting changes in surface reflection from a brightly illuminated limestone specimen would be preferred.
Magnetic Attraction — I’d start with a $10 garden-variety magnetometer from the likes of Amazon, Mouser, or SparkFun to detect iron-ore containing specimens. I’d connect the sensor to the head of a robot arm or the chassis of a four-wheel drive R/C land rover.
Radioactivity — I’d consider repurposing an old radiation sensor or purchasing a modern kit ($45+, Amazon). The advantages of a kit include a smaller size, lighter weight, and lower power drain on a set of batteries.
NEXT STEPS
Learning to identify and differentiate rocks and minerals with sensors of your own design can be a never-ending process. There’s always room for improvement, given time and resources. For example, I’ve been working with a 5W laser repurposed from a cutting table and a spectrograph based on the iPhone to identify specific elements in rock.
If you’re serious about robotic exploration and prospecting — whether on the ocean floor, a mountain peak, or your back yard — then take the time to master geology. Once you master the art, you’ll be able to transfer it to an AI/robotics platform.
Who knows? You and your prospecting robot could rescue our resource-limited world — and launch our inevitable expansion into space. SV
Article Comments