A Self-Guiding Robot Build Using ROS and a Single-Board Computer
By Wyatt Leigh Gilmore View In Digital Edition
Building autonomous machines has come a long way in the past decade thanks to smaller form factors and improved power-to-performance ratios, making them more easily accessible. With simple Linux scripting skills, one can build most any design by utilizing an open source software stack called Robot Operating System (ROS).
In this article, we’ll look at an example robot application which uses a Roomba as a platform and a single-board computer (SBC) as a controller. Specifically, we’ll be using Technologic Systems’ TS-7970, but you can apply the principles in this project to many SBC solutions.
The Problem and Solution
Historically, robots have needed a substantial amount of power and a team of engineers to overcome long and arduous software development. Previous applications with the ROS software have relied on the energy-hungry i386 architecture, which can quickly drain a battery. With the TS-7970 using less than three watts in typical conditions and 15 mW in sleep mode, you’ll have plenty of energy headroom to power, monitor, and control motors and sensors.
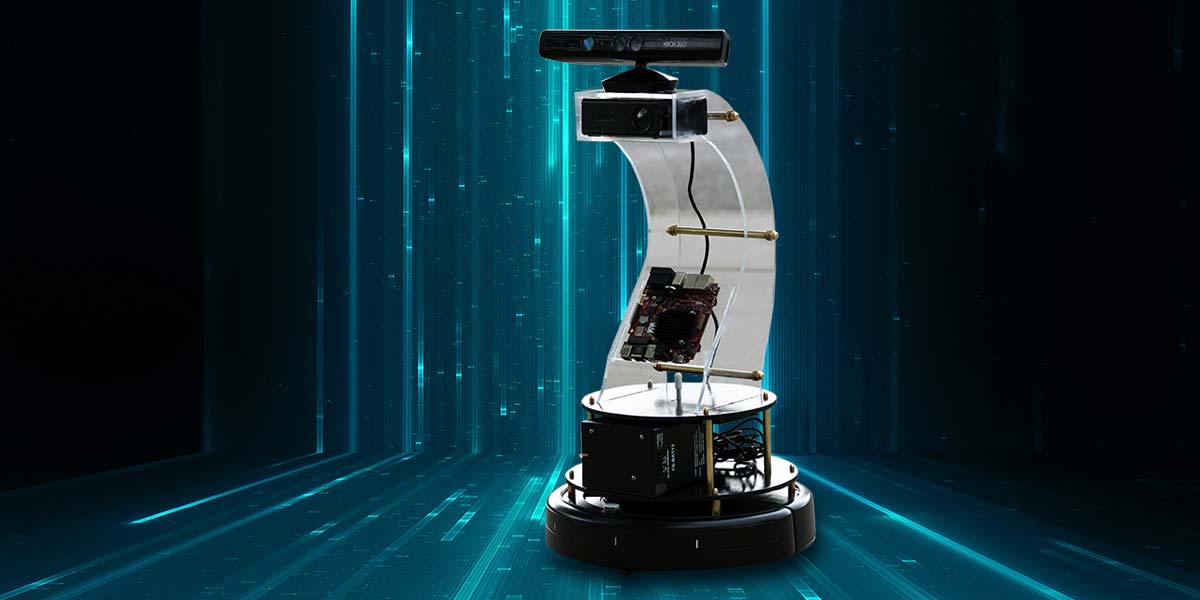
The embedded design of the TS-7970 allows it to endure high vibrations, debris, and temperatures from -40°C to 85°C. Additionally, most — if not all — the communication ports and protocols you would need to build a simple robotic system are included onboard, like DIO, UARTs, CAN, Wi-Fi, Bluetooth, XBee, and more. Finally, the footprint of the TS-7970 is small enough to fit in nearly any enclosed application as it requires little room or airflow. Refer to Figure 1.
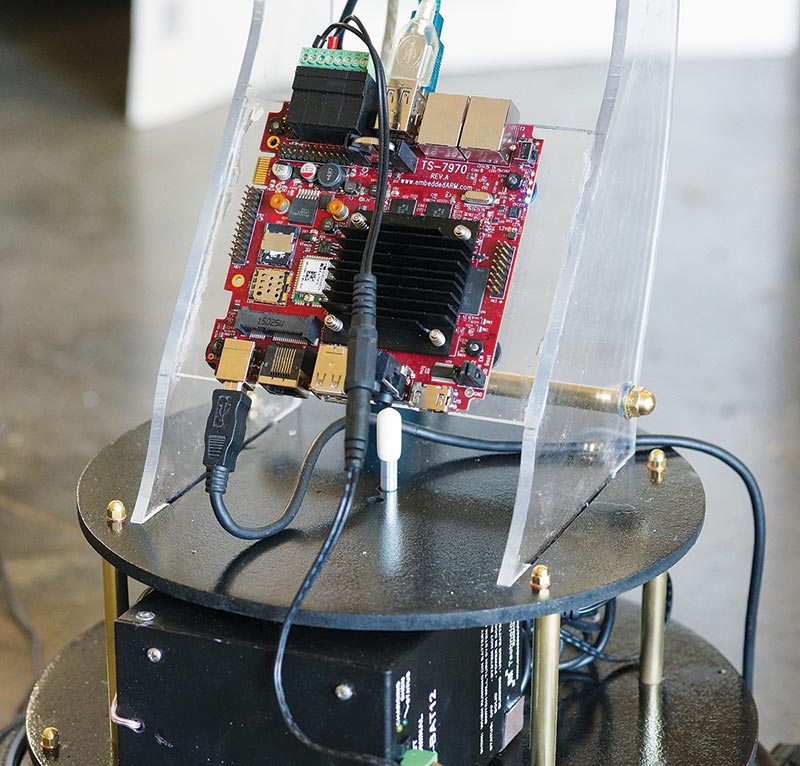
FIGURE 1.
Software
ROS is a popular robotics library available for Linux. This open source framework is a simple yet in-depth way to interact with all your sensors and motors. In industrial, commercial, and personal endeavors, ROS makes for an easy-to-manage and highly efficient toolset for your automated system. From simple manual control to full artificially intelligent maneuvers, ROS can guide your application, or run it completely stand-alone.
Many real world applications focus on autonomous motion and collision avoidance. For example, there’s a small number of companies who have deployed autonomous farm equipment to tend fields without human interaction using ROS. These heavy farm tractors have the ability to see depth, color, and range in real time, and know exact position data from GPS. With these simple abilities, the tractors can take commands from their operator or follow a set of their own paths and routines.
Using such compact hardware, we can easily make a smaller robot of this kind for our own use.
ROS can be used in most major Linux distributions including Debian, Yocto, Ubuntu, and several other different hardware architectures, including ARM and x86. This robot utilizes the ARM-based TS-7970 with an Ubuntu distribution ROS and has complete documentation for the three Linux distributions supported by the TS-7970 (Ubuntu, Debian, and Yocto). However, this application has been implemented with a simple route using this Ubuntu Xental image. This solution utilizes the available SBC horsepower to do the image processing we’ll need later on.
Hardware and Image Processing
The TS-7970’s i.MX6Q quad core processor has an onboard GPU which can support the ROS’ use of OpenCV. The integration of the GPU with CPU on a low power design like this SBC allows maximum efficiency in power and runtime.
In this project, we’re utilizing the GPU capabilities to its full potential to process 3D visual data into navigation information for the robot. To achieve this low latency 3D processing, we’ll couple a Microsoft Xbox 360 Kinect for image capture and process the video on the TS-7970’s GPU.
On the hardware side, our Kinect is using two cameras and an IR blaster. The two cameras pick up the surrounding image in RGB while analyzing the distance from the object to the sensor. The SBC is then getting the “point cloud” data over USB and analyzing it.
Point clouds are a set of data points produced by 3D scanners which identify the locations of several points on the external surfaces of objects around them. Point clouds are used for many purposes, including to create 3D CAD models and for a multitude of visualization, animation, and rendering applications.
In this application, the point cloud will be used by the robot to visualize its environment and track motion within the environment.
Figure 2 is an example of a “point cloud” being rendered of a model robot.
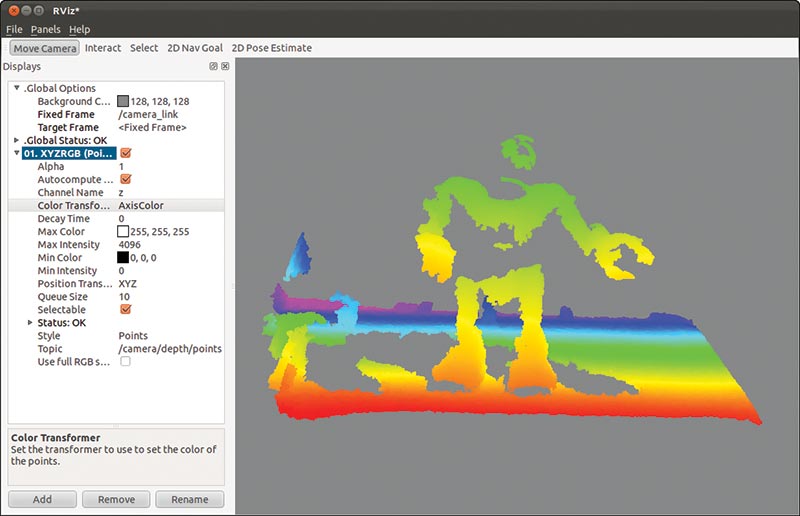
FIGURE 2.
For the robot to have an immediate response to the live video data, multiple software applications are running simultaneous to this point cloud collection, utilizing the full power of the i.MX6 quad core CPU. Using a a 3D visualization environment called RViz, we can analyze the point cloud data being received.
RViz plots the image in near real time to points assigned with a color scale according to depth. Simultaneously, a background Python script catches the points and references them to a movement pattern. The calculated movement instructions are sent over serial to the Roomba base allowing the robot to move and avoid objects. The sensors on the Roomba will also be used by the SBC as feedback.
There are IR distance sensors on the front, along with bump sensors to tell if it hits an object unexpectedly. The SBC gathers this data from the Roomba sensors and uses it in calculating the movement instructions.
This feedback loop allows the robot to work in unison with all its components; essentially giving it a sense of touch and sight and location. All this information being procedurally generated on the TS-7970 is compiled into a map of the environment using the ROS libraries. These maps (shown in Figure 3) are saved in the onboard eMMC memory as a file.
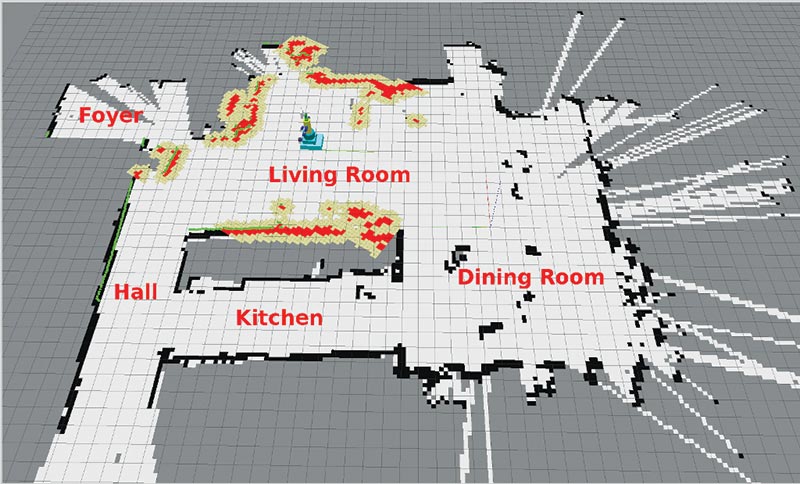
FIGURE 3.
At any time, this map can be opened and edited or labeled. The robot can also reference this map to know its current location, or to find different parts of the building it’s located in. For example, you can label a mapped section as “kitchen,” and with the ROS voice packages installed, tell the robot to “Go to the kitchen.” The robot can also use the map to maneuver its way to different waypoints on the map. The ROS software stack is highly customizable and can be implemented with several different sensors.
For example, a reverse camera and sonar sensor could be included to allow an added degree of sensory control. With enough sensors and the addition of arms, the ROS object detection systems could make your robot smart enough to grab you a soda.
Next, we’ll explain how to set up your own SBC based robot.
Building the Robot: Initial Planning
In brainstorming an example application for ROS, we came up with the idea to create a Roomba-based robot that will follow a person around a room using a depth-sensing camera.
The first step is to gather the components we’ll need to get everything hooked up and powered on. This includes a USB to serial cable with a six-pin mini-DIN connector, a capable battery (12 VDC with 2 Ah at the minimum), and an Xbox 360 Kinect (Figure 4).
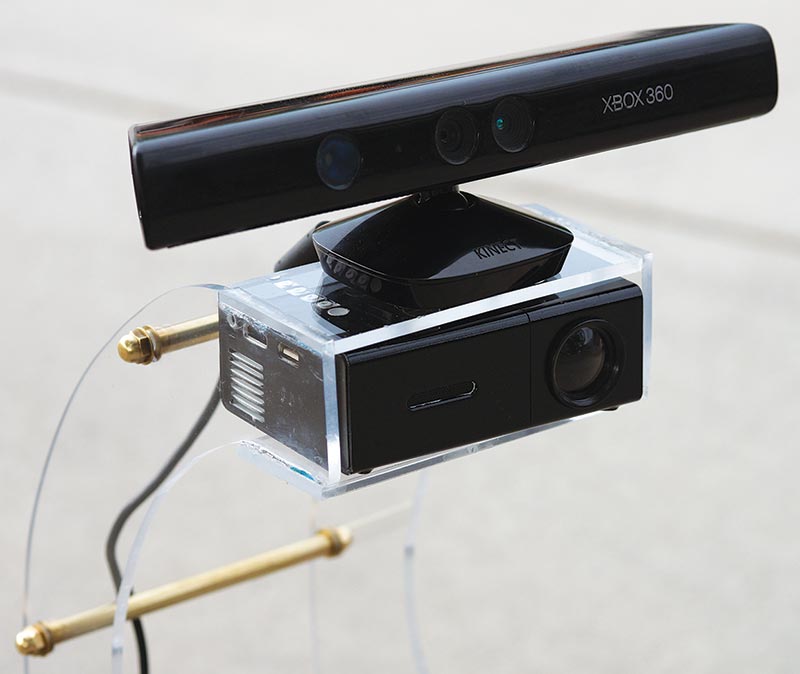
FIGURE 4.
The USB cable will need to be modified to allow regulated 12 VDC power; for our robot, we purchased the specialty cable from: https://www.amazon.com/360-Kinect-Sensor-Adapter-Supply-Microsoft/dp/B01M9CEKMI/ref=sr_1_3?ie=UTF8&qid=1510723847&sr=8-3&keywords=kinect+power+cable.
The next step is to install and configure software on the SBC. Begin by installing ROS Kinetic Kame and Ubuntu Xental by referring to the detailed steps in the following section as well as documentation located at http://wiki.ros.org/ROS/Installation. For interfacing with the Roomba and Xbox Kinect, we’ll also need Turtlebot drivers installed.
At this stage, we’ll need to test and refine our robot. Start by making the robot move by using the keyboard, and then move on to developing a script that will make everything work together and autonomously follow a human.
Let’s take a closer look at how to put together a robot that can follow its own set of rules.
Installing Ubuntu and ROS on an SBC
Before building the TS-7970 into a robot, it will need to have all the Linux and ROS library software installed and configured. None of the robot peripherals need to be connected to the SBC before beginning this process.
If you need any help with the initial setup of a TS-7970, you can refer to the Getting Started Guide.
To start this project, we’ll need to write a microSD card with the TS-7970’s Ubuntu Xental image. Insert the microSD card in the SBC, plug in power, and continue to the setup of Ubuntu and ROS.
Use the login “root” with no password to access the root user. Or, use the login “ubuntu” with the password “ubuntu” to login as a user.
Add a new user for your robot:
$ adduser robo
Enter the password and hit enter.
Reenter the password and fill in the values specified.
Add the user to sudoer file:
$ usermod -aG sudo robo
Change the user to “robo:”
$ su robo
To set up a wired Ethernet connection, simply plug the Ethernet cable into the RJ45 connector, open your console, and type:
$ ifconfig eth0 up
$ dhclient eth0
Installation of ROS
Set up your sources.list to get the sources from which ROS packages can be obtained:
$ sudo sh -c ‘echo “deb [url=http://packages.ros.org/ros/ubuntu]http://packages.ros.org/ros/ubuntu[/url] $(lsb_release -sc) main” > /etc/apt/sources.list.d/ros-latest.list’
Set up your source authentication keys to allow package verification:
$ sudo apt-key adv --keyserver hkp://ha.pool.sks-keyservers.net:80 --recv-key 421C365BD9FF1F717815A3895523BAEEB01FA116
Make sure your Ubuntu package index is up-to-date so that there won’t be any hiccups due to tool version mismatches:
$ sudo apt-get update
As mentioned earlier, there are many different libraries and tools in ROS. The “Desktop-Full Install” included with the ROS Kinetic Kame image includes four default configurations to get you started. You can also install ROS packages individually.
Desktop Install: Includes ROS, rqt, rviz, robot-generic libraries, 2D/3D simulators, navigation, and 2D/3D perception:
$ sudo apt-get install ros-kinetic-desktop-full
Individual Package: You can also install a specific ROS package (replace underscores with dashes of the package name):
$ sudo apt-get install ros-kinetic-PACKAGE
e.g.,
$ sudo apt-get install ros-kinetic-slam-gmapping
To find available packages, use:
$ apt-cache search ros-kinetic
In our example, we’ll install all packages with the Desktop-Full Install.
Initialize rosdep
Before you can use ROS, you will need to initialize rosdep; rosdep enables you to easily install system dependencies for source you want to compile, and is required to run some core components in ROS:
$ sudo rosdep init
$ rosdep update
Environment Setup
It’s convenient if the ROS environment variables are automatically added to your bash session every time a new shell is launched:
$ echo “source /opt/ros/kinetic/setup.bash” >> ~/.bashrc
$ source ~/.bashrc
If you just want to change the environment of your current shell, instead of the above, you can type:
$ source /opt/ros/kinetic/setup.bash
Getting rosinstall and SSH
rosinstall is a frequently used command-line tool in ROS that is distributed separately. It enables you to easily download many source trees for ROS packages with one command. By also installing openssh-server, you’ll be able to access your robot’s command-line interface via a network connection.
To install this tool on Ubuntu, run:
$ sudo apt-get install python-rosinstall
Install SSH:
$ apt-get install openssh-server
All packages for the basic functions of ROS and maneuvering the robot are now installed. You can continue configuring and using the different applications. For this robot demonstration, we’re using an iRobot Roomba and a Microsoft Kinect, so we’ll install the “Turtlebot packages” to get the drives and APIs for these devices.
Turtlebot Install
To begin, you’ll need to install the following Debian packages for TurtleBot:
$ sudo apt-get install ros-kinetic-turtlebot ros-kinetic-turtlebot-apps ros-kinetic-turtlebot-interactions ros-kinetic-turtlebot-simulator ros-kinetic-kobuki-ftdi ros-kinetic-ar-track-alvar-msgs ros-kinetic-turtlebot-gazebo
TurtleBot is a low-cost personal robot kit with open source software.
Note: Before you go on, you may want to refresh the ROS environment variables for your bash session after these packages are installed, using the same command as above:
$echo “source /opt/ros/kinetic/setup.bash” >> ~/.bashrc
Turtlebot Setup
There are two ways we can go about setting up our robot. The first way is using the node itself as a local host. In most applications, a host computer is used to control multiple node “robots” in a swarm. For this project, we’re only using one node and don’t need a host to run the application. Be sure to check out Figure 5.
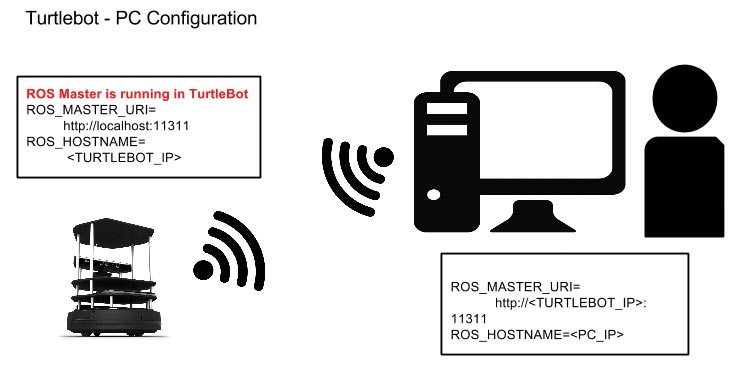
FIGURE 5.
The “Host/node” setup is useful in larger or remote cases where you want to have multiple robots controlling and seeing a single object (i.e., Ford automotive factories), or, if you’re using the robot remotely from another area and want full control. In this example, we’ll show you how to set up the “host/node” and “localhost” setups but will be using the node as the Local Host for the demo.
The following commands will set the environment variables necessary for your robot to resolve the correct names as Local Host for the example code provided in the ROS package.
Set the IP of your remote station and robot with the following:
(LOCALHOST)
$ echo “export ROS_MASTER_URI=http://localhost:11311” >> ~/.bashrc
$ echo “export ROS_HOSTNAME=localhost” >> ~/.bashrc
Alternatively, to communicate to the robot remotely over the TS-7970’s built-in Wi-Fi via the rosinstall and SSH tools you have installed, you’ll need to set up the network connections for your robot. You can use the following setup to create a Host computer broadcasting a local Wi-Fi network, and use the robot as a directly communicating node on the network.
Once again, these commands are setting the environmental variables to work with the example code in the ROS package:
(HOST/NODE) Robot
$ echo “export ROS_MASTER_URI=http://localhost:11311” >> ~/.bashrc
$ echo “export ROS_HOSTNAME=TURTLEBOT_IP” >> ~/.bashrc
(HOST/NODE) Host PC
$ echo “export ROS_MASTER_URI=TURTLEBOT_IP:11311” >> ~/.bashrc
$ echo “export ROS_HOSTNAME=PC IP” >> ~/.bashrc
Add your user to the dialout group to give the robot user permissions to access the serial and USB ports on the TS-7970 that are communicating with the Roomba and Kinect:
$ sudo adduser robo dialout
In order for the Turtlebot package to connect correctly to the hardware we have installed, you’ll need to tell it which APIs to use to interact with the different devices.
To set the 3D sensor to the Kinect:
$ echo “export TURTLEBOT_3D_SENSOR=kinect” >> ~/.bashrc
To set the robot drive mechanism to use the Roomba, you’ll need to connect to the iRobot Create’s Open Interface included with Turtlebot:
$ echo ”export TURTLEBOT_BASE=create” >> ~/.bashrc
Set the robot’s navigation protocol:
$ echo “export TURTLEBOT_STACKS=circles” >> ~/.bashrc
Set the communication interface to talk to the USB port on the TS-7970:
$ echo “export TURTLEBOT_SERIAL_PORT=/dev/ttyUSB0” >> ~/.bashrc
Once again, before you go on, you may want to refresh the ROS environment variables for your bash session to make sure all of these new settings are applied:
$ echo “source /opt/ros/kinetic/setup.bash” >> ~/.bashrc
Install Kinect Drivers
Our robot uses a Microsoft Kinect to see in 3D and infrared. To use the Kinect, you need to install its driver from the ROS repositories:
$ sudo apt-get install ros-kinetic-openni-camera
$ sudo apt-get install ros-kinetic-openni-launch
$ mkdir ~/kinectdriver
$ cd ~/kinectdriver
$ git clone [url=https://github.com/avin2/SensorKinect]https://github.com/avin2/SensorKinect[/url]
$ cd SensorKinect/Bin/
$ tar xvjf SensorKinect093-Bin-Linux-x64-v5.1.2.1.tar.bz2
$ cd Sensor-Bin-Linux-x64-v5.1.2.1/
$ sudo ./install.sh
$ roslaunch openni_launch openni.launch
Testing Your Build
Let’s test the outcome of what we have! Now that all of the software configurations have been completed, you can build up your robot.
First, make sure all of your connections are made and both the external battery and the Roomba battery are charged.
- Connect the Kinect to the 12V external battery and 12V regulator, and the USB to the TS-7970.
- Connect the serial to USB cable to the SBC, and the other end to the six-pin mini DIN serial port on the Roomba.
- Connect a physical USB cable for Console (this can be removed once you have finished the initial movement tests).
- Connect 12V power to the TS-7970.
- Turn 12V power on.
Refer back to Figure 1.
Once you get to a prompt, you can launch a simple test program using the following commands that will allow you to verify communication between the TS-7970 and the Roomba:
$roslaunch turtlebot_bringup minimal.launch --screen &
-
$roslaunch turtlebot_teleop keyboard_teleop.launch
A new prompt should come up with a list of buttons to press on the keyboard to make the robot move. If the robot is not moving as you anticipated, check your connections to the TS-7970, the Roomba, and verify the software installation/configuration steps above.
When the robot is moving correctly, kill that process using CTRL+C, and run the “Follow” mode of the robot to make use of the sensors and mapping data described here. You should now have a fully functional robot!
Put this launch command in your startup scripts and your robot will be able to come to life automatically when power is applied:
$roslaunch turtlebot_follower follower.launch
Conclusion
Watch as your new creation comes to life and starts following you like a lost puppy! Walk towards it, and your robot will move away from you. Step back or walk away slowly and the robot will start to follow you. Dance with it, have it chase your friends, or eventually fetch you a soda! Now that you have a functioning robot that knows how to follow humans, you can add on to the ROS software endlessly.
Give your robot speech and facial recognition and tell it to go chase your feline friend. Or, hook it up to your smart home and have your robot automate your lights and tell you what the temperature is.
You can go as far as attaching a robotic arm and installing object recognition to actually go and grab you a soda from the kitchen.
Congratulations! You now have the start of a fully configurable robot. Have fun! The possibilities only end where your imagination does! SV
Sources
ROS and Turtlebot
http://wiki.ros.org/turtlebot?distro=kinetic
iRobot Create or Roomba
http://store.irobot.com/default/create-programmable-programmable-robot-irobot-create-2/RC65099.html
iRobot Serial Cable
http://store.irobot.com/default/parts-and-accessories/create-accessories/communication-cable-for-create-2/4466502.html
Kinect Power to USB Cable
https://www.amazon.com/360-Kinect-Sensor-Adapter-Supply-Microsoft/dp/B01M9CEKMI/ref=sr_1_3
Article Comments