
Parkerbot — Animatronic Spider
By Steve Koci View In Digital Edition
The big night is finally here and all your preparations are complete. A light fog smelling of decay drifts through the dimly lit neighborhood as a group of boisterous teenagers descends upon your haunt. Suddenly, out of the darkness charges a creature from their worst nightmares! A huge, hissing spider emerges from its hiding place to attack, sending them screaming and running in fear!
Does this sound like a scene straight from a horror movie? It quite possibly does, but it could also be a reality for your Halloween display. Having the ability to control a prop that can directly interact with your guests can provide many exciting scare opportunities.
Let's explore the use of a wireless radio controller to communicate with a remote controlled vehicle. This setup cannot only be used as a Halloween prop, but could provide locomotion for a variety of different characters where direct interaction with guests is desirable.
This project has been on my to-do list for quite some time. Others have used a remote control car to deliver a scare, but I wanted to put my own twist to it. My haunt already utilizes several spider scares including a lunging spitting spider, as well as one that attacks from its overhead perch atop my front porch. Being able to deploy one more at just the right time that could actually chase my intended scare victims would be epic!
Some of you already have experience working with R/C vehicles and may have many of the components necessary to put this type of project together. This was my first foray into this field, so I had to come up with all the pieces to put the puzzle together.
There is a wide variety of controllers available, but I chose to go with a fairly simple model. It did all that was required for this application so I didn’t feel there was any reason to go with a more complicated and expensive device. The model I chose was the four-channel Tactic TTX410 system from ServoCity (see Resources). It comes with a receiver and is priced under $80. It was the perfect fit for me.
Since I was starting from scratch on this build, I could choose a platform that would be just right. I found what I was looking for in one of the new robot chassis also put out by ServoCity. When I saw the robot kits, I was convinced that I could find one which would satisfy all of my requirements. They offered large platforms that would accept the Actobotics components I wanted to add, and the supplied motors and tires gave them great performance over a variety of terrain.
If having a large spider chase you down the street wasn’t enough, I also wanted to be able to raise its head. In order to accomplish this, I needed to have something that was both controllable and provided the necessary torque to lift the head of the spider. Although a servo would give me the control I wanted, it lacked the necessary torque to lift the spider I had planned on using for this project. This led me to the decision to go with a linear servo — something I have wanted to try since first discovering them.
I also wanted to add moving pincers to its mouth. Once again, I found just what I needed from ServoCity as they have several different models of grippers to choose from that would be perfect for my needs. These use a standard servo and can also be activated using the wireless controller.
This is How We Roll
The base platform I selected for this project was the new Scout robot kit from ServoCity. Although it does come unassembled with many parts (Figure 1), the build was quick and smooth thanks to the thorough online instructional video. A complete tool set isn’t required as it only takes a couple of hex keys to assemble.
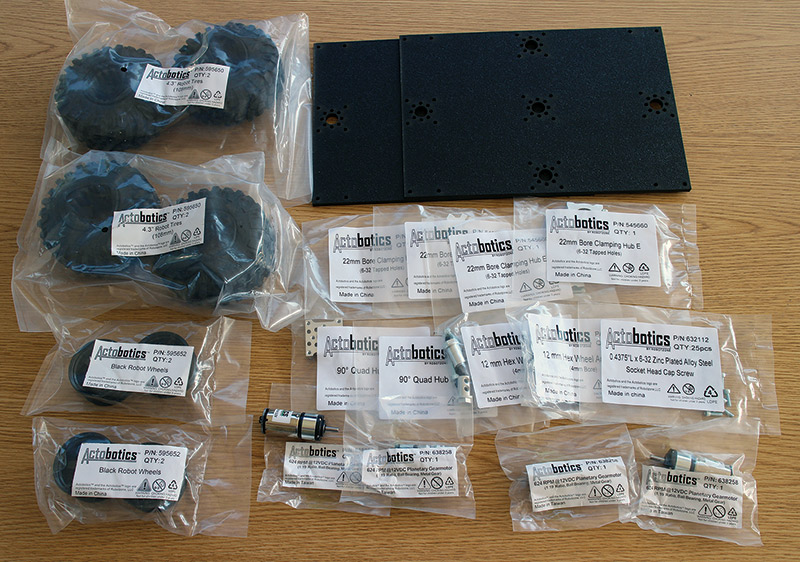
FIGURE 1. The fun begins with the chassis parts from ServoCity.
After a constructive conversation with Kyle — one of the fine ServoCity techs — we decided to use Pololu motor controllers (Figure 2).
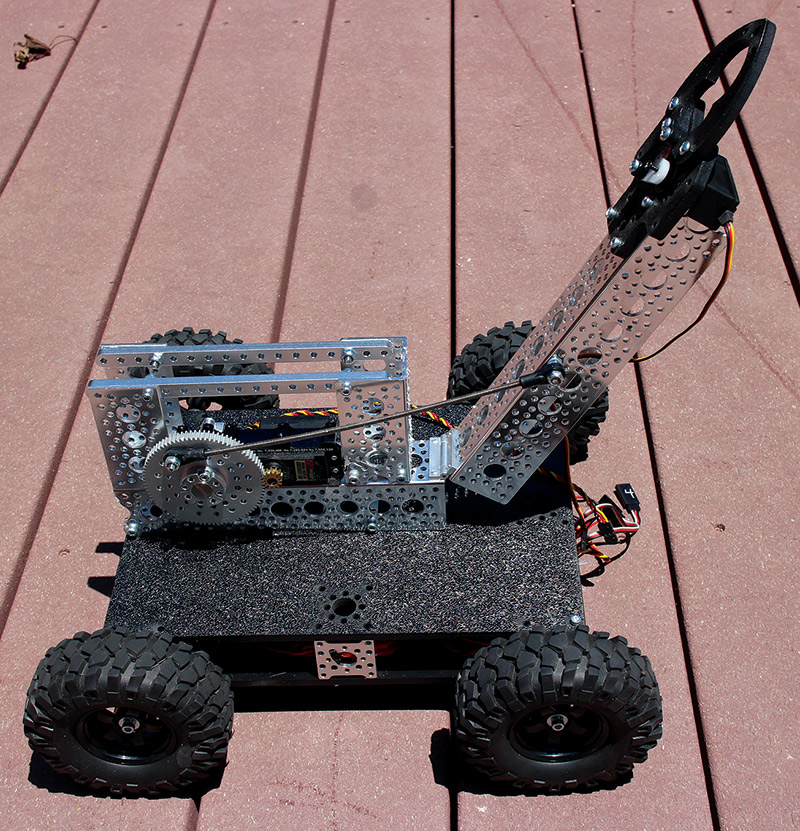
FIGURE 2. Pololu motor controllers and receiver added to chassis.
Two were needed: one for the right side motors, and another for the left side motors. I also installed the gearmotor input power boards to the motors. These make the swapping of motors and changing of polarity (if necessary) a simple task. Everything else was linked together using a variety of wire connectors and extensions.
I’ll Have My People Call Your People
Normally, I would not consider incorporating a wireless controller into one of my designs. However, having the ability to control a character in real time has its advantages. I would be able to choose my intended target and focus on those that I felt could handle the extra scare attention. I do have plenty of young children that visit my haunt and I feel this type of prop may be too intense for some of them. Now, I could keep the spider in hiding until a more suitable victim came along.
The controller was easy to set up using the Simple Motor Controller program provided by Pololu. I just had to go in and change the default setting from serial/USB to RC, and then go through the Quick Input setup. As soon as that was completed, it was off to the races!
Once I had the frame built and the motors running with the controller, it was time to take it for a spin. I rushed outside and quickly had it speeding up and down the sidewalk. I was excited to see that it performed exactly as I had planned. Of course, I still needed to add the lift and gripper mechanisms and the spider body. I made a quick calculation of the combined weight of the yet-to-be-added components and loaded down the chassis with the equivalent in lead. It was now time to test it again to confirm that all was still on track. I pushed the throttle forward expecting it to speed down the sidewalk once again, but was sorely disappointed! It moved, but even a toddler could outrun it now!
It was time to return to the drawing board and attempt to resolve the speed issue. I was so pleased with the speed and agility of the bare platform that I didn’t want to sacrifice it. Something had to give.
We Need More Power, Captain!
I concluded that I had a couple of options open to me. Either add larger and more powerful motors or significantly lighten the load. My unrealistic expectations regarding the ability of my chosen RC platform to carry all the extra weight proved I still had plenty to learn when working with this new base. I now have even more respect for the BattleBot designers that can include all that steel and weaponry and manage to have a quick robot!
I still believed that the Scout robot was up to the task, but I would need to greatly reduce my design in order to control the amount of weight I expected it to carry. It was time to scale back and cut out all the spider’s fat!
The original plan was to use one of the many spiders I had on hand in order to save some money and speed up the build process. The spider I chose was very large and menacing looking, which provided the effect I was after. However, it included some steel reinforcements which added considerable weight. It also had a soft foam body which would make it difficult to install around the mechanics without interfering with their operation.
I then conducted an extensive and fruitless Internet search to try and find a suitable replacement. When I came up empty, I decided to try and recruit my wife to help me construct a custom model. This turned out to be the perfect solution to my problem!
Before we started the construction of the spider, I took another look at my plan to use a linear servo to lift the front of the arachnid. If I was going to go with a lighter one, was there another option? I’ve had great success using the servo powered gearboxes from the Actobotics line at ServoCity for my articulated bodies. I figured it would have the necessary torque to raise the body, now that I’d replaced my original spider with a much lighter one. I mounted it up, attached some weight to the lifting arm, and gave it a test. It handled the load like a champ, with the added bonus of requiring much less juice — allowing my batteries to last significantly longer.
It was now time to build a framework to attach the channel to which the gearbox and gripper would be affixed. I started with two pieces of 12 inch channel and cut them down until I was happy with the proportions. These were simply connected with a hinge, giving it a very wide range of motion. Connecting the servo horn on the gearbox to the upper channel was easy once I had the mounting point selected by using 6/32 threaded rod and ball linkages. I then built a protective structure around the servo to allow the body to be attached without interfering with the mechanism.
The gripper kit was a snap to assemble (again, thanks to the easy-to-follow video instructions). After only a few minutes, it was ready to pinch away (Figures 3 and 4).
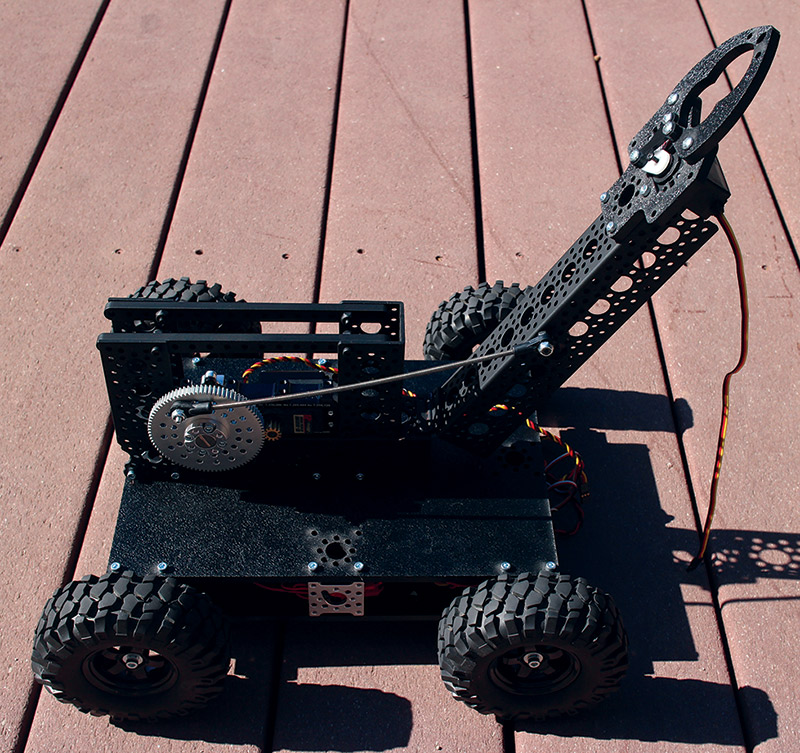
FIGURE 3. Head lifter and gripper mechanisms are complete.
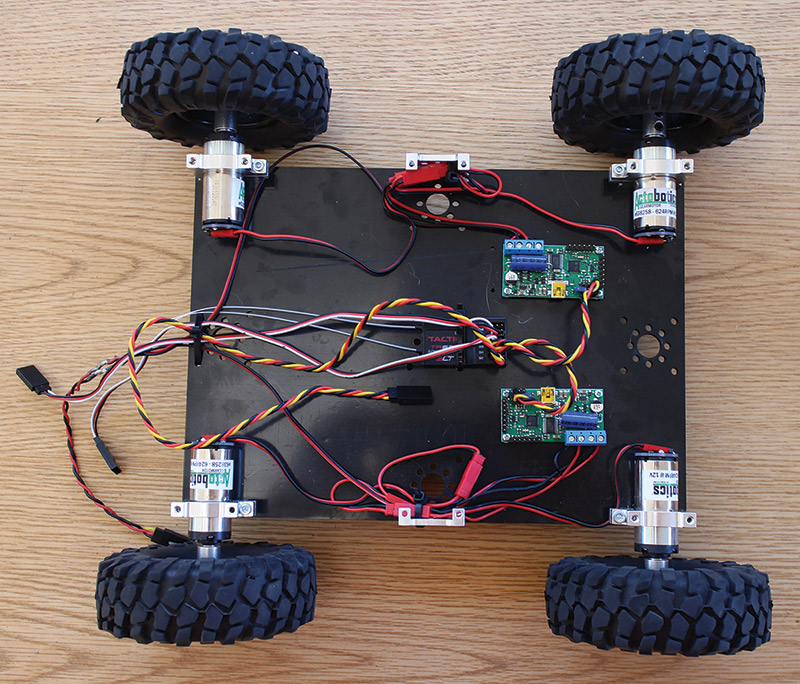
FIGURE 4. Primed and painted black awaiting a body.
The lift and gripper servos were controlled by the left joystick on the controller, while the wheels were directed with the right joystick.
I then took some white Styrofoam and shaped a head and body to fit the exact dimensions required. The interior of the body (Figures 5 and 6) needed to have a large cavity carved out to allow it to fit down over the head lifting mechanism.
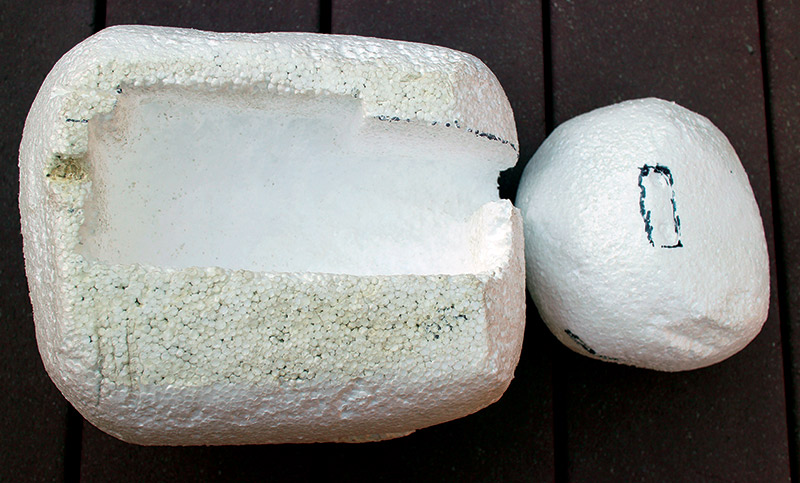
FIGURE 5. Foam body with cutout for the lift mechanism.

FIGURE 6. It looks like a snowman! I need some fur!
I cut some chain link stretching wire for the legs and secured them to the channel with ProPoxy 20. My wife then fashioned the fur to cover the body and wire legs which gave it just the right look.
The addition of a couple of red LED eyes gave it a sinister stare and greatly enhanced the overall effect. I also added a pair of green LEDs to the pincers so their motion could be seen, and another pair of red LEDs underneath the chassis for a spooky glow. I simply tied into the battery pack for the wireless receiver leaving me with one less thing to worry about. Keep it as simple as possible and there are less chances of something going wrong (Figure 7).
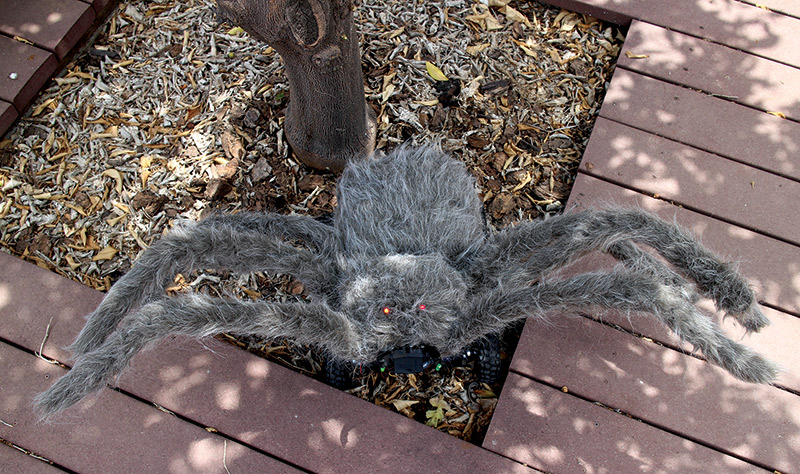
FIGURE 7. Fur and LEDs installed and ready to go hunting!
I Can’t Hear You
No self-respecting spider would be running around in silence! The final step was to take it up one more notch by adding an audio track. Now, I know that spiders don’t really make many sounds, but Hollywood has already primed the public to expect it and I wanted to deliver! I was able to find a variety of insect sounds from free “web"site downloads that allowed me to select several different sounds and combine them to make the track. I used a simple recorder (Figure 8) from Electronics123 (see Resources) which includes a speaker, triggers, and a battery pack. It was then a simple process to load the completed track which I’d prepared in Audacity (see Resources).
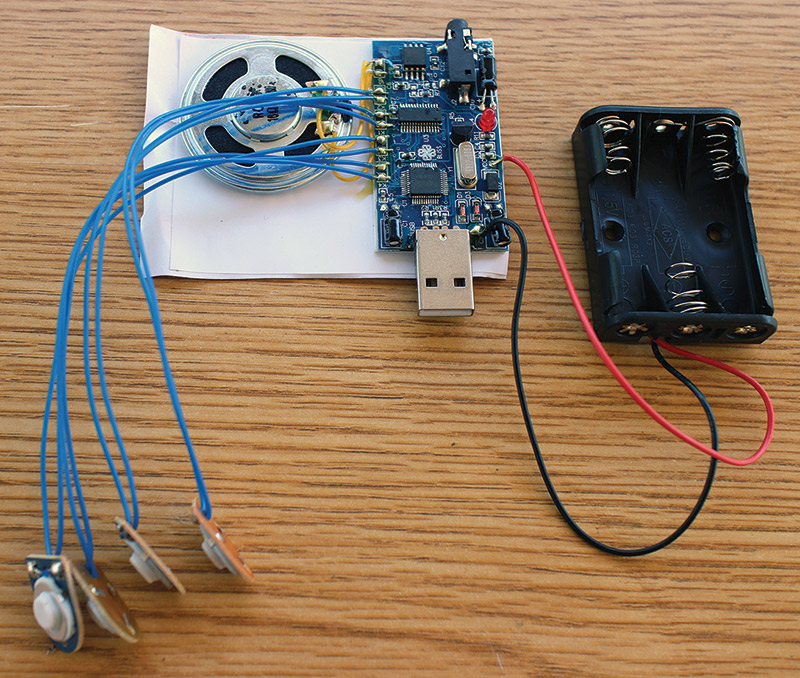
FIGURE 8. Basic audio player from Electronics123.
In order to save weight, I decided to stick with the tiny onboard speaker that came with the player instead of adding a set of speakers. The sound quality is not great but for my purposes, it works. This player includes a repeat function, so I just trigger it and away it goes.
It is Alive!
I had a great time bringing this guy to life (Figure 9).
FIGURE 9. Looking spooky and on the prowl.
Although not an overly complex project, it satisfied my goal which was to explore the technology to determine how useful it would be for our purposes. It allowed me to try out some new techniques and play with some cool previously overlooked toys. I became familiar with the electronics and now have a better understanding on how to best put a system together.
Ultimately, we’ll be using the wireless controller to do some live puppeteering of a character — just like they do when filming movies.
Another project I’d love to try is to affix a gripper attachment to an articulated arm. I would then control it with the wireless transmitter to hand out candy. Combine that with a microphone that controls the jaw of the character and I could talk to the trick or treaters as I hand out the Halloween candy. Now, that would be an interactive character!
After playing with this, I can understand how building fighting robots can become so addicting. It’s a whole lot of fun! SV
Spider Parts
| Quantity | Description | ServoCity Part # |
| 1 | Scout | 637138 |
| 2 | Motor controller | 605060 |
| 2 | 9.6V battery | |
| 1 | Wireless controller | TACJ2410 |
| 1 | HS-485HB servo | 33485S |
| 1 | Hinge | 585644 |
| 2 | 12” channel | 585454 |
| 1 | HS-5685MH servo & gearbox | |
| 1 | 6/32 threaded rod | 98847A007 |
| 1 | Gripper | 637094 |
| 1 | Battery adapter | FBL-TAM |
| 1 | Battery charger | |
| 1 | Servo linkages | |
| 3 | Screw plate | 585430 |
| 2 | Servo leads | |
| 2 | Servo extensions | |
| 1 | Clamping hub | 545352 |
| 1 | Servo lead | |
| 1 | Screws | 632108 |
| 3 | Channel mount | 545360 |
| 4 | Input boards | 605118 |
| 2 | JST extensions | 607016 |
| 4 | JST extensions | 607010 |
| 2 | JST leads | JST-22M |
| 2 | Channel bracket A | 585484 |
| 1 | Aluminum beam (package of 2) | 585416 |
| 1 | Y harness |
Resources
ServoCity
www.servocity.com
Electronics123 Audio Board
www.electronics123.com
Pololu Simple Motor Controller
https://www.pololu.com
Audacity Audio Editor Download
https://sourceforge.net/projects/audacity/
Article Comments