Animatronics for the Do-It-Yourselfer — Conjuring Up a Revitalized Witch Scene
By Steve Koci View In Digital Edition
There are many times when a single character will not fulfill your design specifications. Oftentimes, you need to create an entire scene in order to properly tell your story. This can complicate the process, but the results can be extraordinary!
This is the situation I found myself in when I decided to redesign my witches scene for my Halloween display. I've always felt that the three characters that made up the scene were disconnected and didn’t form a cohesive group. Last time, the scene included a witch stirring a cauldron, one reading from a spell book, and the third was a pneumatically controlled flying witch. All of them were animated but the setting lacked a focal point.
From the beginning, I knew this project would require talents that I do not possess. Once again, I would need to include others to achieve my vision for the new display. The team would be mostly made up of people I had worked with in the past, but we would again be adding a couple of new members.
I feel that it is very important when enlisting the aid of such talented people to provide a framework for the project and then let them loose to do their magic. Micro managing them will only stifle their creativity. Although the work they contribute is a huge help, it is their imagination and inspiration that is unquestionably the real treasure.
Coordinating the team that would be collaborating on the build was another challenge. With members scattered all over the continent, we needed to get creative with our communications. I would, of course, prefer to assemble everyone in a room together but that was not possible. Thank goodness for technology!
To make sure that everyone was on the same page, Brian Lincoln prepared a flow chart showing how each component of the build would be integrated into the final scene (see the system block diagram).
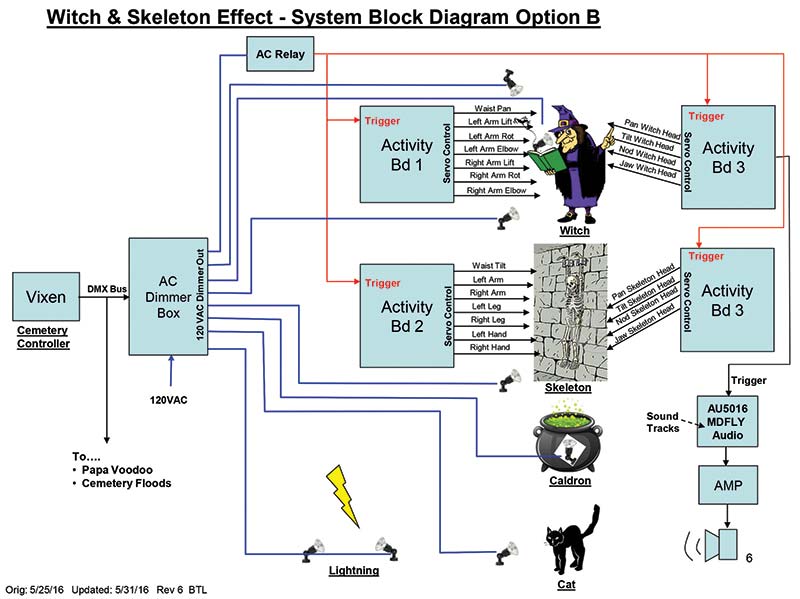
System Block Diagram.
This was an enormous help in keeping track of things as the build progressed.
This project would not have been possible without the contributions of the entire team. As is typical when working with such an accomplished group, the ideas flow and the finished product expands well beyond the original concept.
One of my requirements when starting a new project is to include some new technique, component, or material in the design. This way, I am constantly expanding my knowledge of what works and what does not. Part of the reason I do what I do is that I enjoy the challenge.
If I simply recreate things I have done before, I quickly become bored.
The Recipe for a Witch’s Coven
This project proved to be much more complicated than most and has lots of moving parts. The scene includes two of the witches we have used in the past: the stirring witch and the flying witch. The witch casting the spell will be rebuilt, and an additional character will be added: a skeleton. He will be attached to the back wall and will interact with the witch. The two character’s movements have been synchronized with a new custom audio track. The lighting has been augmented to improve the effect as well. Integrated controllers and extensive programming will really bring the tableau to life.
The elements have been divided up between all members of the team. Everyone’s role was vital to achieving the final result. While many of the components could be completed independently, some items had to be put on hold until other elements were finished.
Let Me Put a Spell on You
Before any programming or puppeteering can take place, the custom audio track needed to be written, performed, and recorded. The team of Pat Molloy, Bonnie Barrows, and Tom Jameson are an extremely talented and creative bunch. They were able to take my very vague guidelines and produce a script that tied the entire back story together.
This process included a significant amount of back and forth discussion between the members of the group. I value the team member’s thoughts, but sometimes you can have too many ideas. The story can quickly expand and become a novel instead of a short story. My goal is to have our scenes last between one and three minutes. Any longer and your audience will lose interest before your story is completed.
The story they created has our witch resurrecting a skeleton from the dead. Their witty dialogue is funny with just the right amount of spookiness. This fits in perfectly with the atmosphere I am trying to create for the entire haunt.
Matt Totten (our sound engineer) was also intimately involved. His responsibility was to take the completed audio tracks and create a finished soundtrack. He did a phenomenal job mixing all the various speaking tracks with the necessary sound effects and melding them together into a spellbinding fantasy.
The track is in stereo, with the witch’s voice on one channel and the skeleton on the other. This allows for a more realistic sound for the banter between the two characters.
In order to fully appreciate the split soundtrack, I went with an upgraded speaker system that includes a subwoofer to increase the bass. The audio track’s sound effects — especially the thunder — really benefit from this. It does not make sense to put forth all this effort to develop a fantastic soundtrack if people cannot hear it to appreciate it.
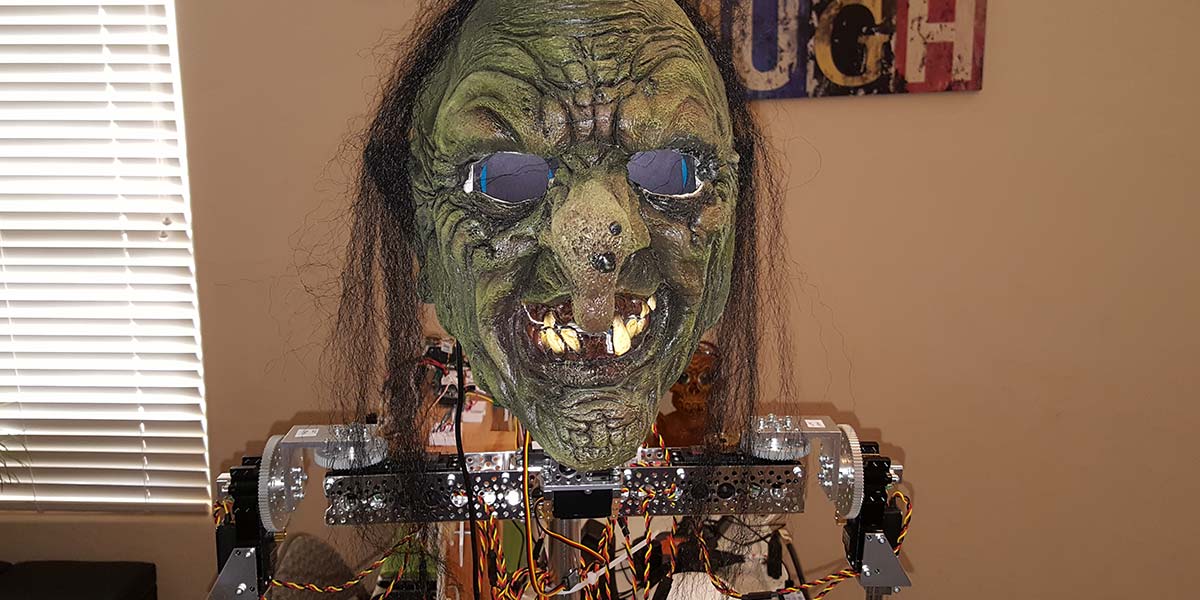
Witch Design
For the witch’s body mechanism, I once again turned to my favorite moving body design which incorporates Hitec servos (see Resources) mounted on ServoCity Actobotics components (see Resources). It's not always necessary to reinvent the wheel. If something works well, go with it (see Figure 1 and Figure 2)!
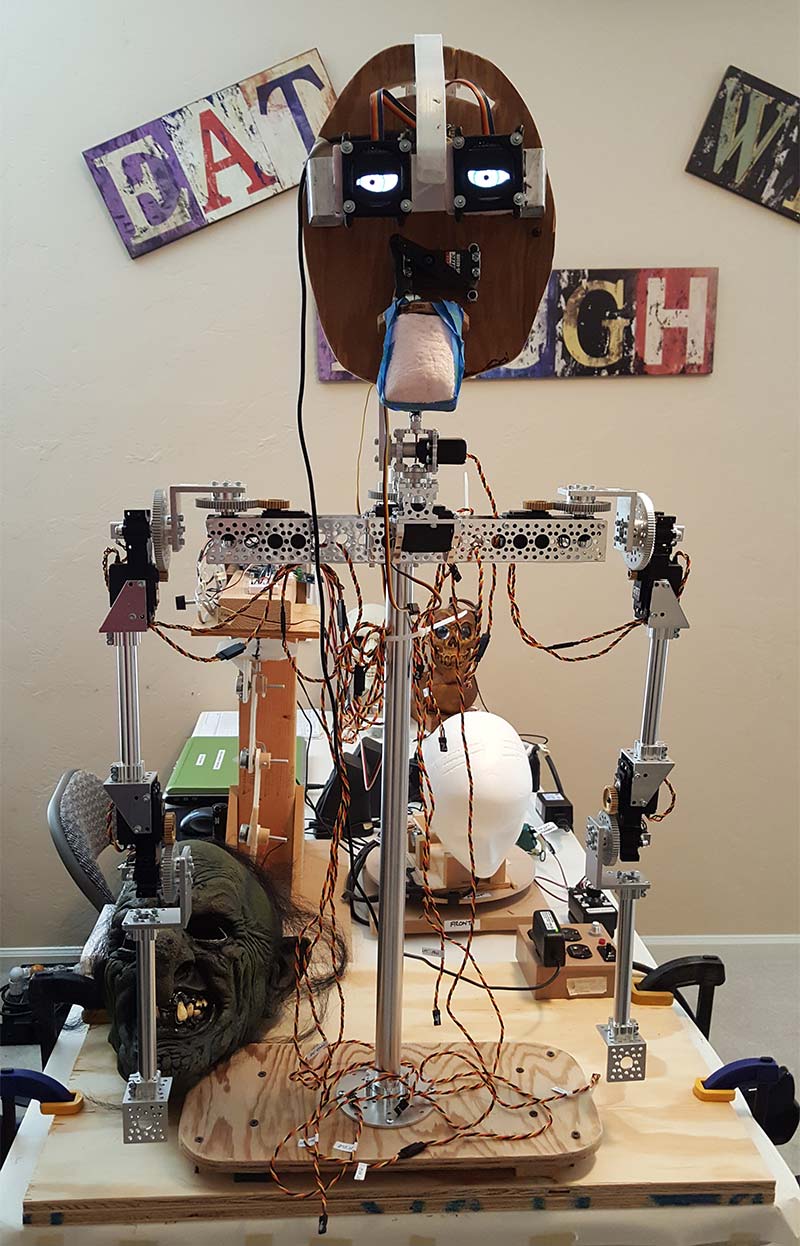
Figure 1. A tangle of wires, but the first test is a success!
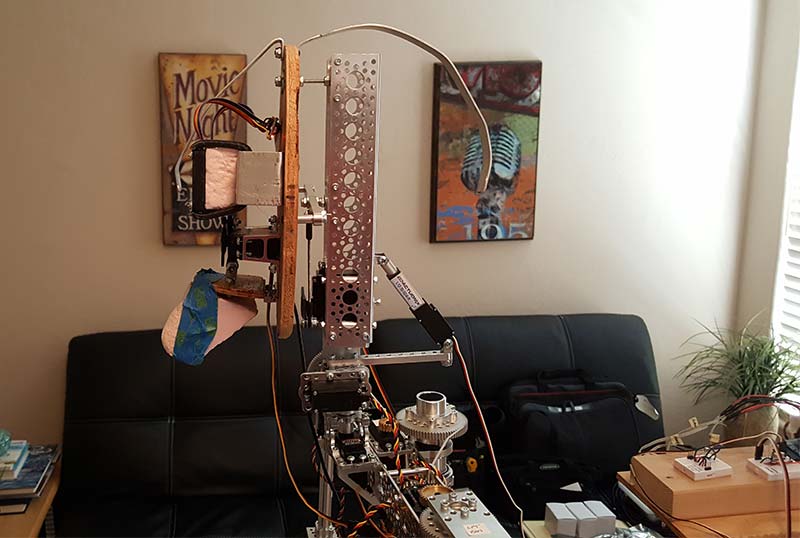
Figure 2. Head design complete with mask support.
The head nod was not to my liking, so I took a page from my Jarvis build (in a previous article in SERVO Magazine) and added a linear actuator. This head design has considerable weight mounted forward of its center of gravity and the servo I had chosen was just not up to the task. Even with the addition of a spring, I was still not getting the response I was looking for. I prefer the nod movement to be very controlled and deliberate, so a linear servo from Actuonix (see Resources) is perfect for the job (Figure 3).
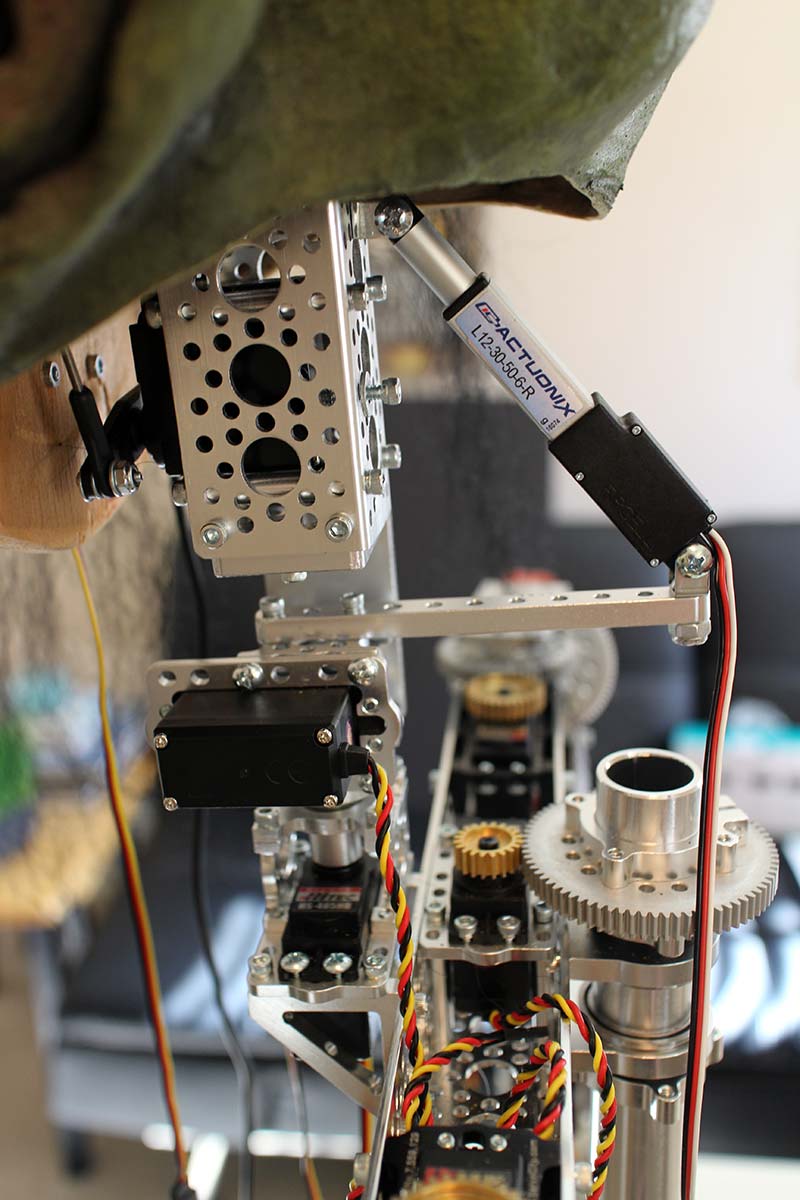
Figure 3. A linear servo provides some extra power.
Hiding the neck mechanism is an issue whenever a mask is utilized. There is always a gap between the bottom of the mask and the clothing. High collars and scarves can help, but sometimes those looks are not included in the costuming plans. One trick that I have found very useful is to use flesh colored pantyhose.
Simply cut a section of the pantyhose that is the appropriate size and slide it over the mechanism. This quick, easy, and inexpensive solution works like a charm!
Skeleton
We decided to take a different approach when designing the mechanisms that would bring the skeleton to life. We have had great success in improving the head tilt movements on several recent characters — including the witch — by using a linear servo. This time, we wanted to further integrate them into the design by using them to move the arms, hands, and legs of the skeleton. The choreography for the skeleton’s movements did not require rapid or extensive motion, so we felt this would be a good opportunity to expand our use of linear servos.
The linear servos for the arms and legs were simple to attach to the facade and the skeleton. The movement of the hands required some additional components. After some selective grinding with a Dremel, a suitable mounting spot was created for the linear servo (Figure 4).
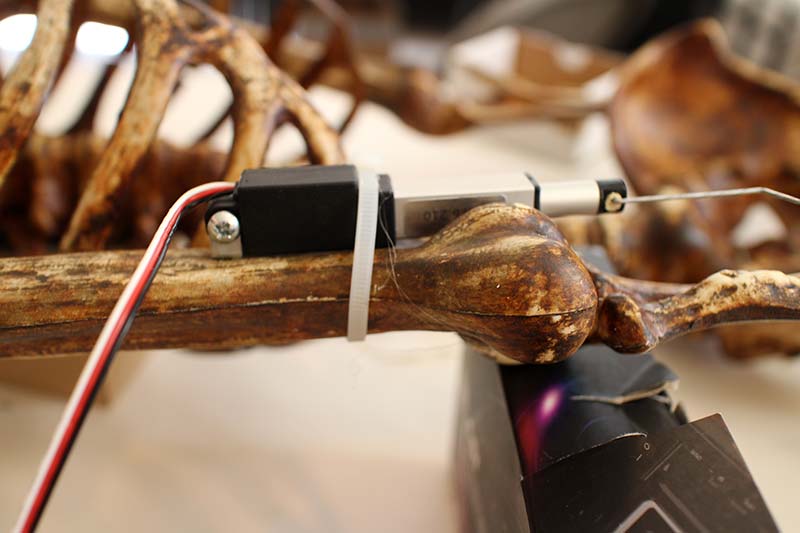
Figure 4. A little paint and this will almost disappear.
A small bracket was fashioned and attached to the back of the hand to provide an attachment point for a wire pull rod. The other end of this rod is then connected to the linear servo (see Figure 5).
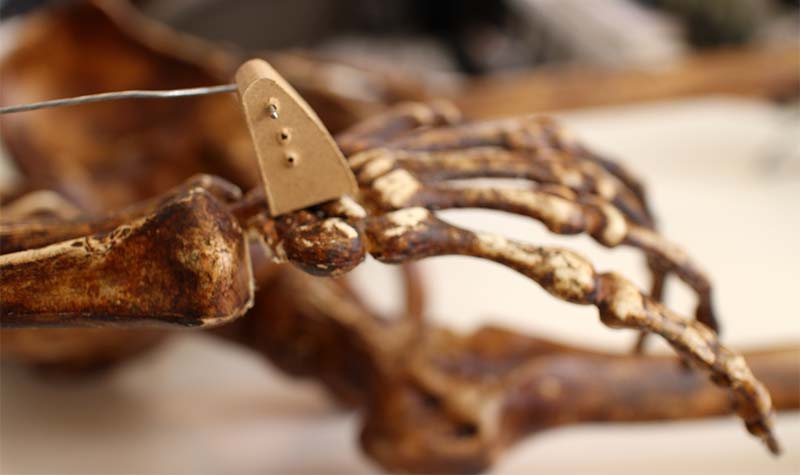
Figure 5. The actuator joint is connected to the wrist joint.
The entire mechanism remains hidden from view and allows the hand to be manipulated at the wrist.
Using the Parallax Activity Board in conjunction with the Hitec servos for puppeteering our characters has worked extremely well for us. However, we ran into an unexpected problem when trying to integrate the linear servos into the mix. The issue was that the Activity Board provides a 3.3V signal while the linear servo actuators require a 5V signal. We discovered the linear servos can work at 3.3V direct drive, however, the Activity Board includes a protective series resistor that modifies the signal enough to render them inoperative.
Several methods to resolve the issue were tried before deciding on a course of action. We incorporated a driver circuit that uses a pair of transistors and two resistors that boost the pulses back up to the 5V required by the linear servos.
The design and construction of the skeleton’s head was the responsibility of Robert Risley. Robert has been instrumental in contributing his creative genius to many of the characters I have built, and his insight and inspiration are truly appreciated. He shares my belief that we should always be pushing the envelope in our creations and striving to work outside our comfort zones. He once again hit it out of the park with this design!
He started with a plastic Lindberg skull which has a Monster Guts three-axis assembly mounted inside.This gives Robert an anatomically correct starting point when sculpting the head. By adding Apoxie Sculpt clay, he slowly builds up the features of the character until he gets it absolutely perfect! Mission accomplished (Figure 6)!

Figure 6. The skeleton head comes to life
To increase the strength of the spine for mounting the head, I modified it by inserting a threaded rod which runs between the pelvis and the shoulders. This provides a solid structure for attaching the skeleton to the façade, as well as for securing the head to the body.
Before the skeleton can be chained to the wall, he must first be stained the proper color. Robert made this happen by liberally applying some Saddle Tan Gel Stain from Tandy Leather and then wiping off the excess (see Resources).This is our go-to stain whenever we are looking to provide a weathered appearance to a prop or character (Figure 7).
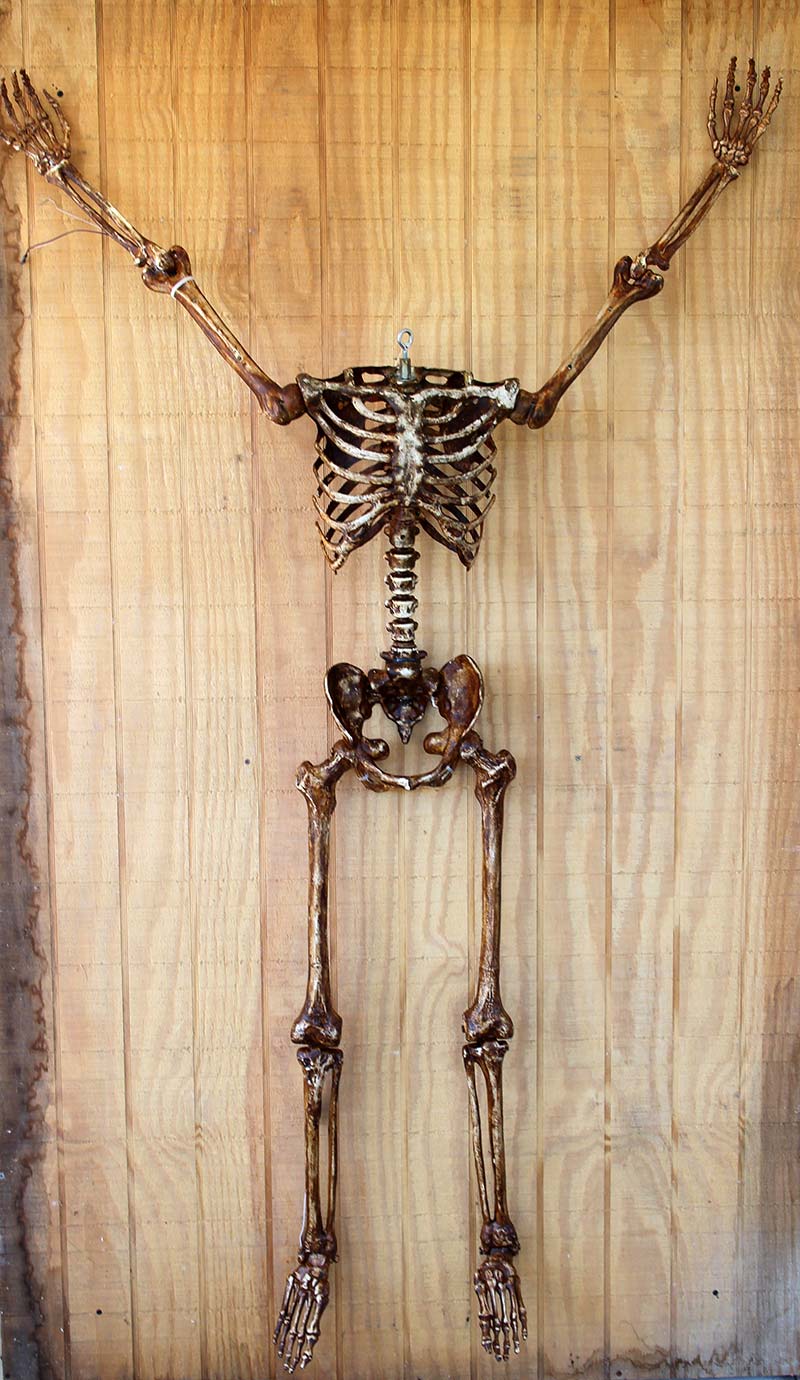
Figure 7. All painted up and nowhere to go.
Parallax Activity Boards
Providing the illusion of life in our characters requires more than a wee bit of hocus pocus! Once the soundtrack was completed, it was time to wake up the witches and get them moving. This massive undertaking is the purview of our master puppeteer, Brian Lincoln. His considerable skill is apparent when you see how realistically the characters perform under his direction.
For me, this is the most exciting part of the build. Seeing the scenario I had imagined transcend to reality is inspiring. It is also the time to discover if the project will actually operate in the fashion you intended. Discovering that you are not as smart as you thought you were can be humbling, but the challenge lies in adapting and overcoming the temporary setbacks you encounter.
We decided to divide up the many functions of the two characters between four individual Activity Boards. This would allow us to separate the body movements from the head actions. It would also give us a tremendous amount of flexibility in adding additional features in the future.
The Activity Boards have the capability of controlling eight separate mechanisms. The skeleton and witch’s heads require four channels each, the skeleton body five, and the witch’s body six. This left us with at least two unused channels per board for other purposes (Figure 8).
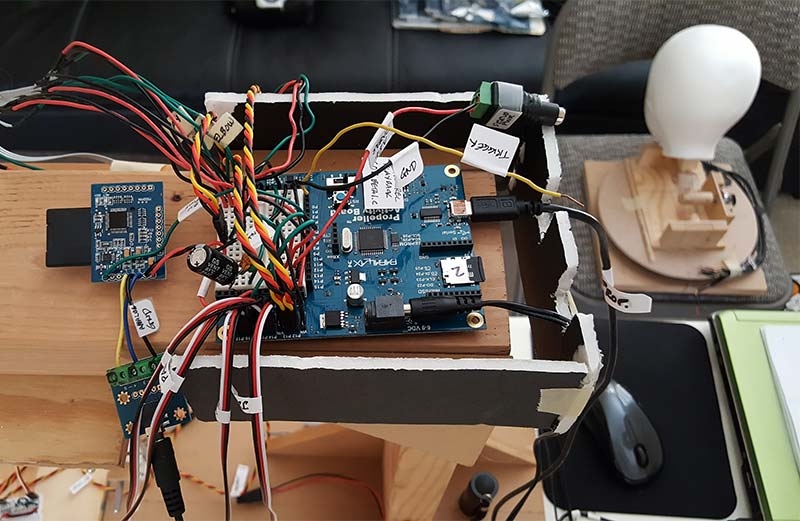
Figure 8. The brains of the operation are hidden inside.
To aid in the task of puppeteering the motions, Brian has constructed a couple of mechanisms which he refers to as an AMS, or Articulated Model with Sensors (Figure 9 and Figure 10).
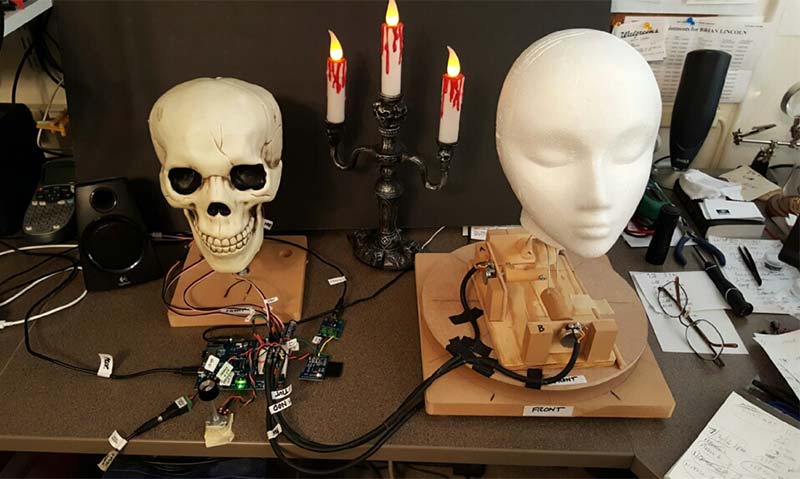
Figure 9. I think I want to look over there.
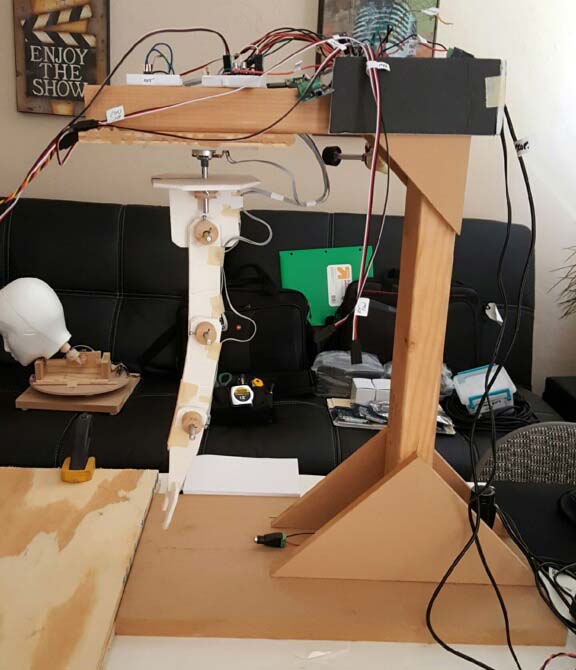
Figure 10. Arm AMS helps puppeteer the smooth movements.
These incorporate multiple potentiometers located at the pivot points which convert the motions of the model into the necessary code for the Activity Boards. This allows us to instill very lifelike movements into the characters.
The Eyes are the Windows to the Soul
Ever since I discovered the electronic eyes which use mini screens created by David Boccabella (Marcwolf), I have included them in my projects whenever possible. The opportunity to add such realism to my characters for a reasonable cost makes them a no-brainer (Figure 11 and Figure 12).
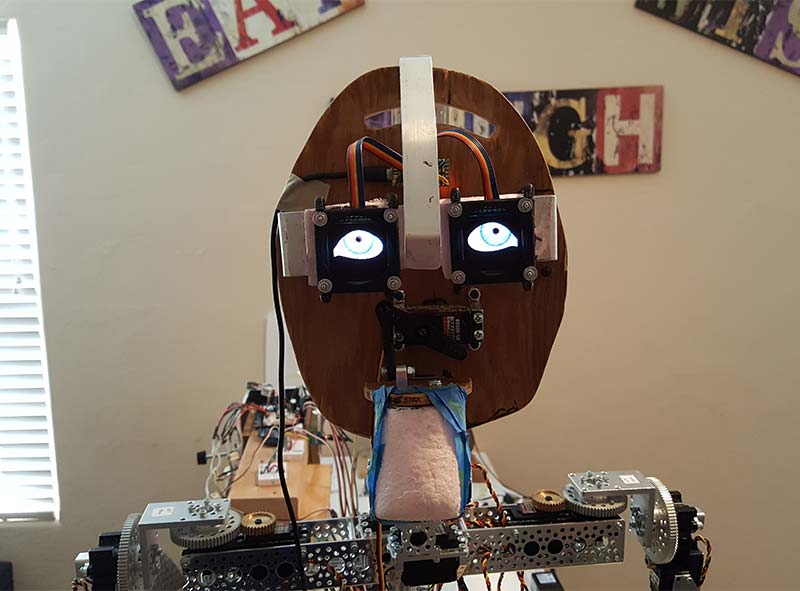
Figure 11. I see you!
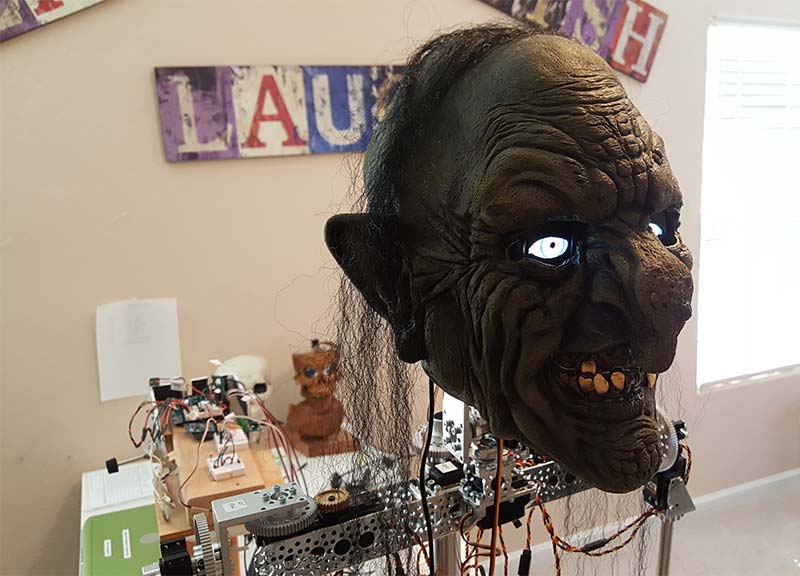
Figure 12. Ready to add a little more hair, eyeballs, and paint highlights.
I have chosen to use the 3D printed enclosures recommended in the original tutorial (see Resources) to help protect the screens. Although these do a great job, you are still faced with the question of how to mount them. Robert came up with an ingenious solution which allows for fine adjustments to the eye’s location, yet keeps them firmly in place. You simply add a couple of springs attached to the existing machine screws and wrap them around your supporting structure. You can now fine-tune their positions and know they will stay where you place them (Figure 13).
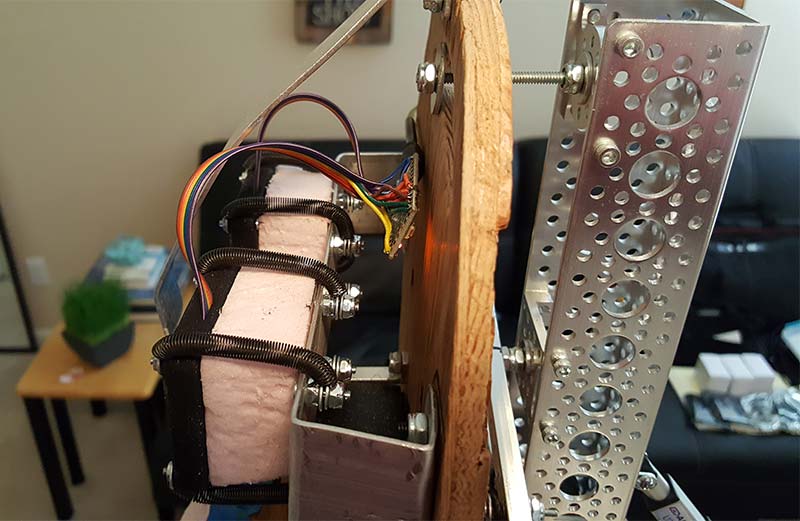
Figure 13. Putting springs to work in another way.
DMX Lighting and Control
Proper lighting effects allow us to manipulate and control where our audience will be looking. It gives us the opportunity to only allow them to see what we want them to. Proper and adequate lighting can make or break a scene. Do not skimp on the time spent on this important aspect of the project!
We chose to use my existing DMX controller setup to not only control the lighting, but also to script the show timing in relation to the activation of our other major scene: Papa VooDoo. Even though his show takes place on the other side of our display, it commands everyone’s attention. Most of the other lights are shut off during his performance, and to say his audio track is powerful is a huge understatement. We wanted to insure that the two scenes would never be playing simultaneously, and this arrangement allowed us to do that (see Figure 14).
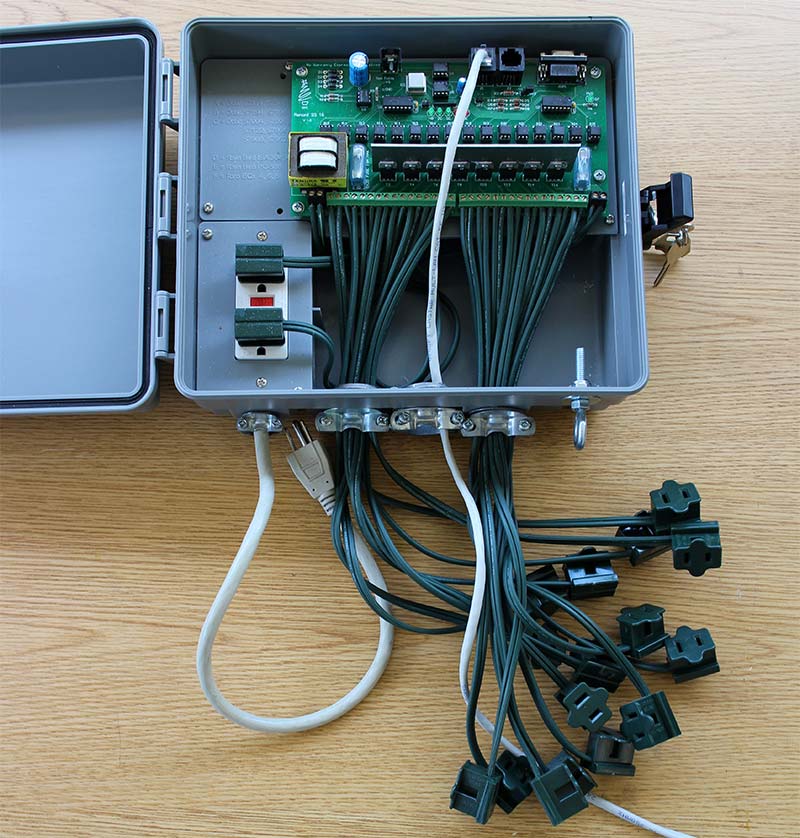
Figure 14. A DMX satellite box ties the scene into the main show.
The free program, Vixen was used to develop the lighting and prop activation sequence. All of the components were individually added to precisely time out each event.
Facade and Supporting Props
It was necessary to build a facade to mount the skeleton to with additional sections added to complete the scene. When finished, the witch’s shack will consist of three four foot wide panels with an additional four foot panel on each side. The illusion will be completed with the addition of a roof section constructed from lathe panels.
I constructed traditional studio flats using 1x3s for the framing and attaching siding. This gives the illusion of a wood slat hut which supports our back story. The scene would not be complete without including the necessary witches accessories such as potion bottles, brooms, black cats, and spell books all covered in spooky cobwebs. My industrial DIY web shooter (Figure 15) makes quick work of the often laborious and time-consuming task of adding the requisite cobwebs.
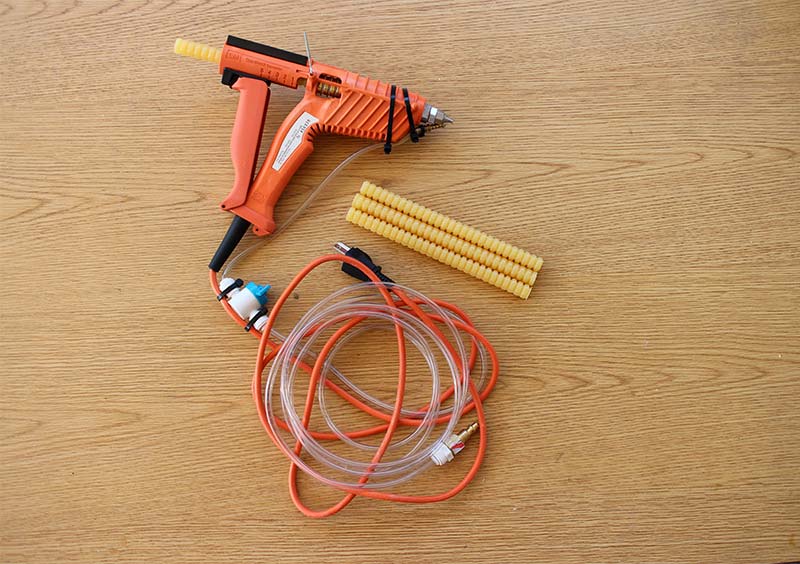
Figure 15. With a little magic, we turn glue into spider webs.
The Rest of the Cast
At least for the time being, the remaining two witches will perform as they have in the past. Several improvements have been suggested and discussed, but they will have to wait for the next revision. Updating them at a later date will allow the show to become “new” again for those that see the show each year. It is so important to keep things fresh when putting on a display.
We will, however, tie the activation of the flying witch into the script. We do not want her flying up and interrupting the action whenever she pleases!
Recording It for Posterity
The project would not be complete without it being recorded for posterity. The popular adage “photos or it did not happen” certainly applies. I am very blessed to have a professional photographer as a son and part of the team. Bryan Koci can always be counted on to take the time from his hectic schedule to document each of my creations. His professionalism shines through in his ability to bring each character to life and present them in their best light.
Closing the Book on this Incantation
The magic formula that made this a reality was the result of plenty of hard work from an extremely talented group of individuals. If you would like to see the performance of the full witch’s coven, check out my YouTube channel after Halloween. I will be sure to post a video of them conjuring up their spells! You can also check out the build thread on the Halloween Forum at http://tinyurl.com/zdndaoe to see the entire process unfold.
Since this issue arrives as we prepare for Halloween, I hope to see some examples posted on the forum of how you apply your technical prowess to celebrate the season.
Keep creating, and may the passion to build be with you! SV
RESOURCES
ServoCity Actobotics — http://tinyurl.com/zzy2ugu
Hitec Servos — https://hitecrcd.com
Actuonix Linear Servos — http://tinyurl.com/zhuwqea
Tandy Leather Stain — http://tinyurl.com/j2cg4p5
Parallax Activity Board — http://tinyurl.com/zev2eaa
Adafruit Electronic Eyes — http://tinyurl.com/p4twuqn
Steve's YouTube Channel — http://tinyurl.com/nma2doj
Article Comments