Servo Magazine ( March 2017 )
The Dobot Magician
By John Blankenship View In Digital Edition
Those interested in a quality robot arm or a 3D printer should consider the Dobot Magician. Its accuracy and easy-to-change end effectors give it multiple personalities that can meet a variety of needs.
My life-sized robot, Arlo was featured in the January 2015 issue of SERVO. Arlo had two inexpensive servomotor powered arms that allowed me to experiment with using vision and touch sensors to control the arm’s movements. Like most arms built for hobbyists, Arlo’s limbs have significant limitations when it comes to accuracy, repeatability, and payload weight. For simple experimentation, such limitations can be acceptable, but real world applications that perform useful tasks often require better specifications.
Unfortunately, most arms capable of dealing with realistic problems are designed for manufacturing environments, which means they are priced far beyond a hobbyist’s budget. I enjoyed experimenting with Arlo’s arms, but I wanted more capability. So, I began looking for an arm with decent specs and a reasonable price.
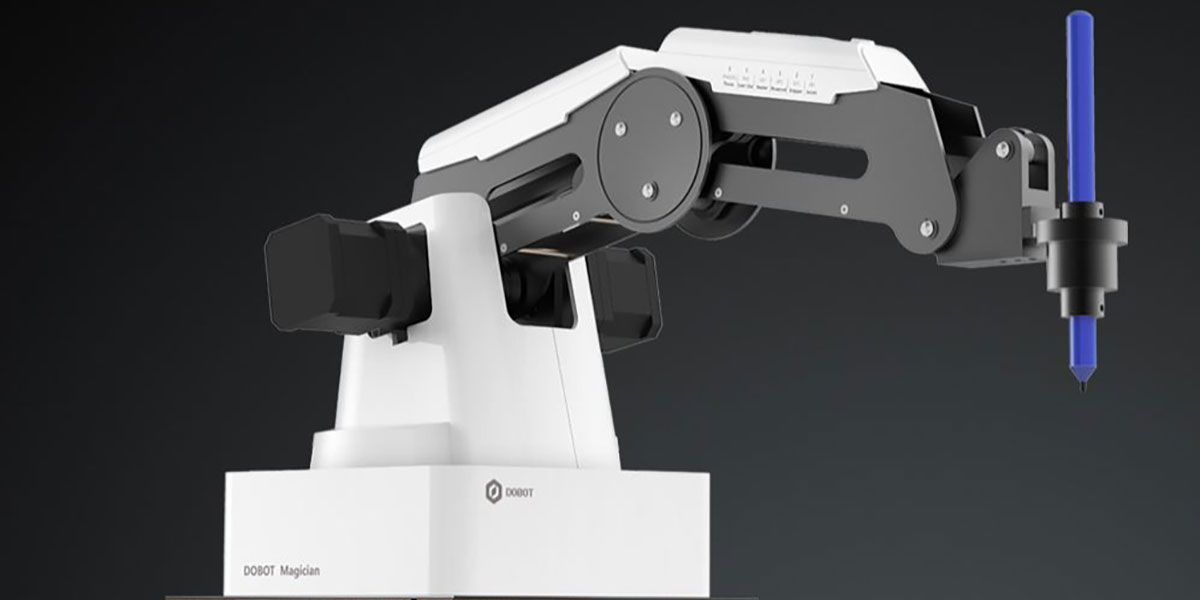
I was somewhat discouraged until I found the Dobot Magician robotic arm, which provides far more options and capabilities than I had even hoped to find. Figure 1 shows the arm and an impressive assortment of accessories as I unpacked everything.
![]()
FIGURE 1.
It has four degrees of freedom, with most of the joints powered by stepper motors to obtain an accuracy of .2 mm when handling loads up to 500 grams.
End Effector Tools
One of my favorite features of the arm is how easy it is to change the tools used for interacting with the robot’s environment. A few turns of a single butterfly bolt quickly releases one tool and attaches another. I am already starting to think about building a custom apparatus for attaching a Dremel tool for drilling printed circuit boards (PCBs).
The Magician comes with two hands for picking up objects. One resembles a typical gripper as shown in Figure 2.
![]()
FIGURE 2.
The fingers always point downward, and open and close pneumatically (an air pump is included). The second option for picking up objects is a suction cup (also powered by the air pump) that allows you to pick up small blocks or even objects such as playing cards (Figure 3).
![]()
FIGURE 3.
The ability to pick up cards was particularly exciting for me, since one of my many hobbies is magic. I am already envisioning my Magician living up to its name by performing card tricks for my friends.
I/O Ports
Figure 3 also shows another well-thought-out feature of the arm. Notice the sockets on the robot’s forearm (the protective covers have been removed from all sockets). They provide both digital and analog ports as well as switched power and PWM that can be used to control end effector tools and obtain sensory information. Additional ports are available on the arm’s base for interfacing with devices not mounted on the end of the arm.
Since some form of gripper will generally be the primary tool used by most hobbyists, I will explore Dobot’s software for controlling the arm and grippers shortly, but first let’s look at some of the Magician’s other end effector tools.
Drawing and Engraving
There is a spring loaded mechanism for holding a pen or even a paint brush to give the arm the ability to draw or paint. There is also a laser capable of engraving (burning) gray-scale pictures on heavy paper, wood, or leather. I was impressed when I discovered how the provided software makes it easy to perform these tasks. With engraving, for example, you just give it a picture (or text) and it handles everything else. I have hopes that such ease-of-use may even get my wife (an artist) interested in robotics.
Figure 4 shows the pen holder and the laser.
![]()
FIGURE 4.
Figure 5 shows how accurate and repeatable the arm is.
![]()
FIGURE 5.
The smiley face shown was draw 10 times with the pen attachment. As you can see, the nine subsequent drawings coincide almost perfectly with the original image.
It is worth mentioning that most operations — such as engraving and moving objects — perform their actions without external friction restricting the arm’s movement.
When writing with the pen, the pen-to-paper contact can source considerable friction though, especially if the arm is initialized with too much force on the pen. Minimizing such friction is vital to getting the performance shown in Figure 5.
3D Printing
The arm’s accuracy makes it possible to use it as a 3D printer. This dual functionality has the potential for making the arm very affordable for hobbyists thinking of purchasing both an arm and a printer. All the necessary components including the software, a temperature controlled print head, and an extruder (see Figure 6) comes with it.
![]()
FIGURE 6.
Even though I had never used a 3D printer, I was able to print the thin-walled twisted vase (holding a tube of Super Glue™) shown in Figure 7.
![]()
FIGURE 7.
After learning more about printing, I was able to produce the small squirrel-like Pokémon character also shown in Figure 7. It would be beneficial if Dobot included a 3D tutorial for beginners. I am sure that I could benefit from a better understanding of how various printer parameters affect the final product. Even simple hints such as “minimize friction in the extruder conduit by keeping it as straight as possible” would have been nice to know without a lot of trial and error.
The Dobot Studio
All of the arm’s functions can be initiated from an integrated environment called the Dobot Studio as shown in Figure 8. Being able to navigate easily to various functions is a nice touch.
![]()
FIGURE 8.
Programming the Arm
I expect that most hobbyists will want to program the arm to perform interesting applications. Imagine, for example, having the arm actually moving the pieces when playing checkers, or even drawing the grid for a game of Xs and Os and then marking its own moves.
The arm can be programmed with an integrated scripting language or with direct commands through a serial interface or over a network connection. Dobot provides the basic protocol for such direct commands, but there is an even easier method. A variation of Google’s Blockly language is also included, and is by far the easiest way to customize the arm’s behavior (although complex applications might be better implemented in one of the more robust programming alternatives).
Figure 9 shows a simple Blockly program that demonstrates how easy programming the arm can be.
![]()
FIGURE 9.
Some of the details for programming the arm are currently lacking due to its newness, but Dobot promises to have complete programming manuals available by April 2017. I had a few installation problems and numerous questions about programming the arm, and was pleased with the help obtained from Dobot. Patience will be a virtue though, because the time difference between China and the United States almost ensures that answers to questions will take at least a day or two.
Teach and Playback
The ability to truly program the arm will be appreciated by most hobbyists, but for many applications, you can simply move the arm to various points and record the joint positions in a table (see Figure 10).
![]()
FIGURE 10.
The arm can be moved electronically using the control panel shown in Figure 11, or you can disengage the motors by pressing a button on the forearm to manually place the arm in the desired positions.
![]()
FIGURE 11.
Notice there are two sets of controls in Figure 11. The lower two move each joint independent of the others. The upper two controls allow you to move in the X-Y-Z directions without affecting the orientation of the gripper. This requires many calculations, and I found it impressive that the arm handled them all for me.
Once a table of points has been created (and edited with the integrated editor) the arm can be instructed to move between the points in a variety of ways. It can, for example, move between two points using a straight line, or you can use the JUMP mode to have the system automatically raise and lower the arm when moving between two points (a behavior perfect for manipulating objects with the suction cup or gripper).
Entries in the table can force the arm to delay for a specific period of time before moving to the next point, or even pause until the value of a port (either analog or digital) returns a specified value. You can also tell the arm to repeat the table actions a specific number of times.
Once you have developed a table to solve a particular application (drilling a PCB, for example), you can download everything to the arm with the click of a mouse. The arm can then be disconnected from the PC and perform the operations on its own.
If you only want a 3D printer, the Magician is probably not a good choice because there is so much competition. At the time of this writing, even Walmart.com offers six 3D printers with three of them selling for under $400. If you have been thinking about purchasing a quality robotic arm though, and you want/need something better than a typical servomotor powered hobby arm, then you should check out the Dobot Magician. It’s like buying a great arm and getting the printer for free. Even with a price tag around $1,000, its many tools and features make it worthy of consideration. SV
Article Comments