
How to Make Multiple Robots Using Servo Building Blocks
By Bob Davis View In Digital Edition
Humanoid robots that are made out of servo building blocks abound on the Internet. They vary from as little as five servos or “Degrees of Freedom” (DOF) to 19 or more servos per robot. For more variety, you can make a lot of different robots using the same parts.
It’s easier to make a simple five DOF robot and then make more complicated versions as your abilities increase. Starting with five servos, you’ll have two in each leg and the head to make a total of five. Then, you can add arms of two servos each to get a total of nine servos. If you add one servo per leg and one servo per arm, you will come up with a 13 DOF robot. If you add another servo per leg and hands with servos, then you will have a 17 DOF robot.
When I bought my first humanoid robot kit, there were no servos included with it. I asked the vendor what servos to get and he said to use Tower Pro MG995s or MG996s. I went on eBay and bought some of both. They didn't have enough power, they didn't return to the same position, and two of them even burned up.
The moral of that story is this: Do not buy your servos on eBay unless you like to make your life difficult. It turns out that there are a lot of imitation servos being sold there that are junk.
A better option is to use Hitec servos. They work the opposite from Tower Pro servos, so the software has to be changed to match them. The MG995/996s can be replaced with Hitec HS-625 or HS-645 servos; the MG958 servos can be replaced with Hitec HS-7940 versions.
So, what exactly are these servo building blocks? They are metal brackets that allow you to connect servos together to make different robots. They usually include the following:
- Servo Mounting Bracket — Designed to hold servos
- Short U Bracket — Fits over servo
- Long U Bracket — Fits over servo
- Angled U Bracket — For shoulders
- Straight Bracket
- Angled “L” Bracket
- Waist Bracket — 3.5 inches long
- Feet — 2.5 by 5.0 inches
You'll also need some hardware such as servo horns, bearings, and screws.
The typical robot chest is made out of several small pieces. There are two angle brackets and a short U bracket, as well as the waist bracket and two servo mounting brackets. Figure 1 shows a typical robot chest.
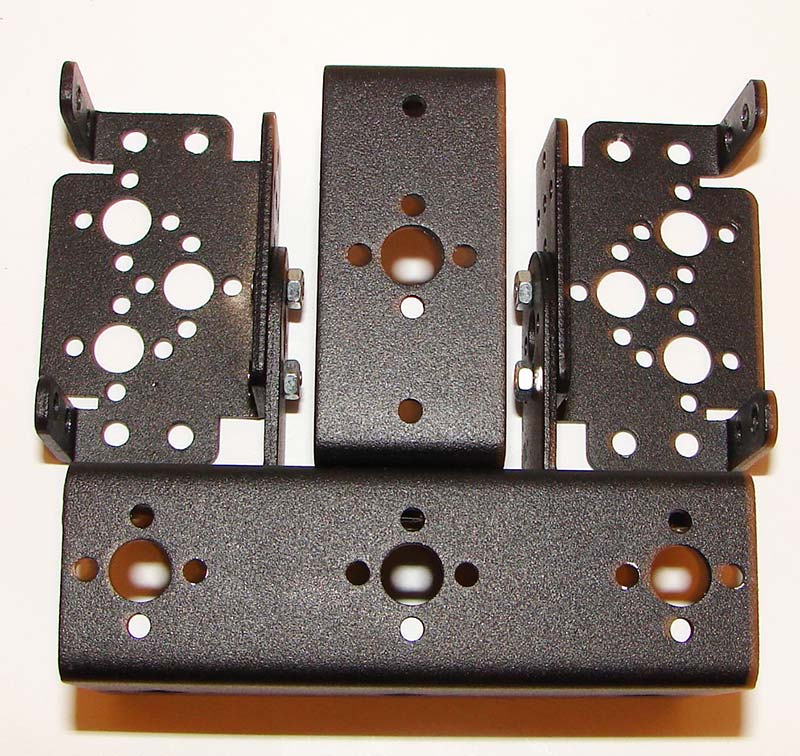
Figure 1. Typical robot chest.
If you make a solid chest out of some three inch by one inch aluminum “C” channel, it will look a lot better. Besides looking better, a homemade chest gives you a place to mount an Arduino or Raspberry Pi controller. Figure 2 shows the mechanical drawing for the improved chest design.
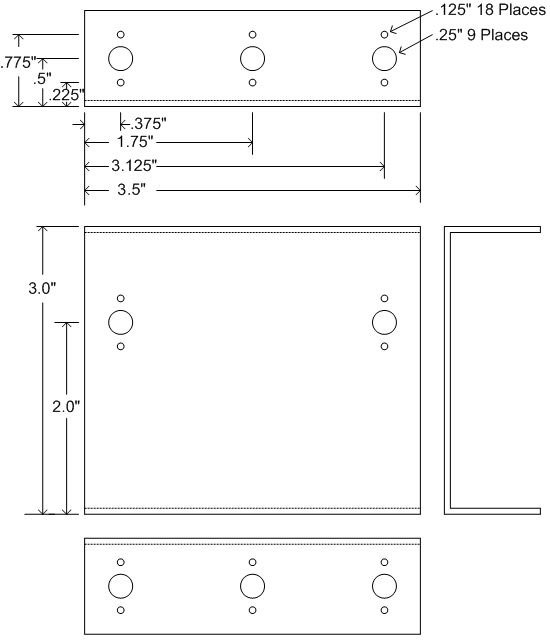
Figure 2. Improved robot chest design.
Besides making a better chest, you might want to add a better looking “head” to your robot. I made a head out of a 3.3 inch clear plastic Christmas tree ornament.
First, I cut two slots: one on either side of the hole used to hang the ornament. The cuts should be 3/4 inches apart and 1-3/4 inches long. I used wire cutters to connect the slots together and to remove the hanging hole. Refer to Figure 3.

Figure 3. Making a robot head.
Next, the area for the face to show through is taped off and the globe is spray painted. Finally, a circuit board with LEDs for the eyes and mouth is glued inside of the globe. The globe is then slid over a servo and lightly glued in place. Be careful because the circuit board fits tight to one end of the servo.
In the smallest humanoid robots that usually having five to nine DOF, the ankle servo lifts the opposite foot off the ground. The hip servos then rotate to move the lifted foot forward or backward.
In the 13 DOF version, the ankle servo once again lifts the opposite foot so it can then move forward or backward. When you get up to 17 DOF, both the ankle and the upper hip servos shift the center of gravity over the stationary foot, then the opposite foot can move forward or backward. This allows the robot to walk without tilting nearly as much.
Figure 4 shows a size comparison of humanoid robots.
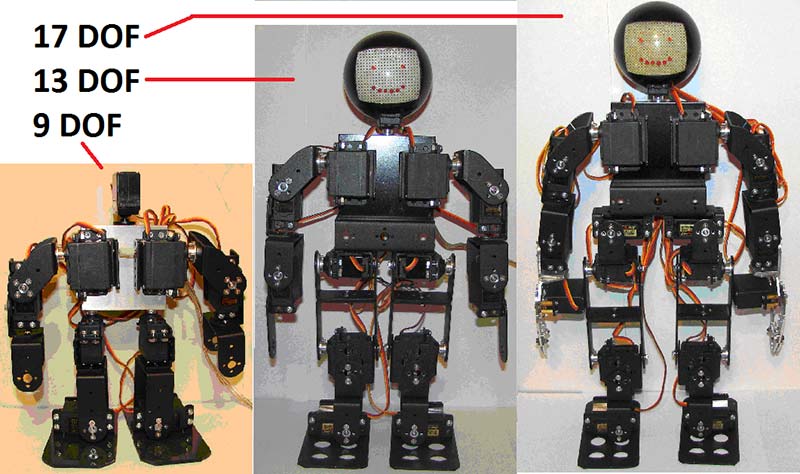
Figure 4. Humanoid robots with different DOF.
The parts necessary for 9, 13, and 17 DOF robots are shown in Table 1.
| 9 DOF | 13 DOF | 17 DOF | |
| 8 | 12 | 16 | Servo mounting bracket |
| 2 | 6 | 6 | Short U type servo bracket |
| 2 | 2 | 4 | Long U type servo bracket |
| 2 | 2 | 2 | Angled U type servo bracket |
| 0 | 2 | 0 | Flat servo bracket |
| 2 | 4 | 6 | L type servo bracket |
| 0 | 1 | 1 | Robot waist bracket |
| 1 | 1 | 1 | Robot chest bracket (or two angled and one short U bracket) |
| 2 | 2 | 2 | Foot base |
| 8 | 12 | 16 | Miniature ball radial bearing |
| 9 | 13 | 17 | Metal servo horn flange |
| 9 | 13 | 9 | 120 oz-in MG995 or MG996 servos |
| 0 | 0 | 8 | 220 oz-in MG958 servos for the legs |
| 0 | 0 | 2 | Robot hands |
| 1 | 1 | 1 | Arduino Uno and servo shield |
Table 1. Don’t forget that you will need lots of screws and nuts.
The next robots we’ll discuss will have four legs. Refer to Figure 5.
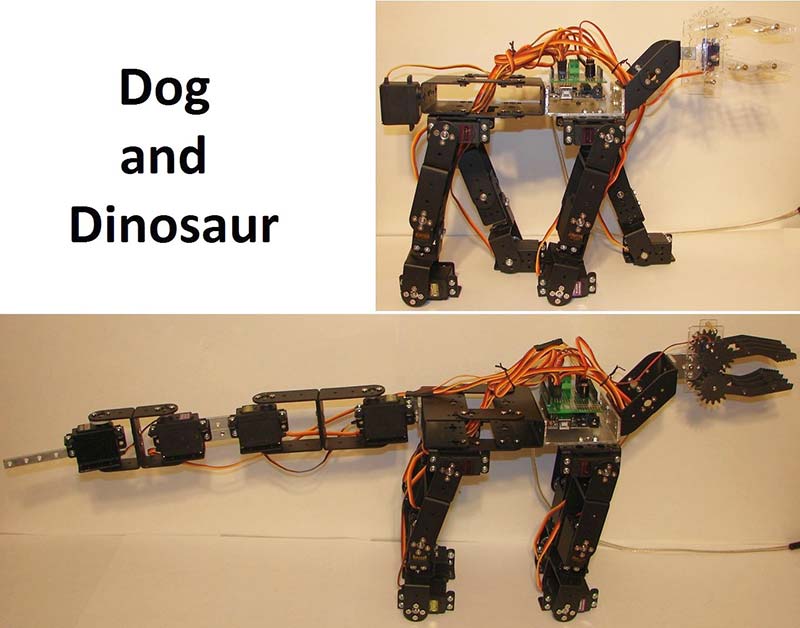
Figure 5. Four-legged robots.
Their feet consist of the servo mounting brackets. All of their leg servos rotate forward and backward; there is no need for a “tilt” servo. The dinosaur version is a little tricky as he has to move his tail to one side to lift the opposite foot. The rear leg servos for the dinosaur should be MG958s. The dinosaur also uses more brackets than what came with the original kit.
The required parts for a 14 DOF dog and 17 DOF dinosaur are shown in Table 2.
| Dog | Dino | |
| 12 | 16 | Multi-functional servo mounting bracket |
| 8 | 10 | Short U type servo bracket |
| 4 | 6 | Long U type servo bracket |
| 2 | 4 | Angled U type servo bracket (four for a longer neck) |
| 4 | 6 | Flat servo bracket |
| 5 | 6 | L type servo bracket |
| 2 | 2 | Robot waist bracket |
| 1 | 1 | Robot chest bracket (or set of two waist brackets) |
| 0 | 0 | Foot base (or you can make smaller ones) |
| 12 | 16 | Miniature ball radial bearing |
| 13 | 16 | Metal servo horn flange |
| 13 | 16 | MG995, MG996, or MG958 servos |
| 1 | 1 | Robot hand (as the head, includes a micro servo) |
| 1 | 1 | Arduino Uno and servo shield |
Table 2. As always, lots of screws and nuts.
The most complicated robot to build is a six legged “spider” bot. A true spider has eight legs of course, but making a robot with six legs is complicated enough. There are kits available to build a “spider,” but you can make it with the parts from the humanoid robot. You will need a couple more servos, servo brackets, and some other brackets.
The part that you will likely have to make yourself is the lower legs; refer to Figure 6.
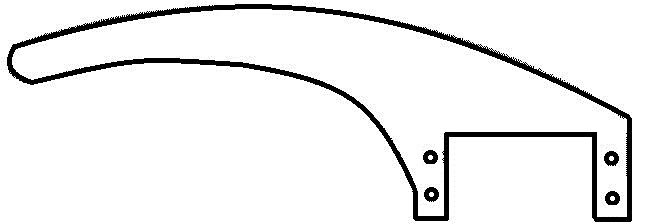
Figure 6. Spider lower leg.
They need to be 6-1/4 inches long and can be made out of aluminum or Plexiglas. I cut mine out of 1/4 inch Plexiglas with a jig saw and then painted them black.
The trickiest part to making the spider with the humanoid robot parts was designing the body. A spider kit typically comes with two metal plates that are spaced apart with metal spacers so that the servos fit between the plates. We can do pretty much the same thing with U shaped brackets.
The upper part of the six legs is made by fastening two servos back to back and rotated 90 degrees from each other. Then, a long and a short U bracket go to the lower leg servo (that also has the lower legs attached to it). The middle leg servo should be a MG958; otherwise, the body will not lift very high off the floor. See Figure 7.
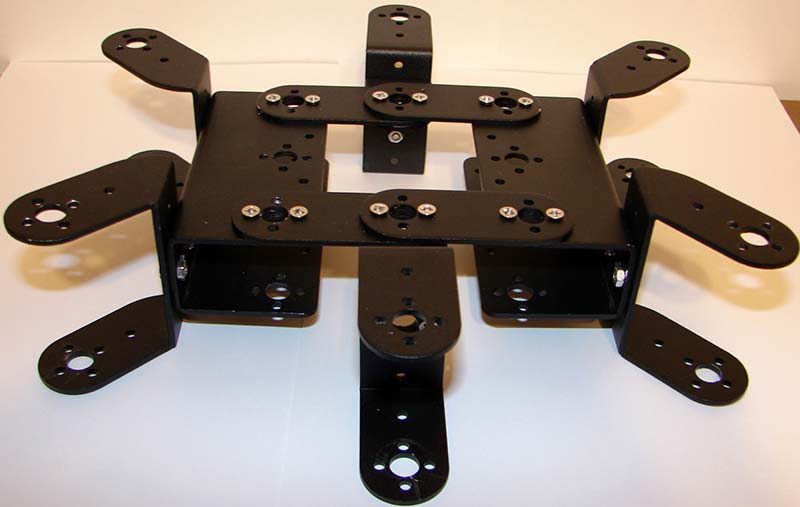
Figure 7. Six-legged robot body.
The completed spider is very large (some people might even scream when it comes to life!). It needs a surface that is about 24 inches by 24 inches. See Figure 8.
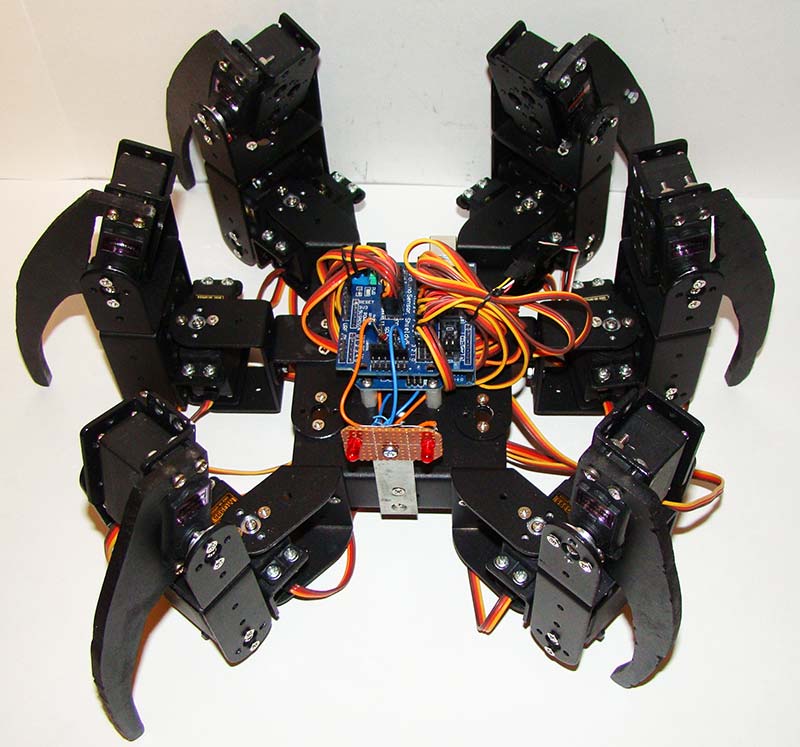
Figure 8. Six-legged “spider.”
The “spider” is one of the easiest robots to write programs for, as it does not fall over if you get the walking sequence wrong. The 18 DOF spider robot parts list is in Table 3.
18x Multi-functional servo mounting bracket
18x MG995, MG996, or MG958 servos
8x Short U type servo bracket
6x Long U type servo bracket
4x Angled U type servo bracket
4x Flat servo bracket
2x L type servo bracket
2x Robot waist bracket
18x Miniature ball radial bearing
18x Metal servo horn flange
6x Spider lower legs
Optional two LED eyes
Arduino Uno and servo shield
Lots of screws and nuts
Table 3. Parts List.
So, there you have it. You now know how to make six different robots out of the same parts. There are many more possibilities of robots to make, like a two legged dinosaur or “raptor.” The possibilities are endless. I look forward to hearing from readers who have created other servo based robots. To see what I am creating next, be sure to visit my blog at bobdavis321.blogspot.com. SV
Article Comments