RobotBASIC Robots for Beginners — Part 2: Adding Sensors
By John Blankenship View In Digital Edition
Readers that have never built a robot often find the low-level programming needed to control motors and interrogate sensors to be intimidating. This final article in a two-part series shows how easy it is to add sensors to the inexpensive motorized platforms developed in Part 1.
The first part showed how to build an inexpensive entry-level robot platform that could be powered with either DC motors or servomotors. It also explained how a RobotBASIC RROS chip can greatly reduce the complexities associated with hardware interfacing and the low-level programming generally required for motor control.
This second installment will add sensory capabilities and simple programs will demonstrate how easily sensor data can be obtained and used to control the behavior of an RROS-based robot.
Adding a PING))) Ranger
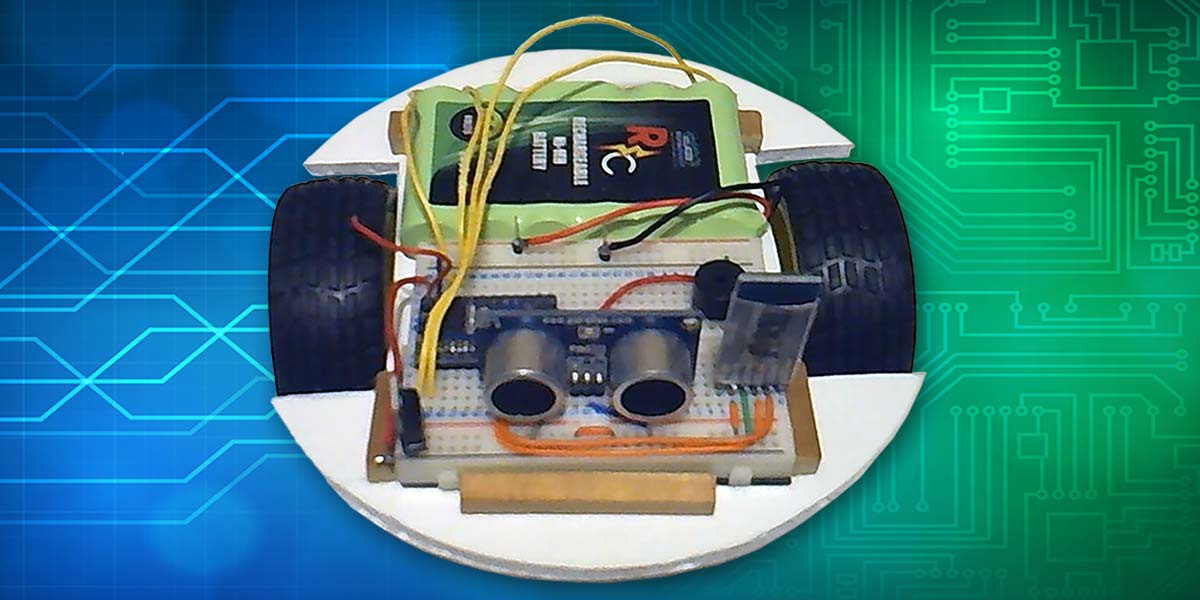
Let’s start by adding a Parallax PING))) ultrasonic ranging sensor to the DC robot we discussed in the first part of the series. Other than adding the PING))) sensor, no physical modifications need to be made to the robot. The new robot is shown in Figure 1.
![]()
FIGURE 1.
Figure 2 shows the updated schematic with the PING))) sensor added. Only three connections are required (5V, ground, and signal). Using the PING))) is very easy because RobotBASIC provides an rRange() function for reading the sensor.
![]()
FIGURE 2.
Obtaining and Using the Ranging Data
The program in Figure 3 moves the robot forward until it’s five inches from an obstacle (the units returned by rRange() are 1/2 inch).
#include “RROScommands.bas”
gosub InitCommands
PortNum = 5 // set to your Bluetooth Port
main:
gosub InitDCrobot
while rRange()>10
rForward 1
wend
end
InitDCrobot:
rCommport PortNum
rLocate 10,10
rCommand(MotorSetup, SMALLDC)
rCommand(SetSpeed,17)
rCommand(SetReducForwRight,5)
rCommand(SetMoveTime,34)
rCommand(SetRotationTime,33)
rCommand (SensorSetup, PING)
return
FIGURE 3.
After initialization, a while-loop continually moves the robot forward in tiny increments, while the range reading is greater than 10.
Refer to Part 1 for additional details about programs like this.
Reducing Development Time
One of the great things about using an RROS-based robot is that you can reduce your development time using RobotBASIC’s robot simulator. Figure 4 shows a program that demonstrates how this works.
main:
xs=400
ys=300
rLocate xs,ys
rectangle 70,100,300,200,red,gray
circle 550,50,750,250,red,gray
//gosub InitDCrobot
rTurn -90
angle = -90
for i=1 to 10
r = rRange()
x=xs+r*cos(DtoR(angle-90))
y=ys+r*sin(DtoR(angle-90))
line 400,300,x,y
angle+=20
if i<10
rTurn 20
else
rTurn -90 // original position
endif
next
end
FIGURE 4.
It locates the simulated robot in the center of the screen and draws two obstacles within the environment. The robot then rotates to the left 90° before turning right in 20° increments. At each position, it takes an rRange() reading and draws a line whose length is proportional to the distance measured, extending forward from the robot’s current orientation.
The program was easy to develop on the simulator because of the instant feedback. You know immediately if the robot is not turning correctly or if faulty math is drawing the scan lines improperly.
The output from this program is shown in Figure 5. This could be the beginning of a program that maps the robot’s environment, so it can formulate a path to avoid objects.
![]()
FIGURE 5.
Scans with the Real Robot
This same program can be used to control a real robot. All we need to do is initialize the actual robot as previously demonstrated. This is easily done by replacing the original three lines that located the simulated robot and drew the two obstacles with gosub InitDCrobot.
The real robot was placed on the floor in my office with a chair and two cases serving as obstacles, as shown in Figure 6.
![]()
FIGURE 6.
When the modified program was run, it produced the output in Figure 7.
![]()
FIGURE 7.
Notice the scan shows the chair further away than the two cases, and the two openings (front and right) are obvious.
If your application needs a tighter beam, you could use an IR ranger rather than the ultrasonic PING))). The RROS manual outlines many sensor options supported by the RROS chip and can be download from the RROS tab at www.RobotBASIC.org.
Let’s look at one more supported option to illustrate just how easy it is to add capabilities to RROS-based robots.
Figure 8 shows a PING))) ranger mounted on a small servomotor.
![]()
FIGURE 8.
A four-pin header was hot-glued to one end of the servomotor so that it could be physically mounted on the robot by simply plugging it into the breadboard (see Figure 9).
![]()
FIGURE 9.
Other than supplying five volts and ground to the turret servo, you only need to connect the servo control pin to the RROS pin 10 to complete the physical setup.
Notice that we are now using the servo-powered robot. When properly initialized, the RROS will control either robot using the same commands and programs.
The RROS chip provides all the necessary low-level code to control the turret. You could use the command rRange(-90) to look directly left or rRange(20) to look 20° to the robot’s right. The turret will automatically move before the reading is taken.
If you have ever programmed a turret mounted ranger, this simplicity should excite you because it gives you more time for application development instead of slaving over low-level code.
Adding the turret would let your robot create scans like Figure 7 much quicker because your program could move the turret instead of rotating the robot.
As you can see, even beginners can build an entry-level robot quickly and inexpensively using the techniques discussed. Then, when you’re ready for more sophistication, you can easily add more sensors to your RROS-based robot (download the RROS manual for more details). SV
If you are intrigued by RROS-based robots, look for my book RobotBASIC Robots for Beginners on Amazon.
Article Comments