Pool Bot
By Dave Prochnow View In Digital Edition
Build Your Own Underwater ROV for Less than $100
What's that on the bottom of the swimming pool? It's big and dark and near the drain. Well, if you have about four hours of time and around $100, you could easily find out what that thing is. In less time than it would take to hire a pool boy, you can build an underwater remotely operated vehicle (ROV) that can deftly descend to the pool's drain and quickly ID whether you have debris or a mermaid living in your pool.
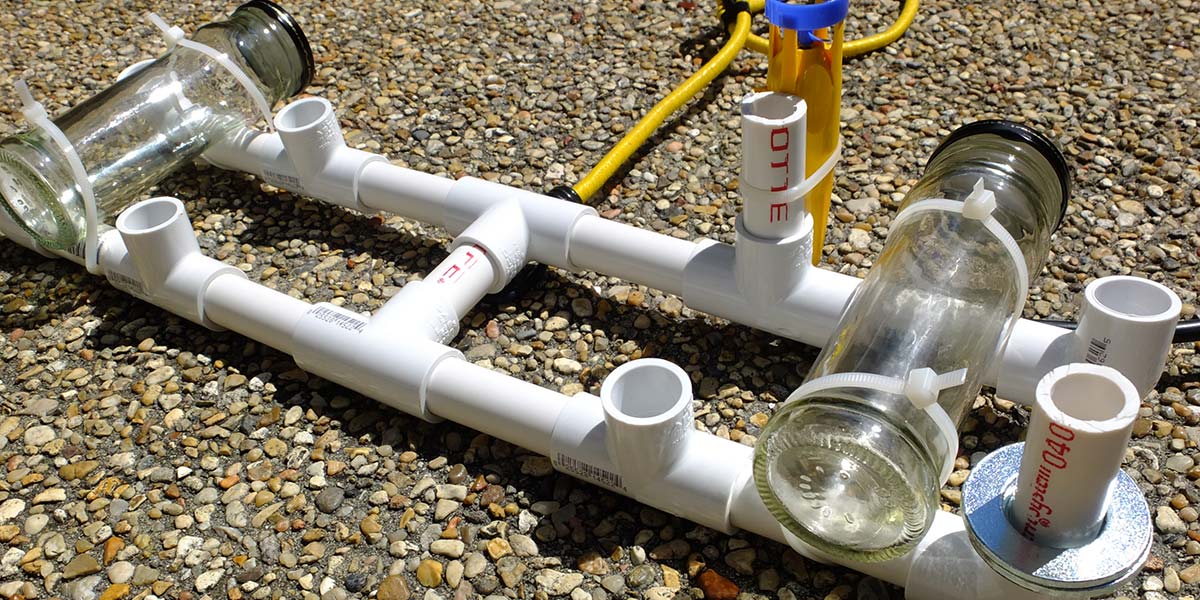
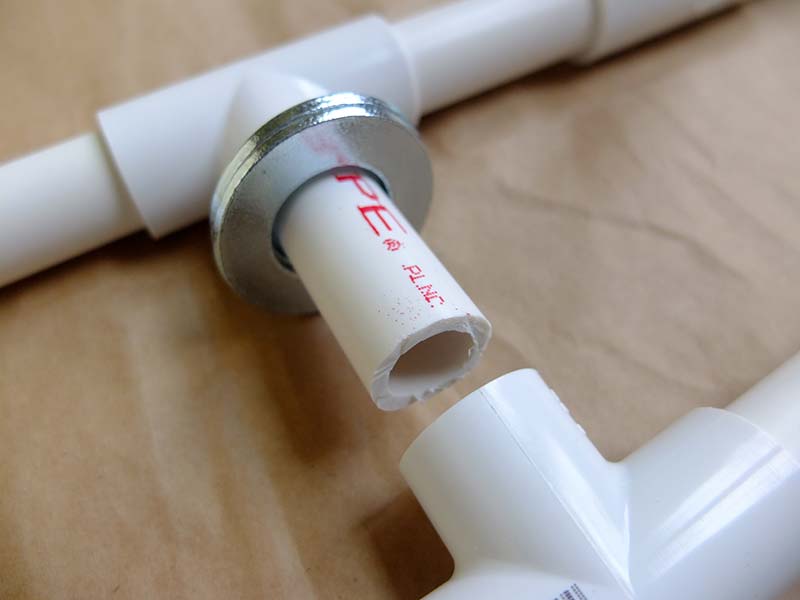
Pool Bot is built on a framework of Schedule 40 PVC tubing and connectors. While there is nothing extraordinary about utilizing this building material for the construction of an ROV, the hallmark of the project is that none of the PVC joints are glued together. Couple this virtue with employing cable ties as support structure and Pool Bot can be disassembled for convenient storage, and rebuilt for spontaneous periodic inspections of the swimming pool.
While adept at tooling about a swimming pool, Pool Bot can also be used in both natural freshwater and saltwater environments. Remember, if used in either one of these natural aquatic resources, the entire ROV should be thoroughly scrubbed and cleaned prior to storage. Failure to properly clean all of Pool Bot’s surfaces can result in the formation of mold and rot which could destroy the ROV.
Another more prominent and controversial aspect of Pool Bot is the use of a single 9V battery for a power supply. Adding electrical power to any ROV is a complex task that generally involves long, thick, waterproof umbilical cables that stretch from the above-water operator’s position to the underwater ROV. By using a 9V battery, however, the need for extensive waterproofing and cable bulk can be reduced.
There’s no need to charge batteries or lug a lead-acid battery around. The Pool Bot 9V power is easy to carry and easy to connect. Likewise, the amount of cable needed for a lightweight 9V ROV is reduced to a neatly braided twist of six 22-gauge wires. The length of these wires is determined by the distance from shore to the target depth inside the swimming pool. Generally speaking, a spool of 20 foot pencil diameter wire should be sufficient for most pool excursions.
Keel Haul
Before you start construction of Pool Bot, make sure that you have two empty and clean olive jars. While olive jars aren’t mandatory (i.e., bacon bits, pickled peppers, etc. are good alternatives), any clear glass cylindrical household grocery jar will work. If glass jars are a concern for you, use plastic soda bottles with weight added inside (sand, rocks, etc.) instead. Just make sure that both jars (or plastic bottles) are identical in size, weight, etc., and the lids can create an airtight seal.
You can test this requirement by loading each jar with several heavy metal washers, attaching the lids, and holding the jars under water for several minutes. If you don’t see any air bubbles streaming from the lid and the contents are still dry after this water test, the jar can be used for Pool Bot.
(If you’re having trouble emptying an olive jar, make a batch or three of ROV Martinis (e.g., 1-2/3 ounces gin, 1/3 ounce dry vermouth, dash of black strap rum, and several large olives; shaken not stirred, then add olive “depth charges.”)
One final precaution: Even though the power supply is a modest 9V system, water is still a deadly enemy of Pool Bot’s electrical motors. Make absolutely sure that the entire ROV propulsion system, camera system, and LED lighting system are completely and thoroughly waterproof. Liberal applications of waterproof silicone sealant to every critical opening, joint, and conduit is essential.
Also, watch for breaks in the wiring insulation; one crack can doom the ROV. Frayed, cracked, and abraded wiring should be immediately replaced.
Step-By-Step
Pool Bot Frame
- Place the lids on the two jars and lay them parallel to each other on your workbench; glass ends forward. While the distance between the jars is not critical, this space will determine the overall size of Pool Bot.
- Loosely lay the Schedule 40 tees and elbows around the jars following the layout in the frame photograph.
- Use a hacksaw to cut the Schedule 40 pipe into short pieces for connecting the tees and elbows together. A press-fit construction is all that is necessary. If the final frame is too wobbly or loose, you can opt to glue all of the joints. Remember that gluing Pool Bot’s frame together will make it impossible to disassemble for storage. The pipe lengths used here are: nine two inch pieces and eight three inch pieces, with one two inch piece used for the ROV keel and the eight remaining pieces inserted into all open upright elbows and tees.
Propulsion System
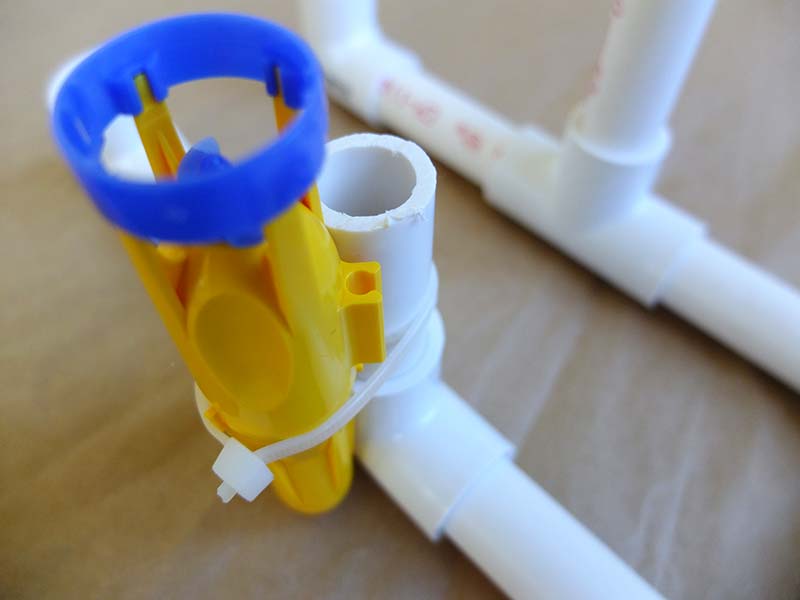
Propulsion motor. The Y axis motor installed on Pool Bot.
- Follow the manufacturer’s assembly instructions for building the Pool Bot motors. During assembly, do not attach the rudder (part #A6), suction cup and holder (part #A3), and the jumper plate to any of the motors.
- Solder wire connections between the motors and the switches. Follow the schematic diagram for routing each wire. Remember to use about 20 feet of wire for every switch-to-motor connection. Two SPDT (single pole, double throw) switches are used for each motor. These switches are wired to reverse the motor’s polarity for driving the ROV in two directions with the same motor.
- Using cable ties, attach the motors to the Pool Bot frame. One motor is attached in the X axis, a second motor is attached in the Y axis, and the third motor is attached in the Z axis.
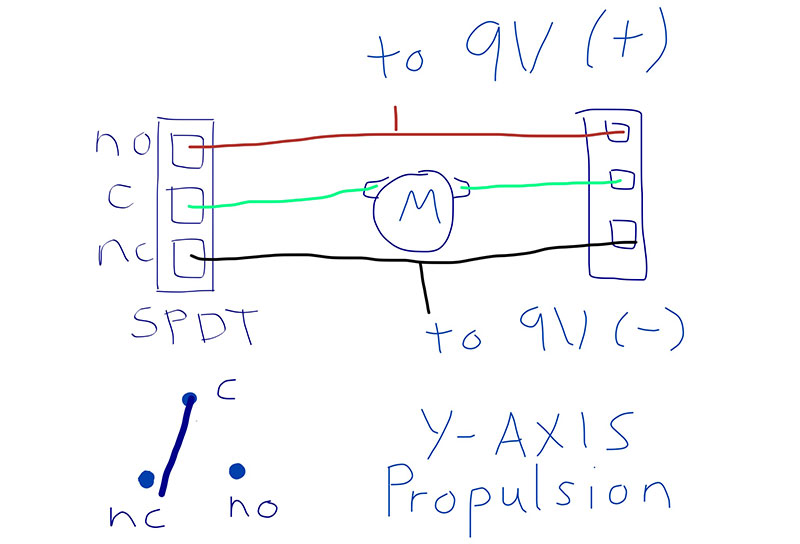
Wiring Schematic. Wiring connections for one directional control motor (Y axis) for the Pool Bot propulsion system. Two SPDT switches and one Tamiya submarine motor kit are used for each directional control motor (i.e., Y axis, X axis, and Z axis).
Power Supply
- Connect the 9V battery connector to each of the correct SPDT poles. All normally open switch poles should be connected to the battery’s positive terminal (+) and all normally closed switch poles should be connected to the negative terminal (-).
- Assemble the 9V battery connector and switches either inside a project box or mount these components on a scrap piece of wood.
LED Lighting System (Optional)
- Underwater ROV lighting in a sunlit swimming pool is not necessary, but when it’s nighttime LEDs can look really cool. Powerful white LED lights can be embedded inside the two jars. If you elect to add an underwater lighting system, one LED lighting system must be inserted into each jar.
- Create a lighting system by connecting a white LED, current-limiting resistor, 3.7V LiPo battery, and switch on a small piece of scrap perforated circuit board. When assembled, each lighting system is dropped inside a jar.
- Line the inside of each jar with a sleeve of black construction paper. This paper sleeve will minimize the amount of reflective glare that could “blind” the underwater camera system during daytime operation.
WARNING: Be absolutely certain that you can safely turn on each LED lighting system switch, drop the system inside each jar, and securely attach the lid to each jar before you launch Pool Bot. Any water that leaks inside the jar could cause a dangerous short circuit.
NOTE: If you elect to skip the LED lighting system, you must still install the two empty jars on Pool Bot. These jars add to both the structural stability of the ROV and help establish the unit’s buoyancy.
Underwater Camera System (Optional)
- Dry-test your underwater camera system. Connect the power and video signal cables to your closed-circuit monitor and make sure that you are able to clearly see approximately one meter away from the camera.
- Wet-test your underwater camera system. Ensure that the camera housing is watertight and that both the power and video signal cables/connectors are adequately waterproofed. Attach a small weight to the camera and slowly lower it into some water. Watch the video signal on your closed-circuit monitor; the resulting image should be reasonably clear. Not all automobile backup rear view camera systems (like the one utilized here; refer to the Parts List) will work. Make sure that your system is weatherproof.
WARNING: Make sure the power and video signal cable connectors are not near the water during testing.
NOTE: Many automotive backup camera systems require 12V. In order to easily and conveniently introduce 12V into the Pool Bot system, wire two 9V batteries in series, i.e., connect the negative terminal from one 9V connector to the positive terminal of another connector. Route the remaining positive and negative terminals through a 7812 voltage regulator IC. Refer to the voltage regulator’s datasheet for connection information.
- Attach the underwater camera system between the two jars, aiming it forecastle (that’s forward, you land lubbers).
Underwater Collection System (Optional)
- Using cable ties, fasten an aquarium net to the underside of the middle keel pipe on the Pool Bot frame. This attachment point might need to be moved during the sea worthiness test (see Testing section) for loading ballast. If this relocation is necessary, just snip the cable ties, load the ballast, and reattach the aquarium net with new ties.
Analog Recovery System (Mandatory)
- Mount the U-bolt to the midway point on Pool Bot’s stern (that’s the ROV’s rear). Securely attach 25 feet of nylon cord to the U-bolt. If the propulsion system fails, this cord will be used to pull Pool Bot to the surface.
Testing, Testing
Test the completed Pool Bot on dry land before you attempt your first “sea trial.” There are four main tests that you should perform: propulsion system (e.g., press an SPDT button and the correct motor should turn in the proper direction); lighting system (e.g., turn on each LED switch and seal the LED inside its respective jar); camera system (e.g., turn on the closed-circuit monitor and ensure that you are receiving a good video signal); and analog recovery system (e.g., lift Pool Bot up off the workbench by pulling on the nylon cord).
If all tests are completed successfully, then move onto your first sea worthiness test. If, on the other hand, any of the tests were not successful, make corrections to your construction and try the tests again.
Never attempt a sea worthiness test without a 100% successfully tested Pool Bot!
Before throwing Pool Bot into the swimming pool, a sea worthiness test must be successfully performed. The main objective with this test is to establish the buoyancy of the ROV. Ancillary ballast and trimming will also be necessary during testing.
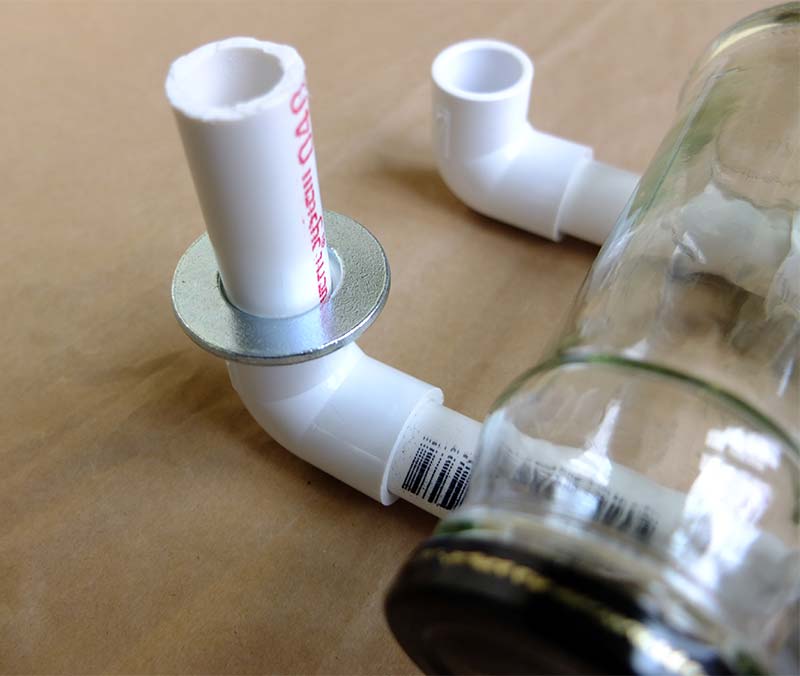
Trim. Use washers for trimming Pool Bot on the two inch long elbow support standards.
First of all, disconnect the power supply from Pool Bot. Likewise, switch OFF both LED lighting systems. Use a two to three foot deep container filled with water (e.g., laundry room sink, bathtub, barrel, etc.) and set the ROV into the water.
Ideally, Pool Bot should float perfectly level just below the surface of the water. Flat washers are used as ballast for obtaining the proper buoyancy, as well as for trimming and/or balancing the vessel.
Ballast. Flat washers are added to the center keel pipe piece for establishing the ROV's buoyancy.
Carefully slip flat washers over the center keel pipe piece. Depending on the air volume and glass thickness of your jars, this step could take quite a few washers. Once the proper buoyancy has been determined, slide the washers forward and backward until the ROV rests perfectly level just below the surface of the water. Secure the washers in this position with two cable ties (one tie added ahead of the washers and the other cable tie fixed behind the washer line-up).
If Pool Bot appears to be listing to either port or starboard (i.e., tilting to the left or right), the vessel will need to be trimmed. In order to trim your ROV, slip a washer over the two inch support standards inside each of the four elbows. Use as many washers on any/all of the four elbows as needed to trim your ROV.
When all of the trim washers have been added, secure each stack with a cable tie. Pool Bot should now be ready for its maiden voyage.
Bon Voyage
Take your entire underwater ROV setup outside and connect the power supply to Pool Bot. Test each propulsion control switch to ensure that you have adequate power for this voyage. If power looks good, flick each LED switch ON and seal each jar, lower Pool Bot into the water, and press the descent (Y axis; down) motor button. Away she goes!
Slowly pay out both the power supply umbilical tether cable and the nylon recovery cord. Don’t be tempted to braid the cable and cord together. One accidental tug on the nylon cord could sink Pool Bot in a power loss short-circuit crash. Watch the video signal on the closed-circuit monitor and methodically apply short downward thrust bursts coupled with short bursts of forward (Z axis) thrust. If properly balanced and trimmed, short motor runs are ideal for navigating Pool Bot.
Once you’re comfortable “driving” your ROV around the swimming pool, try to make your way over to the big dark mass that you initially found lurking around the pool’s drain. A skillful skipper should be able to glide up to that mass and retrieve it with the aquarium net.
Don’t be too surprised, however, if that stagnant dark mass turns out to be a slumbering snapping turtle that doesn’t like ROVs disturbing its sleep. SURFACE! SURFACE! You’re probably going to need a bigger boat! SV
Pool Bot Parts List*
- Two empty olive jars w/lids
- Six Schedule 40 1/2 inch tees
- Four Schedule 40 1/2 inch elbows
- 1/2 inch x four feet Schedule 40 pipe
- 7/8 inch flat washers (as many as needed for ballast and trim)
- 14 inch cable ties
- Waterproof automotive backup camera
- Two bright white LEDs
- Two 3.7 volt LiPo batteries
- Three Tamiya submarine motor kits
- Six SPDT switches
- Three 9V battery connectors and batteries
- 7812 voltage regulator
- Tube waterproof silicone sealant
- Aquarium net
- 20 feet nylon rope
- 1/2 inch U-bolt with hardware
- 22-gauge stranded wire
- Black construction paper
* This list includes the components for all of the optional systems.
Article Comments